

A clean recording can have all the right notes and still feel too sharp or separate from the rest of a track. Waves J37 Tape gives you ways to change that texture, from restrained saturation to a worn, moving echo. It makes most sense when you want to shape a specific instrument or effect return, and you are willing to adjust the input level rather than expect one preset to finish the mix.
What makes J37 worth considering?
J37 combines tape coloration with controls for movement and delay. Its main attraction is the distance between those uses: you can keep a vocal fairly stable, roughen a drum loop, or build an echo that becomes part of the arrangement. You do not have to use all three at once.
The interface is busier than a simple drive knob. That is an advantage if you can hear the problem you want to solve, but a disadvantage if every extra control encourages another unrelated adjustment. Start by choosing either tone, dynamics or an audible effect as the job for this instance. Keep the other elements quiet until the first decision works.
This review follows Waves' documented controls and develops settings you can try on your own recordings. The examples are suggested starting points, rather than claims from a controlled listening test.
Input, Output and SAT: three different decisions
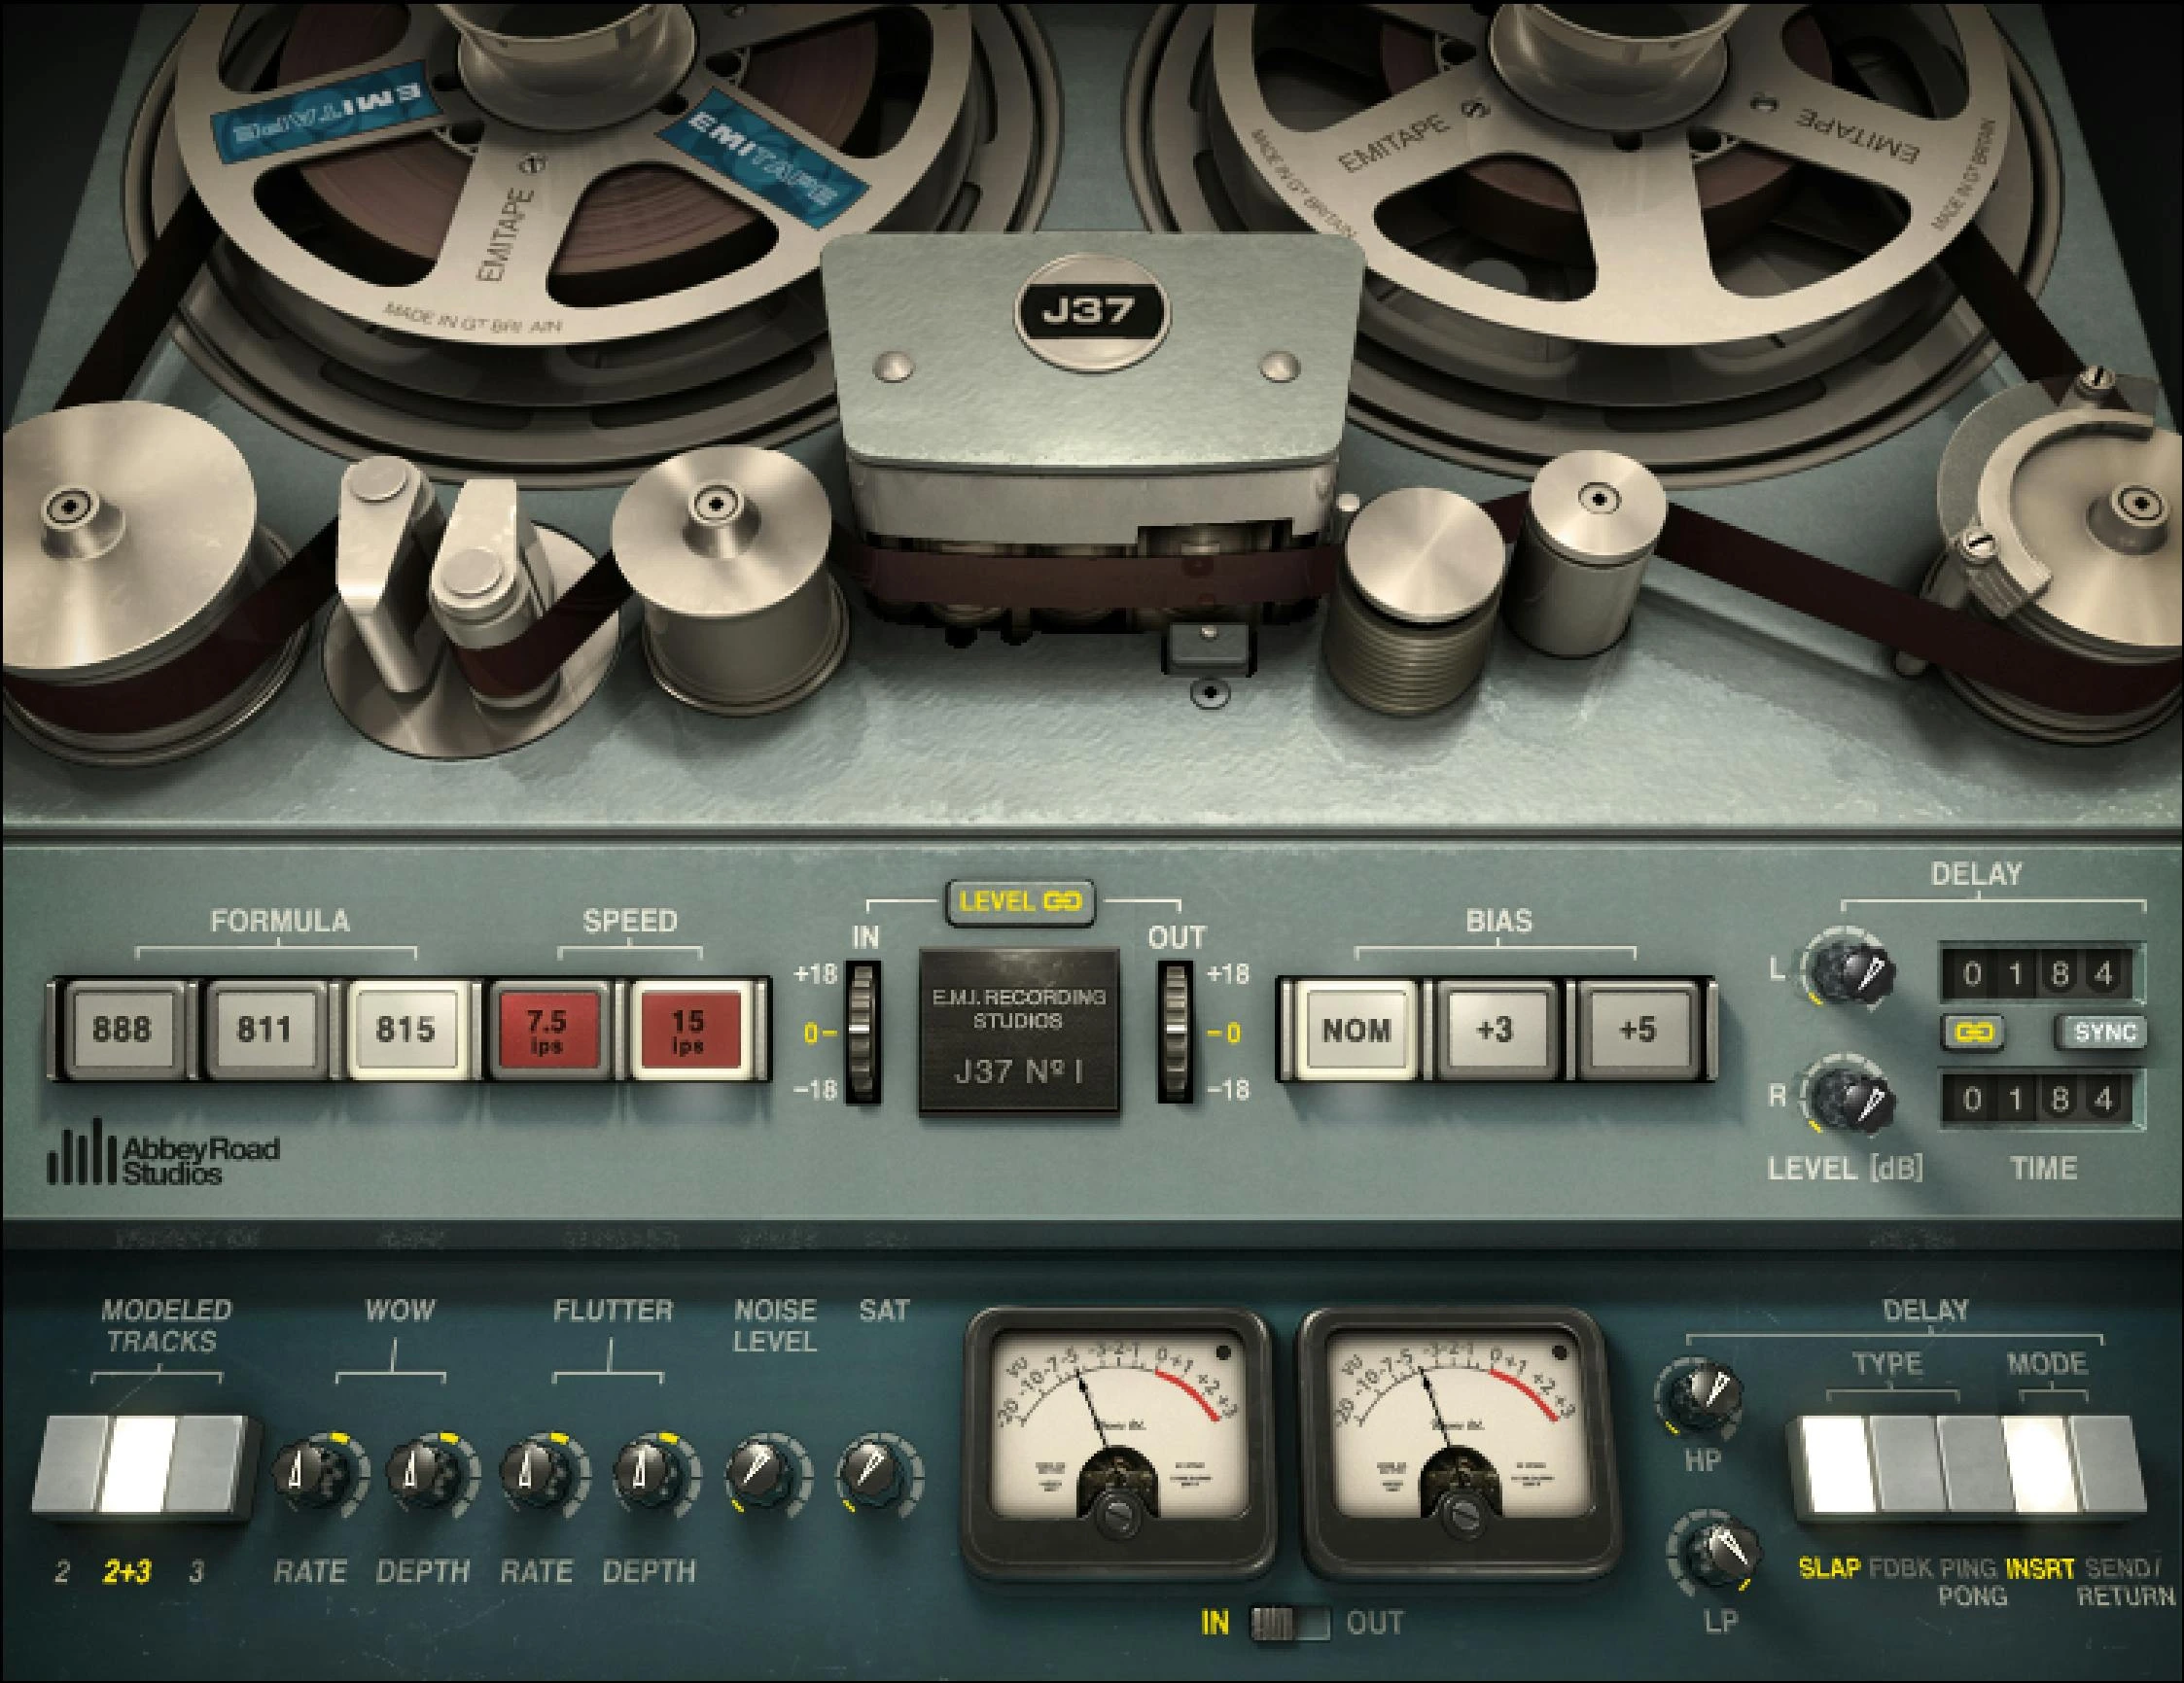
Input drives the tape model harder; Output sets the resulting level. Level Link moves them in opposite directions. SAT adds another saturation stage. Establish Input first, then introduce SAT if you still need a more obvious effect. Waves explains this distinction in its tape-mixing guidance.
Try a short drum loop with a kick, snare and open hat. Raise Input in small steps with Level Link engaged. After each change, use Output to make the processed version approximately as loud as the bypassed version. A linked adjustment is convenient compensation, but it cannot guarantee identical perceived loudness after a nonlinear change.
Judge three things separately: the snare's initial crack, the length of its body and the clarity of the open hat. If the body feels useful but the crack disappears, back off the drive. If only the hats sound unpleasant, processing the whole bus may be the wrong scope. Try the snare or drum room track instead.
Next, return to a mild Input setting and raise SAT gradually. Compare this version with the Input-driven one at similar loudness. Keep the version that addresses the original problem with fewer side effects. Adding both simply because they are available makes the cause of a change harder to identify.
Formula, Speed and Bias: choose a starting character
The three formulas are 888, 811 and 815; Speed offers 7.5 and 15 ips. Bias offers NOM, +3 and +5. Waves identifies 815, 15 ips and NOM as its flattest starting combination. Its written guide to creative tape techniques describes 888 as a useful route toward stronger coloration.
Make the comparison on one sustained guitar chord followed by a short rhythmic passage. Keep the drive modest while changing the formula. Listen for whether the chord remains distinct when the bass and cymbals enter. A darker solo sound is only helpful if it occupies a better place in the arrangement.
Then compare the two speeds without simultaneously changing Bias. If one setting makes the guitar feel fuller, check whether that fullness masks the vocal. If another keeps the pick clearer, check whether it becomes too prominent in the verse. Choose according to that part's role, rather than treating a tape speed as a genre preset.
Leave Bias until the basic balance works. Compare NOM with one over-bias setting, compensate the output and decide whether the extra character is useful. If you cannot identify a benefit in context, return to NOM. A control can remain at its starting position even in a carefully finished mix.
A drum-bus exercise that preserves the kick
For a first drum-bus experiment, choose 815, 15 ips and NOM. Keep the delay inaudible, Noise off, and Wow and Flutter Depth at their Off positions. Leave SAT at minimum. These choices deliberately limit the experiment to the tape model's response to the signal.
- Loop the busiest drum passage and note whether the existing problem is an overly sharp snare, a thin room sound or inconsistent peaks.
- Increase Input a little at a time with Level Link engaged, then refine Output for a fair bypass comparison.
- Check the kick against the bass after every meaningful increase. Keep the low-end timing and separation you already like.
- Back off when the snare loses its useful attack or the cymbals become congested. Save that less aggressive version before experimenting further.
- Compare bus processing with J37 on just the snare or room track. Keep the placement that improves the intended element.
A practical stopping point is where the drums feel more connected while the kick still has an identifiable front edge. If you need substantial envelope control, a compressor gives you attack and release decisions that this workflow does not. Our transient shaper vs compressor guide helps distinguish those jobs.
Vocals: add density without blurring the lyric
Choose a phrase containing a quiet word, a loud vowel and an exposed S. Begin with the restrained tone setup above and raise Input only until you can identify a change at matched loudness. Listen in the track before deciding whether more character is necessary.
Pay attention to the transition from consonant to vowel. If the word starts clearly but the sustained portion feels thin, a little coloration may be worth exploring. If the consonant is already aggressive, increasing drive can make that problem more distracting. Fix the source or address the offending band before adding another effect.
Compare J37 before and after your main compressor while keeping the final vocal level similar. A compressor reacts to what reaches its input, so the order can change the result. Use the same phrase for both versions, then check another section where the singer performs more forcefully. Our harsh-vocal guide covers more targeted alternatives when saturation is not solving the actual problem.
For an intentionally rough ad-lib, work on a separate track or return. You can then push that texture while keeping the main words easy to follow. A short burst of obvious coloration can make more musical sense than leaving the entire lead heavily processed.
Bass: judge note definition as well as weight
Use a bass line that includes both its lowest note and a busier fill. Start conservatively, then compare the two speeds and a small increase in drive. Do not judge the result only from the lowest sustained note: the transition into the next note often reveals whether the part remains readable.
Lower the monitoring level and check an ordinary small speaker if one is available. Ask whether the rhythm is easier to follow, whether the bass sounds like the same instrument and whether the kick still has room. A larger waveform or stronger peak meter reading does not answer those questions.
If the lowest octave loses focus, reduce the processing or apply the more aggressive treatment to a separate upper layer. For an 808 that mainly needs to translate to small speakers, RBass and MaxxBass offer a different approach. Buy J37 for its particular texture and workflow, rather than as a guaranteed bass-translation fix.
Wow, Flutter, Noise and Modeled Tracks
Wow and Flutter have separate Rate and Depth controls. Their Depth value of 0 represents the modeled machine's average behavior; it is not Off. The Off position is −50. Modeled Tracks 2+3 assigns different modeled tracks to left and right, while 2 or 3 uses the same model on both sides. Noise is independently adjustable.
On a piano, set both Depth controls to Off and establish a tone you like. Introduce one kind of movement slowly, listening across a held chord and its decay. Stop if the movement competes with the melody. Compare the setting after a break; a conspicuous effect can become familiar surprisingly quickly during adjustment.
On a stereo pad, compare 2+3 with a single modeled track using the same drive. Notice whether the placement feels appropriate beside the rest of the arrangement. Check mono as part of that decision. Keep Noise off unless the hiss serves an identifiable texture, and check gaps where it is easiest to hear.
Turn the delay into a separate production effect
J37 includes Slap, Feedback and Ping Pong delay types, plus Insert and Send/Return modes. The delay has time, level and filtering controls. Use the appropriate mode for the routing, rather than assuming a preset is already configured as a wet-only return.
For a short vocal slap, try roughly 90–120 ms as a timing experiment. Start with a quiet single echo and listen to a fast line. If it sounds like an unwanted second syllable, shorten it or lower the return. If it merely thickens the vocal without adding the desired sense of space, lengthen it slightly and compare again.
For a rhythmic throw, use a dedicated return and automate the send only on the last word. Start with a quarter-note or eighth-note division and low feedback. Reduce brightness and low-frequency buildup with the delay filters, then check whether the next lyric remains clear. Our send-routing guide explains how the effect should follow the vocal fader.
If delay is the entire reason for buying, consider the H-Delay workflow too. J37's appeal is having echoes alongside the tape model; a dedicated delay may make repeated timing and automation work easier.
Price, limitations and who should buy it
Waves listed J37 at $34.99 when checked on November 22, 2026, against a listed MSRP of $149. This is a promotional USD price before applicable taxes, not a promise about the next checkout. Check your existing bundles and compare the current individual offer before purchasing.
J37 is a sensible candidate if you regularly build tape-colored tracks and effect returns, and want more control than a single drive knob. It is less compelling if you already own a tape plugin that handles those jobs or mainly need precise corrective dynamics. Our J37 vs Kramer Master Tape comparison addresses that specific alternative.
The main practical limitation is that several changes can happen together: tone, transient shape, level and movement. It is easy to approve a louder or darker version without deciding whether it improves the song. Keep a saved restrained setting and compare in context. Verify current host and operating-system support against Waves' system requirements before relying on it in an existing setup.
Conclusion
J37 is most useful when you treat it as a set of deliberate production choices. Establish the tape tone with movement and delay out of the way, learn the difference between driving Input and raising SAT, and add the more obvious effects only when the arrangement benefits. That approach makes its flexibility valuable on individual parts without making every track sound equally worn.
Control names and behavior checked against the J37 user guide. Product and USD price checked on the Waves J37 listing on November 22, 2026. Suggested settings are starting exercises for the reader's own material.


