

A drum room, guitar or keyboard part can need a different texture without needing another layer in the arrangement. Kramer Master Tape combines a modeled tube-and-tape path with a compact set of drive, playback and delay controls. Its appeal is being able to work from restrained coloration toward an obvious effect in one interface. It makes sense when that character serves a specific part, rather than as a mandatory insert on every master.
Two kinds of coloration in one plugin
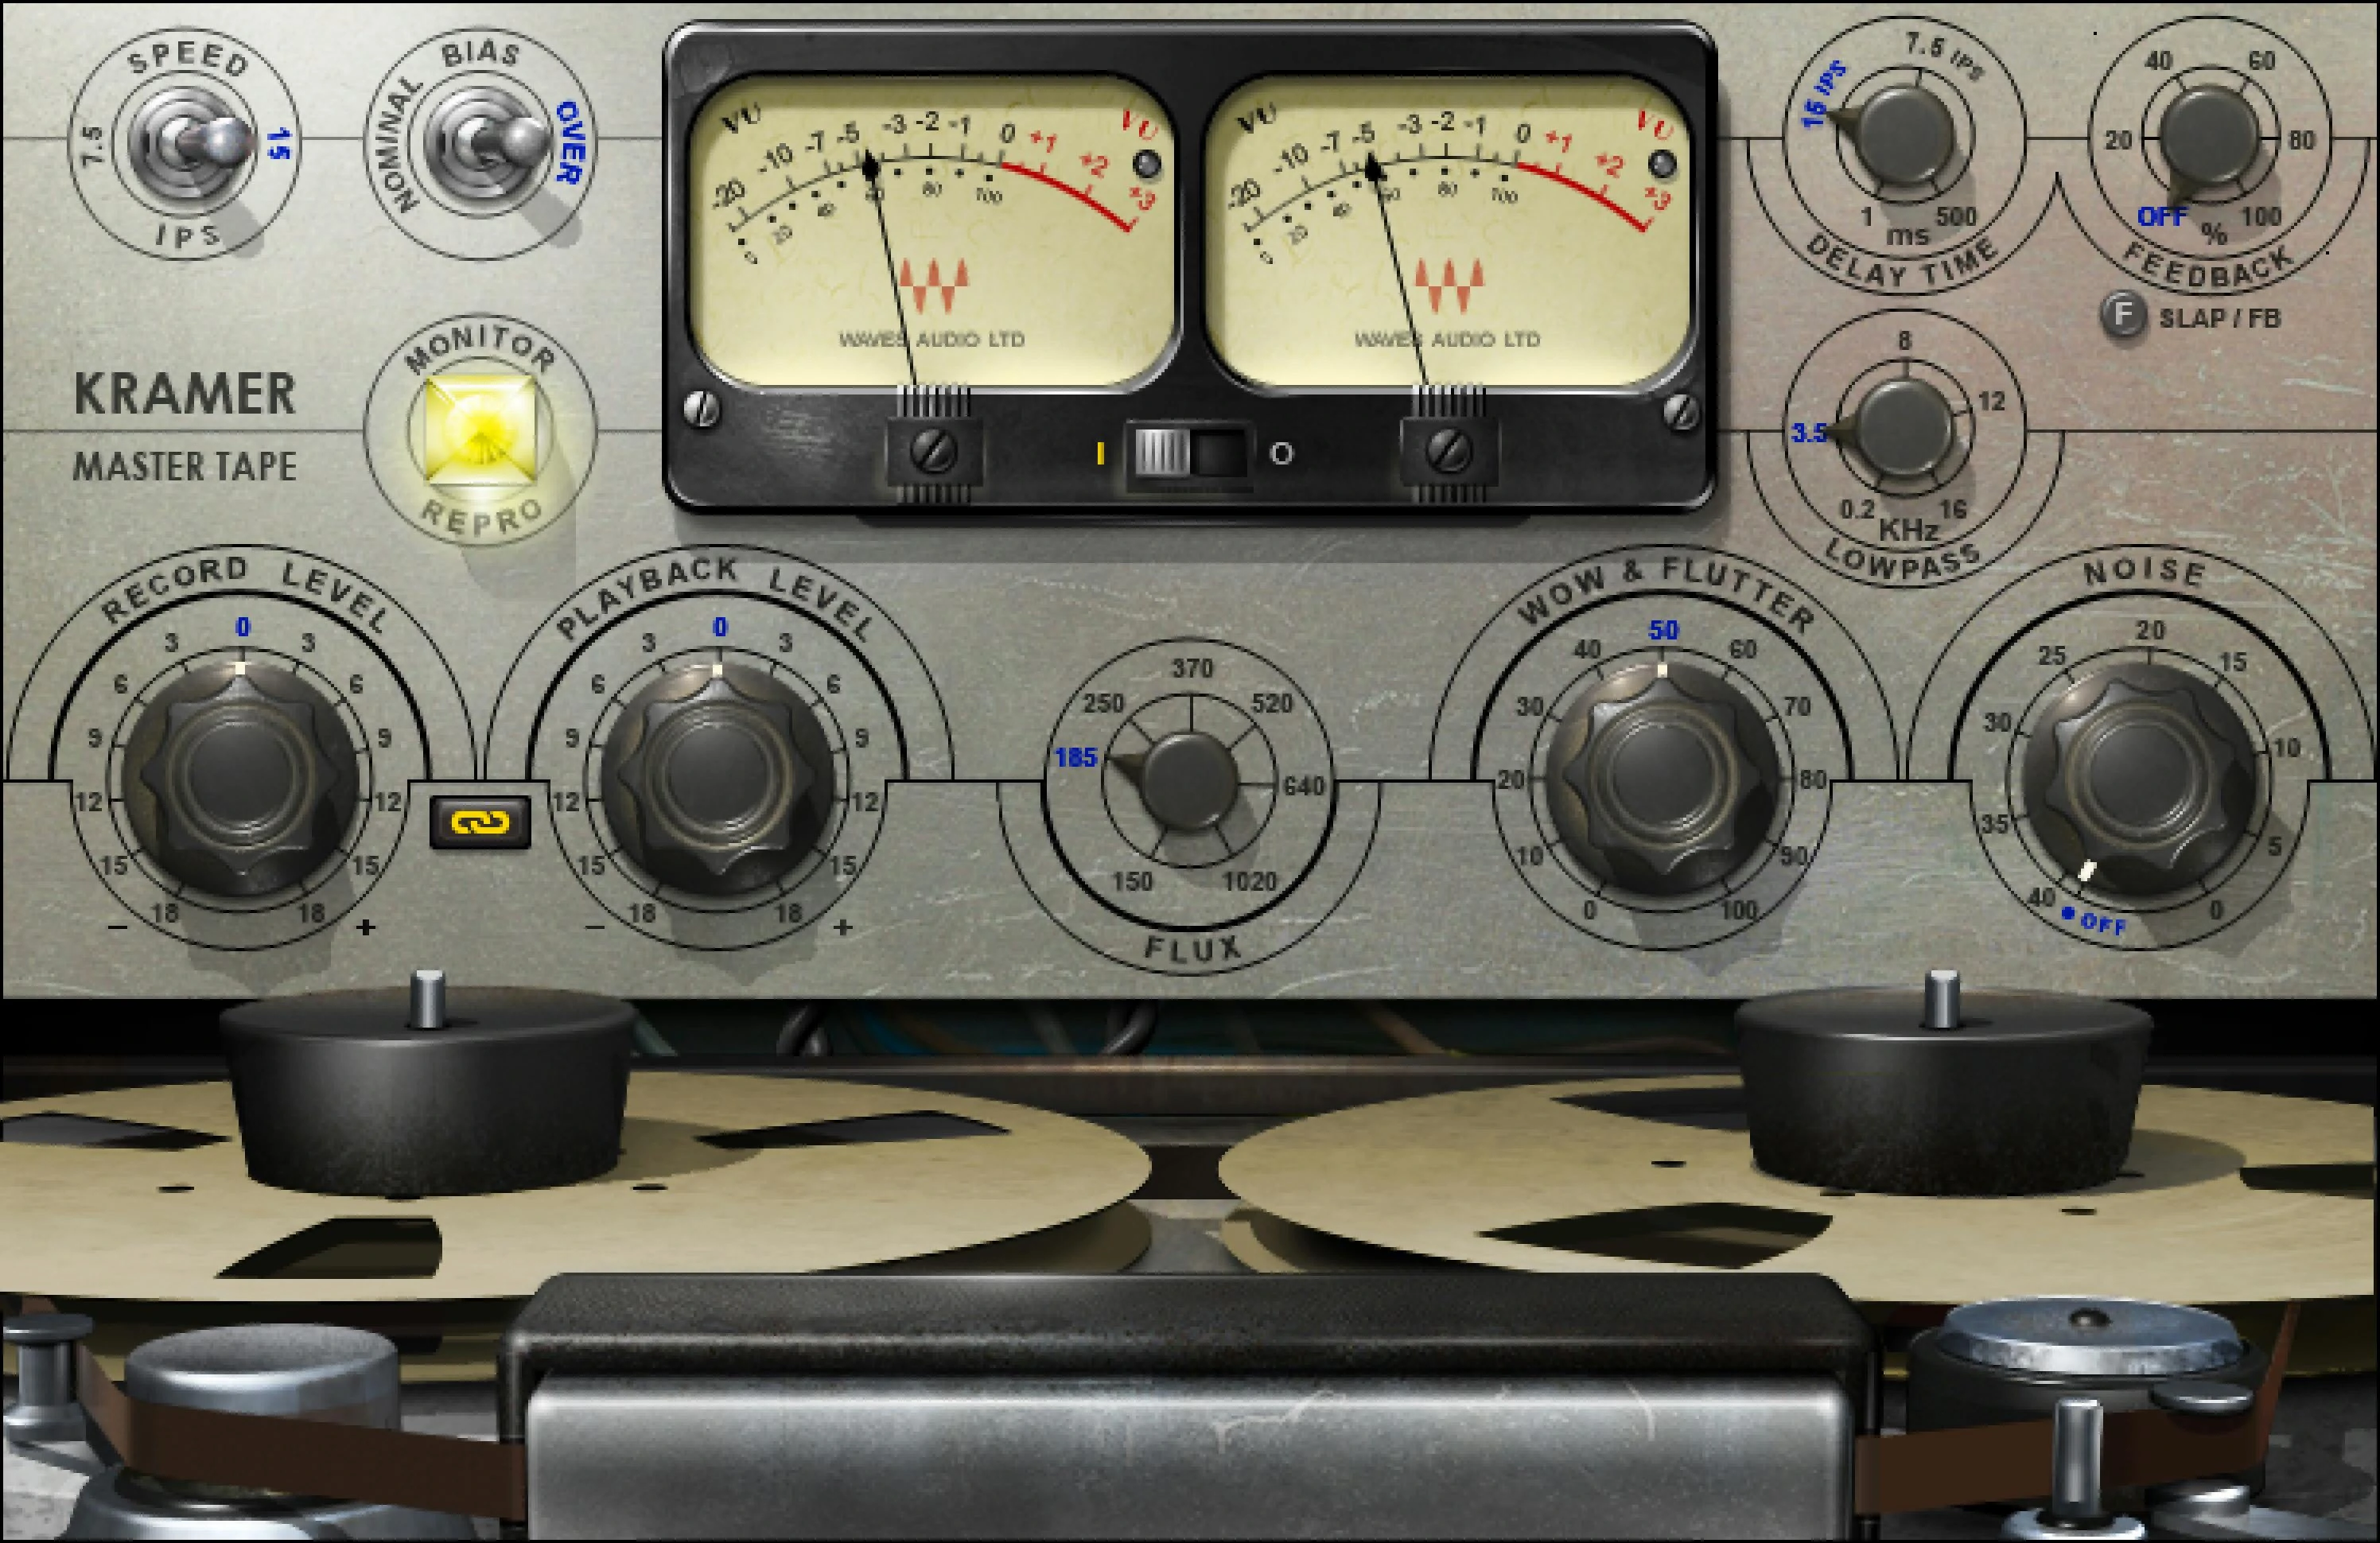
Kramer Master Tape models a vintage quarter-inch tube tape recorder. Its Monitor switch is an important part of the workflow: Input monitors the input tube stage, while Repro includes the tape and playback path. Input is therefore a processing option, not the same thing as bypass.
That gives you a useful first comparison. A part may benefit from the electronics without needing the complete tape response. Another may need the fuller change available in Repro. Decide between those approaches before adding modulation or delay, so you know which change improved the source.
The examples here use the documented controls to propose exercises on your own tracks. They are not claims from a controlled product test. Keep a bypassed reference and compare at similar loudness, particularly when experimenting with drive.
Record Level, Playback Level and Flux
Record Level controls the input level; Playback Level controls the output. Link I/O moves them inversely. Flux changes the simulated tape operating level and its saturation behavior. The documented default is 185 nWb/m. Think of Record Level and Flux as related creative decisions rather than interchangeable volume knobs.
First, keep Flux fixed and raise Record Level a little. With Link I/O enabled, Playback Level moves down to compensate. Refine the output if the two versions still differ in perceived loudness. Listen for a change in texture and transient shape, rather than approving whichever version is louder.
Next, restore a conservative Record Level and raise Flux in small steps. Listen to the same phrase, then save the version that addresses the problem more directly. This comparison is more informative than pushing both controls immediately and trying to identify their separate contributions afterwards.
Waves' modeling white paper explains the independence of the record/playback levels and Flux. You do not need to memorise historical tape calibration to make a useful musical choice, but you do need to know which part of the signal path you are adjusting.
A controlled starting setup
For a first tone experiment, choose Repro, 15 ips and Flux at 185. Turn Noise off, set Wow & Flutter to 0 and leave the delay amount off. Keep Link I/O enabled. Leave Bias unchanged initially so only one decision changes at a time.
- Pick a short part with both an attack and a sustained decay: a snare room, a plucked guitar or a piano phrase works better than an unchanging tone.
- Raise Record Level in small steps and compare with bypass, refining Playback Level for a fair loudness comparison.
- Return Record Level toward its starting point and audition a modest Flux increase, such as 250 nWb/m.
- Compare Input with Repro at a restrained drive setting to hear whether the complete tape path is helpful.
- Save the least aggressive version that solves the original problem, then check it with the whole arrangement.
The number 250 is an exercise setting, not a recommended target for every instrument. The recording's level and existing processing affect the result. If the first change is too strong, reduce the incoming level or the drive rather than assuming the plugin is unsuitable.
Speed and Bias: compare tone before adding dirt
Speed offers 7.5 and 15 ips. The manual describes 15 ips as preserving more high-frequency response, with a different low-end balance at 7.5. Bias offers Nominal and Over. Both controls change the model's behavior; neither is a simple quality ranking for every source.
Use a guitar part with a pick attack and a held chord. Compare speeds at a modest drive setting. If the slower option feels pleasantly rounded alone, check whether the guitar becomes less distinct beside the bass. If the faster option preserves detail, check that the attack does not draw too much attention away from the vocal.
Then compare Bias without changing the rest of the setup. Listen to the chord's upper harmonics and the space between notes. Keep whichever version fits the part, even if that means retaining the default. Changing a switch is not a requirement for a finished sound.
Once the tone is in the right area, return to Record Level and Flux for the amount of character. Keeping those decisions separate makes it easier to hear whether you need a different balance or simply less processing.
Drum rooms and loops: preserve the useful attack
A drum room is a good place to explore stronger coloration because you can balance it against cleaner close microphones. Start from the restrained setup, then raise Record Level or Flux until the room has a useful density. Bring it back into the kit before judging how much is enough.
Listen to the snare's initial crack, the kick's front edge and the cymbal decay separately. A setting that makes the room exciting can also make cymbals crowd the next hit. Reduce the drive or the room balance if the groove loses definition.
For a stereo loop with no separate tracks, the compromise is stricter. Check a section where the kick and cymbals strike together. If one element improves while another becomes worse, consider a smaller correction, another source loop or processing a separate layer rather than forcing the whole loop through a stronger setting.
Tape-style saturation is not a substitute for deliberate compressor timing. If you need to choose how much of an attack passes and how the level recovers, our attack and release guide covers that different job.
Guitars and keyboards: compare Input with Repro
On a guitar recorded through an amp simulation, try a restrained Input-mode treatment first. Raise Record Level with the output compensated, then compare Repro without changing several other controls. The useful question is whether the part needs extra harmonic edge, a different tape-related balance or neither.
Listen to chord separation. If a rhythm guitar becomes exciting but the notes merge into a dense block, reduce the drive before boosting treble to recover detail. Keeping the original transient may matter more than making the sustained tone larger.
On piano, use both a forceful chord and a quieter passage. A setting selected only from the loud chord can make the softer section too obviously processed. Compare the decay and the relationship with the singer, not only the initial impact.
For a deliberately worn pad, establish the tone first and add movement afterwards. That lets you distinguish a tonal improvement from the appeal of an obvious modulation effect. Our TAIP vs Satin comparison covers other tape workflows if movement and sound design are the main reason for the purchase.
Bass: keep the low end readable
Choose a bass phrase that crosses registers. Compare 15 and 7.5 ips at conservative drive, then check the lowest note against the kick. More low weight is only useful if the two instruments remain distinguishable.
Raise Flux gradually while listening to the note's body and the transition into the next note. If the bass becomes more audible but its rhythm less clear, back off. If the upper character starts competing with the vocal, lower the drive instead of treating the new conflict as another EQ problem to solve.
Check a small speaker as well as your main system. If the specific problem is that a pure sub disappears on limited playback, a focused harmonic enhancer may be easier to set up. Our RBass vs MaxxBass comparison explains that alternative. Choose Kramer for the texture and recording-path workflow you actually want.
Wow & Flutter and Noise are separate creative choices
Wow & Flutter combines speed and gain fluctuations in one control. Its value of 50 represents the modeled machine; it is not an off position. Start at 0 for a restrained comparison. Noise adds modeled tape and electronics noise and can be switched off independently.
On a held keyboard chord, introduce movement slowly after saving the stable tone. Listen to whether the chord still feels settled against the bass. A small amount may suit the arrangement, while more obvious movement can become an effect for a particular transition.
Do not leave Noise enabled solely because the interface models a tape machine. Listen to the gaps and the ending of the song, especially when using several instances. Hiss can serve a deliberate texture, but a quiet arrangement may reveal it more strongly than a busy chorus.
If the static coloration works and the movement does not, keep the static version. The plugin does not have to reproduce every imperfection at once to be useful.
Slapback and feedback delay: understand the dry path
The delay offers Slap and Feedback types, a time control up to 500 ms and low-pass filtering. Importantly, the direct signal remains in the mix. The Waves white paper explicitly describes that limitation; this is not a conventional wet-only delay return with a dry mute.
For a simple vocal-slap experiment, use it as an insert and choose Slap. Try a time around 100–140 ms, begin with a low delayed level and compare the phrase with the beat playing. If the echo turns a consonant into an unwanted second syllable, shorten the time or reduce the effect.
Use the delay's Lowpass control to make the echo less bright; it shapes the delay path rather than acting as a general tone control for the whole vocal. Keep the repeat behind the lead, then listen to the pause before the next lyric.
A parallel return can be used as an intentional extra texture, but it also contributes the direct signal. That can change level and the relationship with the original before the echo becomes useful. Do not assume that turning up the send only adds repeats. If you need independent wet/dry control and precise vocal throws, the H-Delay workflow is a more direct comparison.
Using it on the mix bus
The name Master Tape does not mean it belongs on every finished mix. If you choose to audition it there, begin with low drive, Noise off, restrained movement and no delay. Compare the loudest section and a sparse verse at similar perceived level.
Listen for a specific benefit across the whole mix. The drums may feel more connected while the vocal loses useful detail, or the bass may become too dominant. If only one element needs the change, move the processing to that element and compare again.
Check any limiter after the plugin. A different waveform and balance can change how the next processor reacts even when Playback Level seems sensible. Keep an unprocessed version available and judge the complete chain, not just the tape stage in isolation.
Price, J37 and the buying decision
Waves listed Kramer Master Tape at $29.99 on November 22, 2026, against a listed MSRP of $149. This is a promotional USD price before applicable taxes. Check existing bundles and the current offer, and verify your host and operating system against the Waves requirements.
Kramer suits you if Input/Repro, record/playback levels and Flux form a useful set of decisions for your tracks. J37 offers a different model and more separate movement controls; our J37 vs Kramer comparison explains that choice.
Skip Kramer if you already have a tape workflow that does the job, need transparent corrective compression, or mainly want an independently controllable delay return. A small sale price is only useful if the plugin solves a recurring production problem.
Conclusion
Kramer Master Tape is strongest when you learn the recording path before turning it into an effect. Compare Input with Repro, separate Record Level from Flux, and establish the tone without noise or movement. Then add the extras only where they help the arrangement, keeping the delay's always-present direct signal in mind.
Technical references: the Kramer Master Tape user guide and Waves modeling white paper. Product information and USD price checked November 22, 2026. Settings are suggested exercises, not measured test results.

