

Waves H-Delay is worth considering if you want a direct way to build vocal echoes, slapback and darker rhythmic repeats. Its strength is having the important timing, feedback and tone decisions in front of you, so an effect can take shape without a long preset search. The current Dual mode also makes separate left and right timing available within the familiar interface. For everyday mixing, the buying question is whether that workflow offers something useful beyond the delay already included in your DAW.
What H-Delay offers
H-Delay combines tempo-synced and millisecond delay with filtering, modulation, LoFi processing and selectable Analog character. Mono, stereo and mono-to-stereo components cover different routing needs. It suits a focused mixing role: choose a repeat pattern, decide how long it continues and shape how that pattern sits behind the source.
That is an appealing approach for a vocal delay you reach for repeatedly. You can keep the words clear, darken their echoes and change the send level around the performance. It can also work on guitar phrases, synth stabs and drum accents when a repeating gesture helps the arrangement.
The exercises in this review are suggested starting settings. They are not factory presets or results from a measured audio test. Build each effect in your own project, then judge it at the level where it will actually be used.
H-Delay buying guide
| Decision | What the plugin offers | Our advice |
|---|---|---|
| Main role | Vocal echoes, slapback and rhythmic repeats | A focused option for everyday mixing |
| Routing | Insert blend or fully wet send return | Set Dry/Wet for the routing you use |
| Timing | Host, manual BPM or milliseconds | Match the pattern to the phrasing |
| Stereo | Dual times or Ping Pong | Audition width in stereo and mono |
| Character | Filters, modulation, LoFi and Analog | Begin simply; compare one change at a time |
| U.S. offer checked November 14, 2026 | $29.99; stated regular price $149 | Compare with the delay you already own |
The interface and the controls that matter first
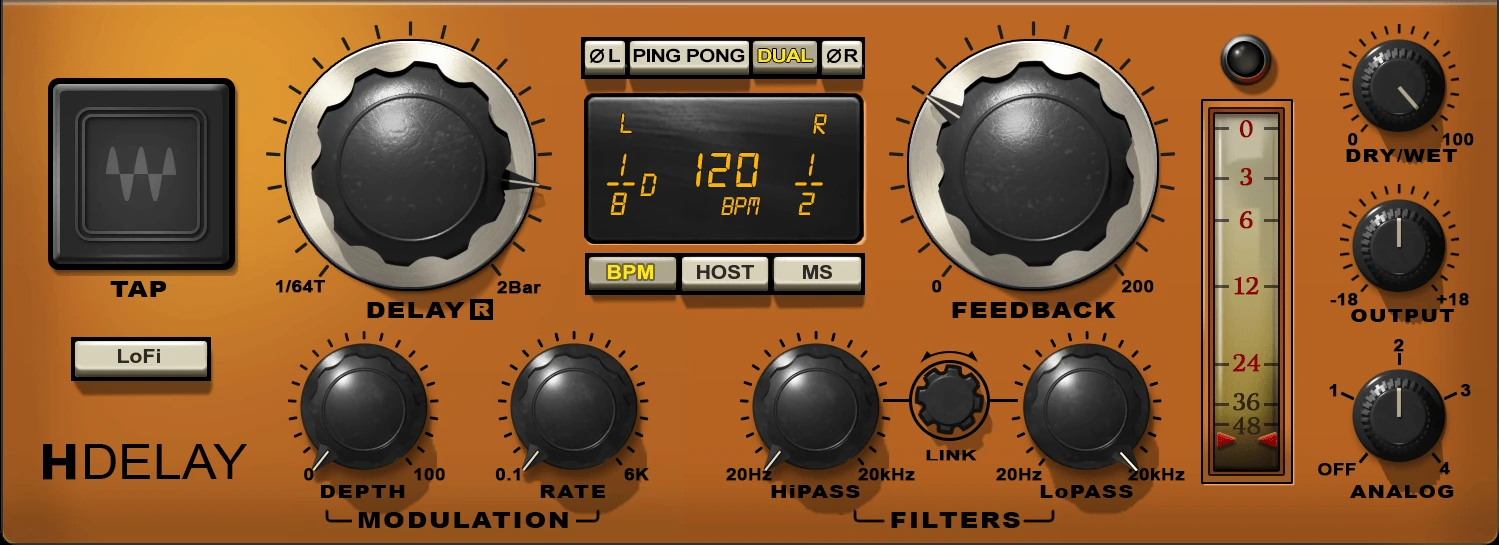
The large Delay control is on the left of the time display, with Feedback to its right. Timing modes sit below the display; Dry/Wet and Output are on the far right. Modulation and the high-pass/low-pass filters run along the bottom, while LoFi and Analog provide additional character choices.
Start with timing, feedback and level before adding character. A rhythmically unsuitable delay will not become a better arrangement decision simply because its repeats sound vintage. Once the repeats land in the right gaps, filtering and modulation can give them their own place behind the dry performance.
Host, BPM and MS timing
Host follows the DAW tempo; BPM uses a manually chosen tempo; MS sets milliseconds directly. The Tap pad provides another timing input. Changing delay time produces a pitch transition, so timing automation can be an audible effect rather than an invisible edit.
For an ordinary synchronized vocal echo, begin in Host mode and confirm that the project tempo is correct. Use MS when you want a short delay judged by feel rather than a fixed note division. Avoid changing modes halfway through an evaluation unless you also check the displayed timing value.
Set up a vocal delay on a send
A send-return setup gives the lead vocal and its echoes separate faders. Several tracks can share an effect, and you can automate how much audio enters it. This is a practical starting arrangement for a lead that needs to remain centered and clear while the repeats occupy the gaps.
- Create an effects return and name it Vocal Delay. Route a send from the lead vocal to that return using your DAW’s normal mixer controls.
- Insert H-Delay on the return and set Dry/Wet to 100. Begin with the return fader low so the first audition is controlled.
- Select Host timing and choose a quarter note. Start with modest Feedback, such as 20, with modulation Depth at zero.
- Raise the send or return until the echo is easy to hear. Listen to its timing against the next line.
- Shape the repeats with the filters, then reduce their level until they support the vocal instead of competing with it.
At 120 BPM, a quarter note lasts 500 milliseconds. That gives you a useful timing reference, but the best setting depends on the phrasing. If each repeat arrives on top of the next important word, try a different note division or use a selective throw rather than reducing the lead’s intelligibility.
Why the return should be fully wet
On a parallel return, the original vocal already reaches the mix through its own channel. A partly dry effect return adds another dry contribution, which can make the vocal seem louder and confuse the comparison. Set the return fully wet and decide the balance with the send and return faders.
When H-Delay is inserted directly on a track, use Dry/Wet to blend the effect there instead. These are two different routing situations. If the vocal changes level unexpectedly when you enable a send, check the routing and Dry/Wet setting before assuming that the delay itself is making the sound better.
Recipe 1: a clear vocal throw
A throw sends a selected word or phrase into the delay while leaving the rest of the line relatively dry. It can fill the pause after a hook without surrounding every syllable with repeats. The main creative decision is which word deserves the listener’s attention a second time.
For a first exercise, choose a line with a clear gap afterward. Set Host to a quarter note, Feedback around 20–30, modulation Depth to zero and Analog Off. Try a high-pass around 250 Hz and low-pass around 5 kHz as proposed starting points, then adjust by ear. Keep the return fully wet.
- Keep the vocal’s delay send down during the beginning of the line.
- Raise that send over the chosen final word so its audio enters H-Delay.
- Lower the send again before the following phrase.
- Listen through the gap and the next entrance. Adjust Feedback until the tail clears enough space.
- Compare the phrase in the full mix, then listen to the return alone for unwanted sounds captured by the send automation.
Automating the input send allows echoes already inside the delay to continue after the send falls. Pulling down the return instead would turn down the existing tail as well. Choose the control according to whether you want to stop new words entering the effect or fade the effect that is already ringing.
Catch the complete word
If the repeat sounds like a chopped syllable, widen the send automation slightly before changing the plugin. Listen for the initial consonant and the end of the vowel. A precisely timed effect still needs enough of the source to sound intentional.
Also check breaths and headphone spill near the selected word. A throw can repeat an edit problem several times. Cleaning the source region may be more effective than making the entire delay darker.
Recipe 2: short slapback without a long tail
Slapback adds a short repeat that can give a dry voice more depth and attitude. It is useful when a long rhythmic tail would clutter the arrangement. Treat it as a small change to the perceived space around the singer before deciding whether it should become an obvious effect.
Switch to MS and try 90 milliseconds as an initial setting, with Feedback near zero and modulation Depth at zero. Start with Analog Off and LoFi disabled so you can judge the timing first. On a send, keep Dry/Wet at 100 and bring the return up gradually.
Compare roughly 70, 90 and 120 milliseconds in your own song. A shorter setting may feel more like thickening; a longer one may become a distinct echo. These are suggested audition points, not boundaries that apply to every voice or tempo.
Keep the effect from becoming a second lead
If the repeat pulls attention away from the words, reduce its level before radically changing its tone. Then try a lower low-pass setting so the slap has less top-end detail than the dry voice. Listen for enough contrast to create depth while the performance remains easy to follow.
For a sparse acoustic arrangement, a quieter slap may be sufficient. In a dense chorus, you might prefer a selective throw instead of raising a constant slap until it becomes distracting. The right effect is the one that helps the section rather than winning a solo audition.
Recipe 3: dotted-eighth movement on a synth
A short synth phrase is a useful way to audition the delay’s rhythmic role. Choose a part with some empty space rather than a continuous wall of notes. Set Host timing to a dotted eighth and use moderate Feedback, such as 20–35, as a starting range.
At 120 BPM, a dotted eighth is 375 milliseconds. Compare that with the 500-millisecond quarter-note setting while the drums play. Listen for whether the repeated accents strengthen the groove or create a competing pattern. If the part already has busy internal movement, a simpler delay may fit better.
Keep modulation off until the rhythm is working, then add a small amount if you want the tail to move. Filter the return while the complete arrangement plays. A pleasing solo texture can still obscure a hi-hat pattern, chord change or vocal entry when the other instruments return.
Dual mode and Ping Pong are different choices
Dual mode allows separate left and right delay times in Host, BPM or MS modes. Select a side in the display and adjust its time, or drag the individual displayed values. The remaining controls stay shared. Ping Pong instead creates alternating stereo repeats; it presents a single timing value and a starting-direction choice.
For a practical Dual audition, try an eighth note on one side and a quarter note on the other, with conservative feedback. Compare it with a single shared timing before increasing the return level. Independent timings should add a useful rhythmic spread, rather than simply making the effect sound larger on headphones.
Check mono before committing to width
Play the section in mono and listen for changes in the balance of the dry lead and its repeats. Do this at the intended effect level. If the delay becomes too prominent or loses an important rhythmic accent, revise the stereo pattern rather than judging the stereo version in isolation.
Leave the phase-reverse buttons alone during the first setup. They are separate tools, and pressing them to make a delay feel wider can alter mono behavior. Establish a useful timing and level balance before experimenting with polarity changes.
Filters: make room around the dry source
The high-pass filter removes low-frequency content from the repeats, while the low-pass trims their top end. The Link control moves the two filter frequencies together. This makes a focused band of echoes easy to position without inserting another processor for basic shaping.
As an exercise, start with both filters open and lower the return until the delay feels balanced. Then raise the high-pass gradually while listening to the kick, bass and vocal body. Stop before the effect becomes so thin that you compensate by turning it up excessively.
Next lower the low-pass while listening to consonants and cymbals. The goal is enough separation that the dry source remains easy to locate. If the echo is meant to be a bright featured moment, you may prefer less filtering; do not make every delay dark by habit.
Filter in context, then inspect the return
Make the musical decision in the mix, then solo the return briefly to catch problems. A return that sounds unexciting alone can work perfectly behind a lead. Return to the complete arrangement before deciding that it needs more high end, feedback or modulation.
Analog, LoFi and modulation
Analog offers four character modes plus Off. LoFi is another tone option, while modulation changes the delay time for movement. Keep these decisions separate when evaluating the plugin: first establish the repeat pattern, then compare one character control at a time.
Waves’ own pop-vocal guidance recommends Analog Off for a clean result because the numbered modes introduce noise. If you hear sound from the return when the source is silent, check this selector before troubleshooting the recording or adding a gate. Choosing Off is also a useful baseline for comparisons.
Do not mistake noise for warmth
Compare an Analog mode with Off at a similar perceived effect level. Listen through the quiet ending as well as the loud hook. Keep the mode if its contribution helps the track; leave it off if the added background distracts from the effect you are trying to create.
For modulation, begin with Depth at zero, bring it up slowly and listen to a sustained note. Movement that sounds attractive on a short pluck may become an obvious pitch wobble on a held vocal. Make that judgment on the material that stays exposed the longest.
Feedback and controlled transitions
Feedback determines how repeats continue. H-Delay’s control extends beyond the ordinary decaying range into buildup, so higher values deserve careful monitoring. For normal vocal support, begin with a modest setting rather than treating the full knob range as a routine mix adjustment.
If you want a rising transition effect, lower the return level before experimenting, keep the monitoring comfortable and prepare automation that brings Feedback back down. Do not leave an escalating tail running unattended while you edit another track. An intentional buildup should have an intentional exit.
Time changes can bend pitch
Changing the Delay control while audio is in the effect creates a pitch movement. That can work as a transition, but it may be distracting when you only want a new rhythmic setting for the next section. Compare a separate return or a change during a silent boundary if the transition itself should remain unobtrusive.
How to make room for the lead while delays continue
If echoes interfere with the next line, solve timing, filtering and level first. A shorter tail or a more selective throw often produces a clearer result with less routing. When the arrangement still needs a long delay, a ducking return is another workflow to consider.
For that approach, place a separate compressor after H-Delay on the return and feed its detector from the dry vocal using your DAW’s sidechain routing. Adjust it so the return falls while the singer performs and comes back during the gaps. This is an external routing technique; it is not a dedicated ducking control inside H-Delay.
Listen to the release in relation to the phrase. If the return surges unnaturally between syllables, reduce compression or adjust its timing. The aim is a usable balance between the lead and its tail, not maximum visible gain reduction.
H-Delay versus the delay in your DAW
Your stock delay may already provide the timing, filtering and routing you need. Set up the same musical effect with both, match the return levels and compare them inside the song. Judge how quickly you reach the result as well as how the repeats sound.
H-Delay makes sense when its compact controls and character options suit your regular work. If you need elaborate patterns with many independently edited taps, establish that requirement before buying. A more elaborate delay workflow may serve that job better than repeatedly working around a simpler interface.
For a wider shortlist, see our delay plugins under $100 guide and EchoBoy vs Valhalla Delay comparison. Choose according to the delay tasks you repeat, rather than collecting several plugins that fill the same role.
Price, updates and installation
The Waves U.S. store showed H-Delay at $29.99 on November 14, 2026, against a stated regular price of $149. Offers and taxes can change, so check the current total. Compare it with your existing tools at the actual purchase price rather than using the regular-price figure alone.
Check the supported DAW and operating-system versions before installation. If you own an older H-Delay version, compare its controls with the current manual before expecting Dual mode to appear. Features available in the current release are not proof that every legacy installation includes them.
Waves states that a perpetual license lets you keep using the version you own after its included Update Plan coverage expires. Later updates may require renewed coverage. Consider that alongside your normal computer-upgrade habits when deciding whether the initial purchase fits your workflow.
Frequently asked questions
Why does the delay return contain the dry vocal?
Check Dry/Wet. On a parallel send-return setup, set it to 100 so the return contributes the effect. For an insert on the original track, use Dry/Wet to choose the blend there.
Why is H-Delay making noise during silence?
Compare Analog Off with the numbered modes. Waves documents noise as part of those modes. If noise remains with Analog Off, inspect the input and the rest of the return chain separately.
Does it have separate left and right timing?
The current version documents this through Dual mode. Select a side in the display to change that side’s delay time. Check your installed version if you do not see the control.
Should I use delay or reverb on a vocal?
Audition both according to the arrangement. Distinct repeats can fill selected gaps; reverb can create a more continuous sense of space. Either can obscure a lead when its level or tail competes with the next phrase.
Is Waves H-Delay worth buying?
H-Delay remains a sensible option for a straightforward mixing delay: vocal throws, short slapback and filtered rhythmic repeats are all clear reasons to audition it. Start with a real task in your own song, compare it with your stock delay and judge the result at matched levels. If the controls help you reach that sound quickly and the current price fits, it has a useful role without needing to become your only delay.
References: H-Delay user guide, Waves vocal-delay guidance, supported hosts and Waves Update Plan. The interface image comes from Waves and is not a screenshot of our suggested settings.


