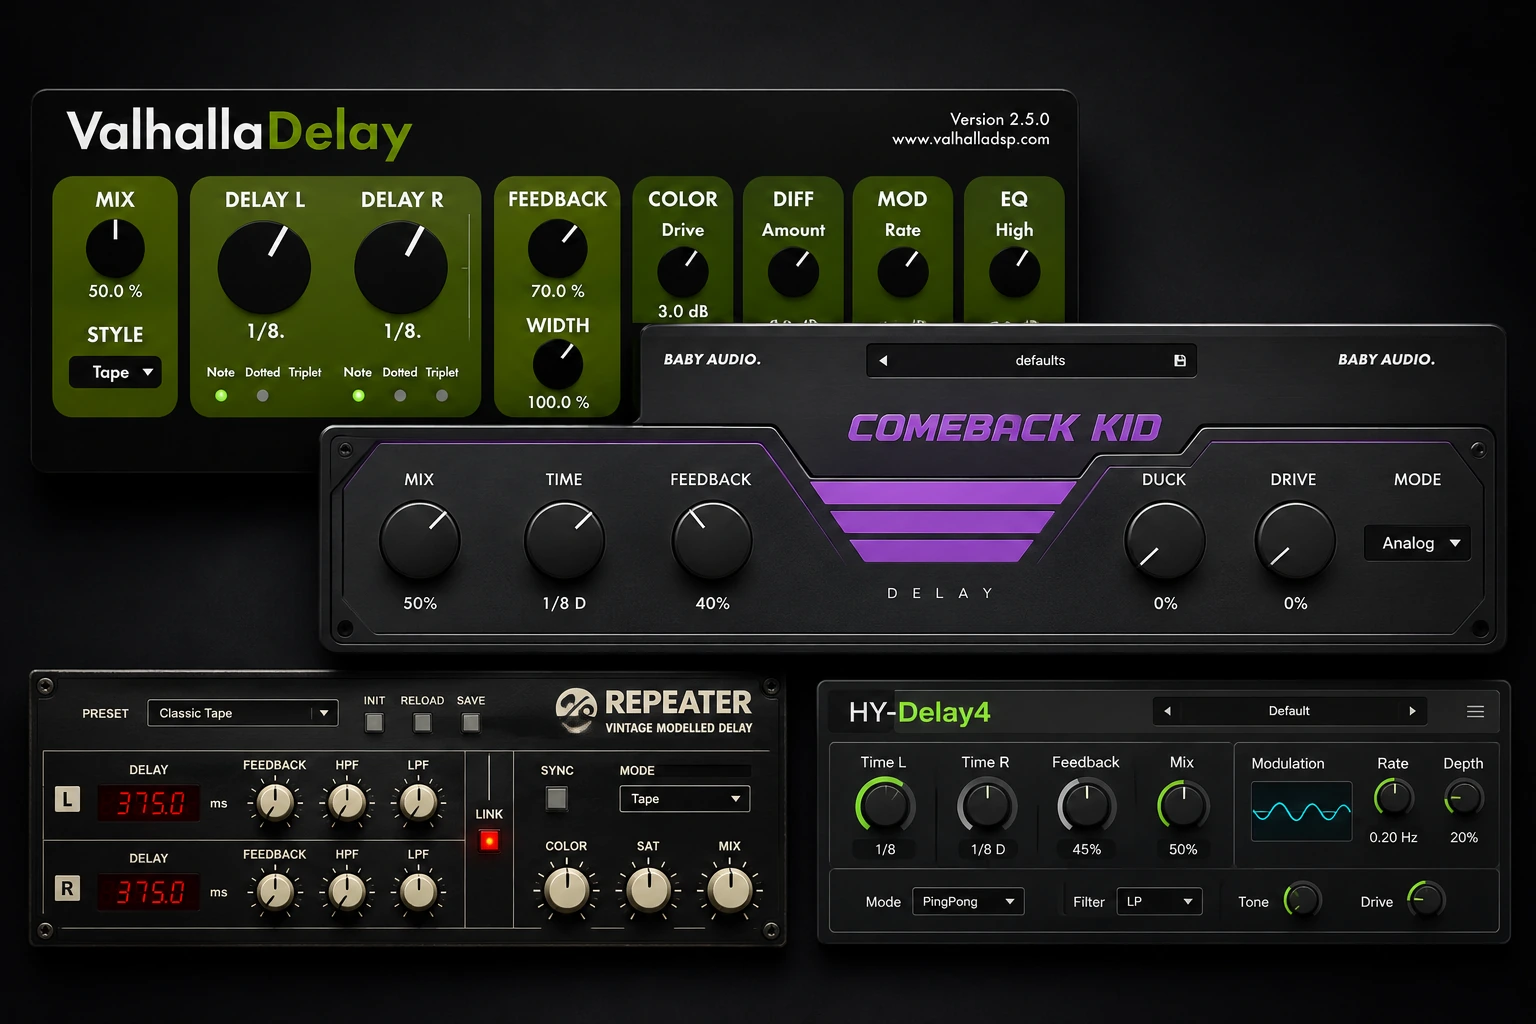

Before buying a delay, think about what you keep reaching for in a session. If you need one plugin for both a short tape slap and a soft synth trail, Valhalla Delay is our first pick at $50. Comeback Kid is better suited to keeping vocal throws behind the lead, and D16 Repeater lets you shape each side of a stereo echo separately. HY-Delay4 makes sense when the repeats need to become part of the rhythm.
The table uses regular U.S. full-license reference prices; promotions and tax can change the checkout total. The controls were reviewed against the linked developer documentation. Each walkthrough is an exercise for your own session, not a measured listening-test result.
Compare the Four Delay Plugins by Price and Use
| Plugin | Best for | Regular U.S. price |
|---|---|---|
| Valhalla Delay | A first paid delay for tape, digital and diffuse echoes | $50 |
| Baby Audio Comeback Kid | Vocal throws that clear space for the lead | $69 |
| D16 Repeater | Two independently shaped delays for guitars and synths | $99 |
| HY-Delay4 | Rhythmic and granular echoes for sound design | $48 |
1. Valhalla Delay for a first paid delay
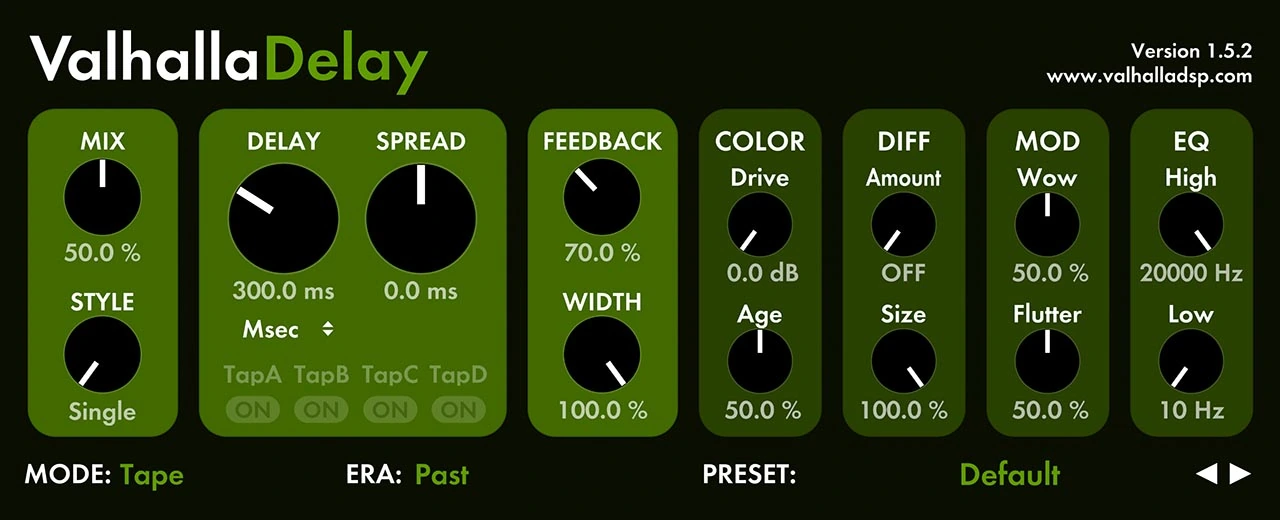
Valhalla separates Mode, which changes the repeat’s character, from Style, which changes its timing and routing. That makes it easy to keep the rhythm fixed while comparing Tape against BBD or Digital. Diffusion gives you another way to change the shape of the echo. A small amount softens the repeat’s edge, and larger changes can make individual hits harder to pick out.
What changes when you move the controls?
Drive changes how hard the saturation stage is hit. Wow and Flutter change the pitch movement in Tape mode. Wow is the slower movement and Flutter is the faster one. To hear them clearly, play a held piano chord with one audible repeat and turn up one control at a time. Back off Wow if you hear the chord’s pitch pull against the dry part. Back off Flutter if the attack starts to feel ragged.
Feedback sends more of each echo around the loop. The Diff Amount and Size controls change how much each repeat spreads out in time. Turn up Feedback when you want to hear more distinct echoes. Increase Size when the repeats already last long enough and you want their edges to blend. This difference is easiest to hear on a short pluck with space after it.
Try a short tape slap on a lead vocal
- Put the plugin on an aux return, set Mix to 100%, then choose Tape in the Mode selector and Single under Style.
- Use milliseconds for Delay and start at 95 ms. Set Feedback around 10% so the first echo does most of the work.
- Start with EQ Low around 180 Hz and High around 5 kHz. Bring the return up under the vocal, then mute it to check whether the voice loses depth or only gets quieter.
If the doubles sound distracting on consonants, lower the return level first. Then compare the same slap in Digital at a similar return level. Tape is worth choosing here if its pitch movement and color add depth to the vocal. Digital gives you a steadier starting point for a lead that already has a lot of texture.
Where it falls short. Ducking is available in specific modes, including DuckTape and Clarity. Comeback Kid gives you a dedicated Ducker alongside its shaping controls on the main panel. That can be quicker if you routinely want a single vocal return you can filter, color and duck in place.
For an overview of Tape, Digital and the more experimental modes, read our Valhalla Delay review.
2. Baby Audio Comeback Kid for vocal throws

Comeback Kid puts filtering, transient shaping, color and ducking on one panel. The Ducker turns down the wet signal when the plugin receives the dry performance, then lets the repeats come forward in the gaps. That’s the reason to choose it over a basic stereo delay if your vocal is already packed with short lines.
Shaper, Flavor and Output solve different problems
Start in Shaper. Lo-Cut and Hi-Cut let you move the echo away from the vocal’s body and top end. The Attack and Sustain controls shape how the wet transients come through. Pull Attack down if the echo of the first consonant pokes out. Keep it closer to neutral if you want the word in the repeat to stay intelligible. Set ducking after the tone so you can tell whether you are hearing an EQ change or simply less return level.
Flavor changes the character after you have the rhythm. Cheap brings in grainy digital color, while Tape adds saturation. Sauce adds reverb to the echo. On a dry ad-lib, compare Cheap and Tape separately at equal wet output. Try Sauce only once the repeat sits where you want it, because the extra tail can carry the effect into the next line.
Try a dotted-eighth echo behind a busy vocal
- Send a vocal to an aux continuously for a few bars. Turn Dry/Out down on the return and bring up Wet/Out.
- Set Time to 1/8 and select Dotted. Start with Feedback around a quarter of the knob’s travel and turn on Ping-Pong if you want alternating repeats.
- Raise Lo-Cut until the return stops thickening the low mids. Lower Hi-Cut until the repeated consonants sit behind the lead.
- Bring up Ducker while looping two adjacent lines. Listen for the echo to recede under the second line and become audible in the next gap.
For a single-word throw, automate the send to feed just that word. The built-in ducker follows the signal reaching the plugin. If the next lyric never reaches that return, use return automation or an external compressor keyed from the full lead to make room for it.
Where it falls short. Ping-Pong gives you an alternating stereo pattern. Repeater lets you build different note divisions and set a different filter and pan position for each line. That extra control matters when the two sides have distinct jobs in the arrangement.
3. D16 Repeater for stereo guitars and synths
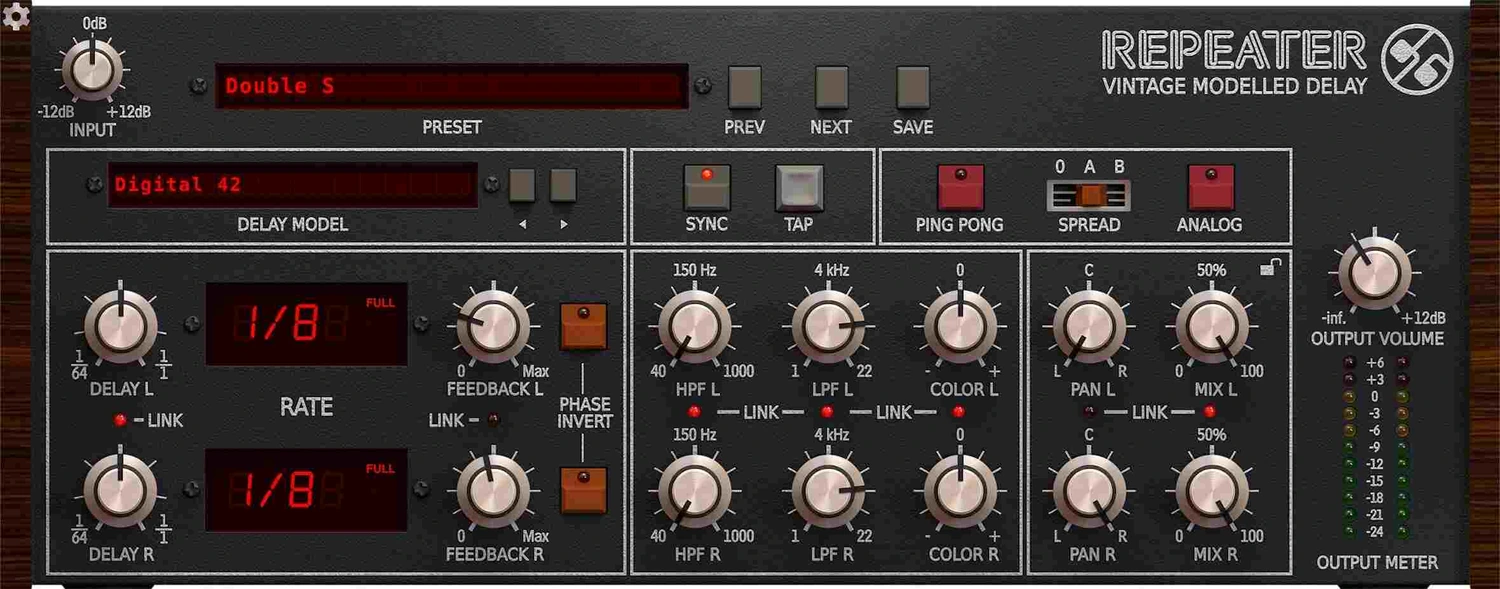
Repeater has 23 delay models, but its main advantage here is the two independently adjustable delay paths. You can keep an eighth-note echo tight and bright on one side while using a slower, darker echo on the other. It’s useful when stereo width alone doesn’t solve the problem because both sides are still hitting at the same time or occupying the same frequency range.
Set up the timing before choosing a model
Repeater’s Model selector changes the delay character. The Analog switch is a separate choice that makes successive passes through the feedback loop darker. The left and right low-pass filters then let you set how bright the individual returns are. Leave Analog off and the filters open when first comparing models. Once a model fits, enable Analog if the later repeats should recede in tone, or adjust a channel filter if just one side is too bright.
Ping Pong cross-connects the feedback lines. Spread offsets their timing to change the stereo image, with A as the smaller offset. Start with both off if you need to know exactly which side is creating a repeat. Try Spread A after the parts are balanced and check whether the effect still reads in mono.
Try two echo patterns on a mono guitar riff
- Send the guitar to a stereo return and make sure the guitar reaches both input channels. Choose Digital Delay, engage Sync and set both Mix controls fully wet.
- Set the left delay to 1/8 and the right to 1/4. Start with low feedback on both sides. Leave Ping Pong off while you set the two rhythms.
- Set the pan controls so the returns sit apart without going all the way to the edges. Darken the longer side with its low-pass filter, then sum the mix to mono and check that the repeats still support the riff.
Once the pattern works, switch to Cassette Tape or DM-2 without moving the time settings. Compare at similar return levels so the louder model doesn’t win by default.
Where it falls short. The $99 price makes the most sense when you repeatedly need its separate left and right controls. If the job is one short slap or two basic note divisions with no per-side tone shaping, start by auditioning your DAW’s stock delay or Valhalla Delay at $50.
4. HY-Delay4 for rhythmic and granular sound design
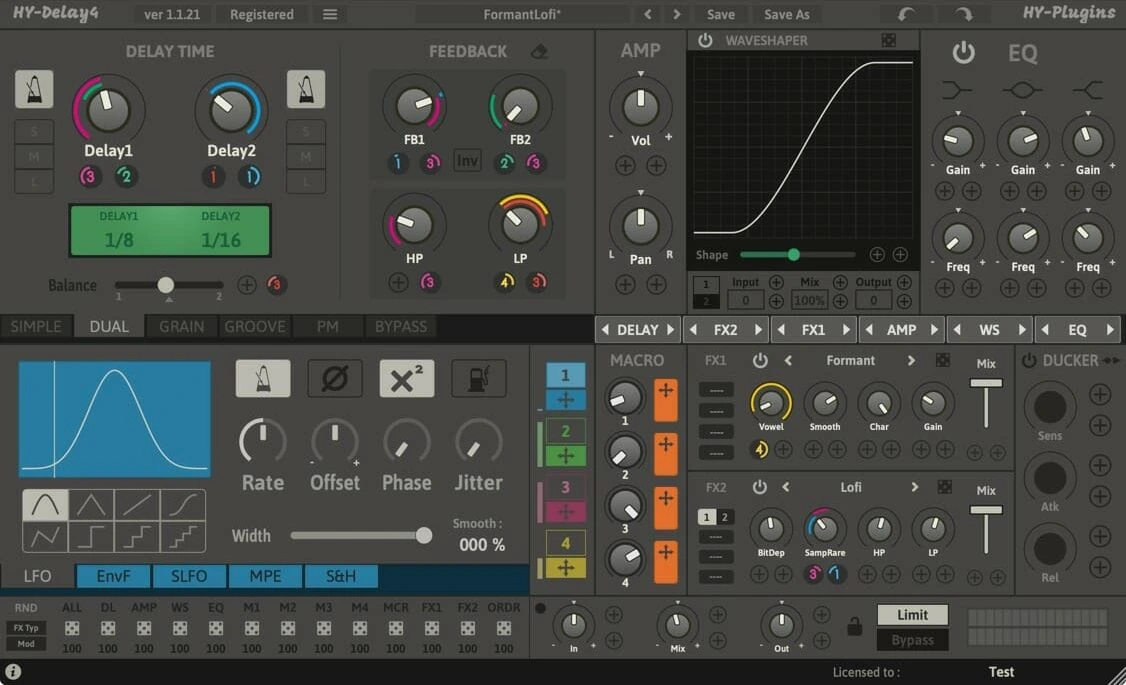
HY-Delay4 gives you five delay modes plus a reorderable effects chain. Its Groove mode uses two delay lines, and Shuffle changes the timing of the second line relative to the first. Grain can pitch-shift the repeats and adjust the grain length. Those are practical reasons to choose it over a conventional delay when an echo needs to add a part to the arrangement.
How to choose a delay mode and route the effects
Start with Simple if you want to learn the timing and feedback controls. Move to Dual for two ping-pong delay stages in series, Groove to build a shuffled rhythm, or Grain to change the pitch and texture of the repeat. PM gives you two parallel lines, with a Vintage setting that gets darker as you multiply the delay time. Pick the mode by what the next repeat needs to do in the track.
The process order row lets you change where the waveshaper, EQ and other modules sit. On the same drum hit, put the EQ before the waveshaper and pull down the low band. Then try the EQ after the waveshaper. The first setting reduces how much low end drives the distortion, while the second changes the low end of a sound that has already been shaped. Match the return level after each move.
Try a shuffled echo on sparse percussion
- Put HY-Delay4 on a send from a rimshot or short percussion loop. Set the master mix fully wet and select Groove in the delay mode tabs.
- Enable Sync, use 1/8 for the base time, and start with low feedback. Move Shuffle slowly while the dry loop plays. Listen for the second repeat moving into the gap between two hits.
- Use Accent to bring the first delay line forward, then filter the wet signal if the added notes compete with the hats. Leave the other effects bypassed until the timing feels right.
Where it falls short. The paid version adds the deeper modes and routing, with more controls to learn before a simple echo is ready. HY-Plugins also offers a free edition with Simple mode, EQ and ducking. If those cover your session, the upgrade is easiest to justify once you have a concrete use for Groove, Grain or the modular chain.
Three quick checks when a delay sounds wrong in the mix
The repeat lands on the next lyric
Fix the timing first. At 120 BPM, a quarter note is 500 ms, an eighth is 250 ms, and a dotted eighth is 375 ms. Switch between an eighth and a dotted eighth while the whole vocal plays. Once the first repeat lands in a useful spot, lower Feedback if the later repeats still get in the way. Use ducking if the rhythm is right and only the overlap is distracting.
The return is clear in solo and muddy in the arrangement
Leave the delay engaged and filter the return while the bass, drums and vocal are playing. Start by cutting low end from the echo. If you can hear the words but the repeat still pulls attention away from the singer, lower the high cut a little or drop the return a few decibels. The level that sounds exciting in solo can be too high under a full arrangement.
The effect disappears on a small mono speaker
Switch your monitoring to mono and toggle the widest feature you turned on, such as Repeater’s Spread or Comeback Kid’s Wider. If the original part stays centered but the repeat loses its attack, reduce the width or pan the echoes closer in. Listen for whether the rhythm still makes sense after the stereo effect is reduced.
How to decide before spending money
Use the same four-bar vocal phrase or guitar riff in your stock delay and the plugin demo. Start with the same timing, similar feedback and an equally loud first repeat. Then give each plugin one job your current setup makes awkward. Try ducking a repeat under the next lyric, separating the two stereo channels or turning one hit into a shuffled rhythm. If you can finish the sound just as quickly with your stock tools, keep using them.
For more options, see our free delay plugin guide or the EchoBoy vs Valhalla Delay comparison. If you need more space behind the repeats, our reverb picks under $100 cover vocal plates, rooms and tempo-synced tails.
Conclusion
Choose by the difficult part of your test: repeat character, vocal ducking, per-side tone or an extra rhythmic part. One successful demo on the track that prompted the search is a stronger reason to buy than collecting all four.
Product documentation and price references
Valhalla Delay’s controls and timing styles. Valhalla DSP’s control guide
Valhalla Delay’s Amount and Size controls. Valhalla DSP’s diffusion guide
Comeback Kid’s routing and controls. Baby Audio manual
Comeback Kid’s regular U.S. price was checked on Avid’s U.S. listing.
Repeater’s channel controls. D16 manual
HY-Delay4’s delay modes and controls. HY-Plugins manual


