


A vocal can need more brightness overall while a few S sounds still leap out of the mix. Turning down all the high frequencies solves one problem by creating another, especially when the singer's breath and articulation are part of the performance. Waves Sibilance offers a focused workflow for detecting those consonants and limiting how much they are reduced. It is a useful candidate when you want a dedicated de-esser with a small number of meaningful decisions.
What Sibilance is designed to solve
De-essing is a local correction within a performance. An uncomfortable S, SH or related burst may need less level, while the vowel before it should keep its tone. The goal is a lyric that feels natural at the intended vocal level, rather than a waveform with no bright events.
Sibilance uses Waves' Organic ReSynthesis technology to identify and process sibilant material. That is a manufacturer-described approach, not a promise that every detection will be correct. You still need to decide whether the selected sounds belong in the correction and whether the result preserves the words.
The settings in this review are exercises to try on your recordings. They are based on documented control behavior and are not claims from a controlled listening test. Use more than one phrase before keeping a setting.
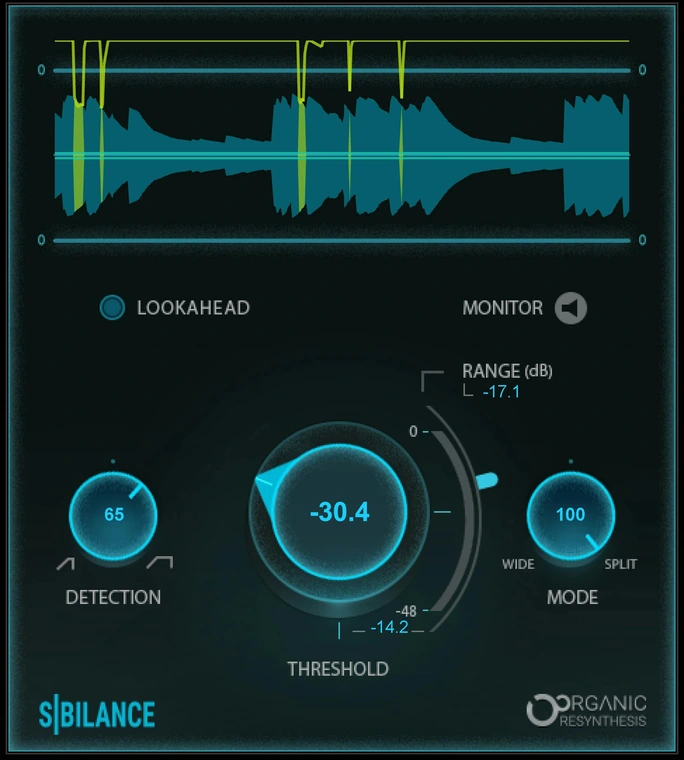
Detection Width is not a frequency-tuning knob
The Detection control changes the width of the detection range. Lower values narrow it; higher values broaden it. Narrow detection often suits an S, while a broader setting may be needed for SH. Monitor auditions the detected material so you can hear what the current setup is selecting.
Begin with a phrase containing both consonants and a bright held vowel. Turn Monitor on briefly and move Detection slowly. You are trying to include the unwanted burst while avoiding substantial portions of the normal voice. The position that selects the most audio is not necessarily the most useful one.
Then turn Monitor off. A detector audition deliberately isolates an unpleasant part of the recording, so it can encourage overcorrection if you stay there too long. Judge the whole word at normal vocal level before lowering Threshold any further.
If a narrow setting catches the sharp S but repeatedly misses the wider SH, that is a useful diagnosis. Broaden Detection and see whether the newly selected material is still mainly the consonant. If too much of the vowel joins it, you may need a compromise or a small edit to the exceptional word.
Threshold decides when; Range limits how far
Threshold sets where processing begins. Range caps the available attenuation. Use them separately: first establish which events should respond, then restrict the correction so an unusually strong consonant cannot pull down more than the phrase can tolerate.
For a first lead-vocal experiment, start with Range around −4 dB. Lower Threshold while replaying the problem word. Stop when it responds usefully, then check a quieter word that should remain natural. An absolute Threshold number is less useful here than how those two events behave.
If ordinary vowels are being reduced, revisit Detection and Threshold. If the right consonant is caught but the result sounds lispy, reduce the available Range. These are different errors: changing depth cannot fully repair a detector that keeps selecting the wrong material.
Do not copy an aggressive factory or screenshot setting without hearing the whole line. A large maximum attenuation may suit an intentionally extreme effect but is a poor default for learning how much a lead needs. Our FL Studio de-essing guide also explains the wider task using stock tools.
Wide and Split change the affected frequency range
Mode moves between Wide at 0 and Split at 100. Wide attenuates the full frequency range of the detected event; Split focuses attenuation above 4 kHz. Intermediate settings blend those behaviors. Detection Width and Mode therefore answer different questions.
A useful comparison is to keep Detection, Threshold and Range unchanged while moving Mode. On a narrow bright S, begin toward Split. On a broader SH whose lower body remains distracting, compare a setting nearer Wide. Do not assume one mode is universally more transparent; judge the actual transition through the consonant.
Listen to the vowel immediately after the event. If it feels as though the entire voice momentarily steps backward, a more Split-oriented setting or a shallower Range may be preferable. If the upper hiss improves but the lower noisy part still sticks out, a broader action deserves a careful comparison.
Match the general vocal level when comparing alternatives. The version with more presence can seem more exciting even if its sibilance is less comfortable. Choose the one that keeps the lyric expressive at the level where it will actually sit in the song.
A sung lead-vocal setup, step by step
- Loop a phrase containing a sharp S, a broader SH and an ordinary bright vowel. Keep the backing track available throughout the exercise.
- Set Range near −4 dB and Mode around 80 as an initial Split-oriented experiment.
- Use Monitor to find a Detection setting that selects the unwanted consonants without taking too much sustained voice. Try the lower half of the control first for a narrow S.
- Turn Monitor off and lower Threshold until the uncomfortable events respond. Leave acceptable words alone where possible.
- Compare Mode nearer the middle if a wider SH still feels too strong, then reduce Range if pronunciation starts to change.
- Check another phrase with different vowels and a louder chorus before saving the setup.
These starting choices are intentionally restrained. If the loud chorus needs much more processing than the verse, compare local automation or clip-level editing with forcing one global setting to handle everything. The most difficult word does not have to determine the tone of the whole recording.
Finally, listen without staring at the graph. Can you follow the lyric easily, and does the singer still sound like the same person? If the effect only seems convincing while you watch every detected event, take a break and compare again in the arrangement.
Rap, speech and breaths need different priorities
Fast rap exposes changes to consonants because the rhythm often depends on them. Use a passage with several adjacent words, not just the worst S in isolation. Keep enough articulation that the words still cut through the beat after processing.
On spoken voice, pauses can make the difference between a breath and a sibilant burst more noticeable. Do not treat every breath as an error. If a breath is simply too loud, a local level adjustment may preserve a more natural phrase than broadening the detector until it catches everything.
For an intimate vocal, leaving some air can be part of the intended sound. Correct the moments that make the listener wince, then check the performance at its normal level. Overcorrecting in solo can leave the voice dull once the instrumental returns.
If the whole voice sounds abrasive across vowels as well as consonants, the task extends beyond de-essing. Our harsh-vocal guide covers tone, recording and arrangement decisions that a consonant detector alone cannot resolve.
Before or after compression and bright EQ?
Place Sibilance where you can evaluate the problem in the actual chain. Before compression, it can reduce exceptional consonants before they reach the next processor. After compression or a bright EQ, it can address the sibilance that remains in the shaped vocal. Neither order is a rule for every recording.
Compare the two placements on the same passage. Revisit Threshold after moving the plugin, because the signal reaching it has changed. Keep the final level similar and pay attention to the compressor's behavior as well as the consonants.
If you need two stages, give each a small, distinct job. For example, one may catch unusually strong raw events while another handles the final brightened tone. Compare that with a simpler single-stage setup before keeping the extra complexity.
Reverb and delay deserve a separate check. A dry lead can be comfortable while its bright repeats still hiss through the gaps. First check what you are feeding those effects. If necessary, process the relevant return rather than de-essing the entire vocal bus more heavily. Our send-routing guide explains how those paths relate to the lead.
Lookahead and the Live components
The regular mono and stereo components offer Lookahead, which adds processing latency. The Live components omit Lookahead and are designed for zero-latency use. Choose according to the monitoring task and compare detection on the same phrase.
For mixing an existing recording, audition Lookahead if a difficult onset escapes the current setup. For a singer monitoring while recording, evaluate the complete cue path instead of enabling it automatically. Interface buffer settings and other plugins still contribute to what the performer hears.
Do not toggle latency-related options casually during a performance. Establish a suitable component and monitoring setup first, then leave the processing stable for the take. Our FL Studio latency guide covers the rest of that path.
When editing is the better correction
A few unusually strong consonants may be quicker to repair with clip gain or automation. Reduce the offending event gently and listen through the word boundary. If that solves the issue, the entire performance may not need a more sensitive detector.
Clipping, room noise and microphone distortion are different problems. De-essing can reduce the level of an unpleasant event, but it does not restore every detail lost in a damaged recording. Keep expectations tied to the actual source and consider another take when that is practical.
Waves recommends individual voices or instruments for the best results. On a complete vocal-and-instrument mix, a detector has more competing information to interpret. Prefer processing the isolated vocal when you have it, and check backing stacks separately before applying a strong setting to the whole group.
Price, alternatives and who should buy
Waves listed Sibilance at $29.99 on November 22, 2026, against a listed MSRP of $79. This is a promotional USD price before applicable taxes. Check your existing bundles and current offer, and confirm host and operating-system support in the Waves requirements.
Sibilance suits you if dedicated detection, a clear attenuation limit and a Wide/Split blend are useful decisions in your vocal work. If you prefer a more conventional frequency-based de-esser, read our Sibilance vs Renaissance DeEsser comparison. If a dynamic EQ you already own handles the recording comfortably, another purchase may not add much.
Skip it as a general vocal-repair solution. It is a focused tool for a focused problem, and its value depends on selecting the right events without taking away the performance's useful articulation.
Conclusion
Waves Sibilance gives you a direct way to work through detection, depth and processing mode as separate choices. Start by identifying the actual consonant, cap the reduction, then compare the full phrase in context. A good setting makes the lyric easier to listen to while leaving its pronunciation and character intact.
Technical reference: the Waves Sibilance user guide. Product information and USD price checked November 22, 2026. Numerical examples are suggested exercises for the reader's own recordings.

