
A post-fader send follows the source track's fader: lower the track and less signal reaches the effect. A pre-fader send takes its signal before that fader, so you can lower the dry track without lowering the feed to the effect.
Use post-fader sends as the usual starting point for shared reverb and delay. Use pre-fader sends when the destination needs an independent balance, such as a headphone mix or a deliberate effect-only passage. The useful question is what should happen when you move the source fader.
Pre-fader vs post-fader: the practical difference
| Situation | Usual choice | What happens when you lower the source fader? |
|---|---|---|
| Shared vocal reverb | Post-fader | Less new vocal signal enters the reverb. |
| Delay that follows the dry instrument | Post-fader | The delay input falls with the instrument. |
| Independent headphone balance | Pre-fader | The send level stays independent of that fader. |
| Fade the dry source while feeding a wash of reverb | Pre-fader | The dry sound falls while the effect keeps receiving audio. |
| One-word delay throw | Usually post-fader with send automation | The chosen word enters the delay; existing repeats can continue. |
| Parallel processing | Depends on the intended interaction | Choose whether the processor's input should follow source rides. |
Understand the three level controls
A basic send effect involves three different controls. The source fader sets that track's contribution to its main output. The send control sets how much signal is copied to the destination. The return fader sets how much of the processed destination you hear.
For a shared reverb, the send on each instrument controls its contribution to the room. The return fader controls the combined reverb coming back. Lowering a single vocal send is therefore different from lowering a return that also receives guitars and backing vocals.
On a conventional reverb or delay return, set the effect to wet-only. Otherwise the return can add another copy of the dry source, changing its level and potentially confusing your balance. Other parallel processors may have different routing requirements, so check what the return actually contains.
A simple level example
Imagine a steady source feeding a post-fader send, with the send control left unchanged. Lower the source fader by 6 dB: the signal entering that send also falls by 6 dB. With a pre-fader send taken before the same fader, that fader move does not change the send's input.
This describes the feed, not a promise that the effect's audible output instantly changes by the same amount. Reverbs retain tails, delays retain repeats, and compressors or saturation can react differently at different input levels. The destination also has its own gain controls.
Likewise, “pre-fader” does not mean independent of everything upstream. Changing clip gain, instrument output or a processor before the tap can still change what reaches the send.
Why post-fader usually works for reverb
When a vocal gets quieter in the arrangement, you will often want less new vocal energy entering its reverb too. Post-fader routing makes that happen without writing a second automation curve for every volume ride.
It also makes ordinary balance adjustments easier to predict. If a guitar is too loud, lowering its source fader reduces both the direct contribution and its ongoing feed to the space. You can then change the send separately if you want that guitar to feel closer or farther away.
The relationship is not completely fixed in every moment. A long tail from the previous phrase can remain after the dry level drops. If that tail masks the next section, automate the return or effect parameters rather than assuming the send mode is wrong.
When pre-fader solves a different problem
An independent monitoring balance
A performer may need more vocal and less backing track in their headphones while your main mix stays unchanged. A separate pre-fader send balance can provide that independence, provided the destination is routed to the intended monitoring output.
Keep the listening path clear. If the same headphone mix is also fed back into the main mix, it can duplicate signals rather than merely provide a separate monitor balance.
A dry sound fading into a sustained effect
For a transition, you might want a synth to disappear from the foreground while continuing to feed a reverb. A pre-fader send lets you lower its dry fader without reducing that feed. Automate the send itself when you want the reverb to stop receiving new material.
If you only want the existing tail to ring out, you may not need pre-fader routing at all. A post-fader setup can stop receiving new signal while its reverb continues decaying. Decide whether you want continued feeding or simply continued decay.
Pre-fader does not necessarily mean pre-effects
The send's tap point determines which processing it includes. A send can be before the channel fader but after EQ and compression. In other systems, you can choose a point earlier in the effects chain.
This matters on vocals. A send taken before de-essing can feed strong sibilance into a bright reverb even when the dry vocal sounds controlled. A send after de-essing receives the cleaned-up signal. Neither position is universally correct, but they create different results.
In Ableton Live, the return track's Pre/Post toggle refers to the source's mixer stage, including its volume, pan and track-active controls. It is not a switch that automatically removes source devices from the send path. The Live mixing manual explains that arrangement.
Setting up a pre-fader send in FL Studio
FL Studio's normal Mixer routing sends are post-fader. Fruity Send can instead take audio from its position in the effects stack, before the track fader.
- Name a destination Mixer track and load the desired effect there.
- From the source, right-click the destination's send control and choose Sidechain to this track.
- Insert Fruity Send at the desired source effects slot.
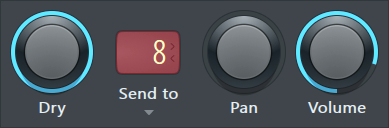
- Choose that linked destination with Fruity Send's Send to control.
- Set Dry to 100% if the source should continue through its own track. Adjust Volume for the sent signal.
The sidechain link makes the destination available without adding a second ordinary post-fader audio feed. Fruity Send supplies the audible send. Its default Dry setting is 0%, so check this if the original disappears. See the Fruity Send manual.
Make a delay throw without cutting off the repeats
For a word-ending throw, place the delay on its own return and automate the source send upward only around the word you want repeated. Lower that send again afterward. This stops the following words entering the delay while the repeats already inside it can continue.
If you automate the return fader down instead, you lower the repeats themselves. That is useful for a deliberate cutoff, but it is a different action. The send controls what enters; the return controls what comes back.
A post-fader send is often sufficient for this job. Use pre-fader if the dry fader automation must not alter what enters the delay. For an example of a delay suited to vocal throws, see our Waves H-Delay review.
Baby Audio Comeback Kid is an optional delay for this send-automation exercise. Put it on the return, use a wet-only output and automate the source send around one phrase ending. Keep the return audible afterward so you can judge how the repeats decay. Your existing delay can perform the same routing test.
Why muting is not a reliable test across every DAW
Mute and solo behaviour depend on the DAW, routing and tap point. Do not assume that muting a source will always leave a pre-fader send audible, or that soloing a return will always preserve every source feeding it.
To test fader independence specifically, play a steady passage and lower the source fader while watching the destination's input meter. Restore the fader, then test mute and solo separately. This isolates the question you are trying to answer.
Troubleshooting sends and returns
| Problem | Check | Likely correction |
|---|---|---|
| Reverb dominates as the dry track gets quieter | Is the feed pre-fader? | Use post-fader or automate the send alongside the dry level. |
| The source gets louder when the return is enabled | Does the effect pass dry audio? | Use wet-only operation for a conventional reverb or delay return. |
| Repeats vanish during a throw | Are you automating the return instead of the send? | Close the input feed while leaving the return audible. |
| A pre-fader effect still changes after a gain adjustment | Was the adjustment before the send tap? | Control the level after the tap or compensate the send deliberately. |
| A parallel compressor changes character during rides | Is its feed following the source fader? | Choose a tap point that matches the intended detector behaviour. |
For compression-specific routing, read our parallel compression guide. If the routing is correct but the vocal still feels too distant, adjust the space itself; our reverb pre-delay guide covers one useful control.
Conclusion
Choose post-fader when the effect feed should follow source volume moves. Choose pre-fader when that feed needs its own balance. Then verify the tap point, dry pass-through and return level: those details explain most surprises that the pre/post label alone does not.


