

Reverb pre-delay sets the gap between a sound and the onset of its reverberation. A short gap can help a vocal's first consonant remain distinct before the space builds around it. Too much can make the reverb feel detached, especially on fast phrases or percussion. Start with a modest value, listen against the rhythm and adjust decay and effect level separately instead of asking pre-delay to solve every clarity problem.
Pre-delay settings to audition
| Goal | Suggested audition range | Listen for |
|---|---|---|
| A closely connected room around a source | 0–15 ms | Space that joins the sound without hiding its attack |
| A clear lead vocal with audible ambience | 20–50 ms | The word beginning before the reverb becomes prominent |
| A more separated, dramatic vocal space | 50–90 ms | A useful gap rather than an accidental slap |
| A deliberately rhythmic reverb entrance | Try a short tempo division | Whether the entrance supports the groove and the next phrase |
These are comparison ranges, not boundaries between correct and incorrect settings. A bright room, a diffuse hall and a plate can make the same number feel different. The source, early-reflection pattern and effect level also influence how clearly you hear the gap.
Pre-delay, decay and delay are different controls
Pre-delay changes when the reverberant response starts relative to the source. Decay controls how long the reverberation continues or fades. Raising pre-delay does not shorten the tail. A long hall can still fill the gaps between words even if each new word initially has a little more space around it.
An ordinary delay effect produces echoes according to its timing and feedback. Pre-delay is usually a time offset feeding or positioning the reverb, without becoming a repeating echo pattern by itself. At longer values, the reverb's entrance can nevertheless feel like a separate event. That audible separation can be intentional, but it should fit the phrase.
Plugin implementations vary. Some position early and late components differently or provide separate timing controls. Check the manual when you need a particular reflection pattern rather than assuming that every reverb shifts its entire response in exactly the same way.
A practical vocal setup
Use a vocal phrase with clear consonants, a held vowel and a short gap before the next line. Place the reverb on a send return and keep that return fully wet so the original vocal comes from its own channel. Start with a relatively restrained reverb level and a decay you can easily hear, such as roughly 1.5 seconds for this exercise.
- Set pre-delay to zero and listen to the first word in the full arrangement.
- Compare about 25 ms, then 50 ms, without changing decay or return level.
- Listen for whether the consonant stays clear and whether the reverberation still feels attached to the singer.
- Return to the best of those settings and adjust in smaller steps.
- Check a faster line and the next vocal entrance before committing.
If the reverb becomes too obvious during the gap, turn down the return or shorten decay. If the singer still feels distant, try a less dense or darker reverb, or reduce early reflections where the plugin allows it. Pre-delay is one part of perceived depth, not a universal “bring the vocal forward” control.
How to change pre-delay in FL Studio
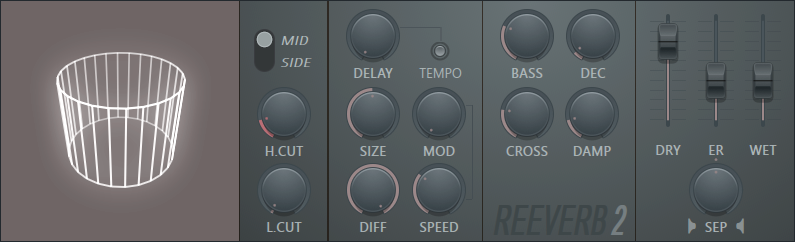
In Fruity Reeverb 2, the control is labeled DELAY. Image-Line defines it as the interval between the direct input and the first reverb reflection. DEC controls decay, while DRY and WET set the two output contributions. Knowing those labels makes it easier to change timing without accidentally changing the blend.
On a dedicated reverb return, set DRY to zero and use WET for the effect output; blend that return with the original using your Mixer routing. When the plugin is inserted directly on a vocal, keep a suitable dry contribution inside the plugin instead. The same balance settings are not appropriate for both arrangements.
For the listening test, leave size, diffusion and decay unchanged while moving DELAY. Once you have chosen an entrance that works, refine those other controls. If you change the room algorithm and several parameters at once, you will no longer know whether the improvement came from pre-delay.
Should reverb pre-delay be tempo-synced?
Tempo sync is useful when you want the effect entrance to have an obvious rhythmic relationship. It is optional for a subtle sense of separation. A free timing value that sounds good with the performance does not need to land exactly on a grid division.
To calculate a quarter note, divide 60,000 by the BPM. Halve that result for an eighth note, and halve it again for a sixteenth. At 120 BPM, a quarter note is 500 ms, a sixteenth is 125 ms, a thirty-second is 62.5 ms and a sixty-fourth is 31.25 ms. Those last two values are useful audition points for a modest vocal gap; the longer divisions can create a much more detached entrance.
Do not round a musical decision into a rule. A singer may phrase behind the beat, and the next consonant may arrive before a long, synced reverb entrance has cleared. Compare a nearby unsynced value as well. Choose the one that supports the performance rather than the one with the tidiest fraction.
Different sources need different listening priorities
Lead vocals: protect the words that matter
Focus on intelligibility through the whole sentence. A setting that separates one held note beautifully may cause the reverb from the previous word to overlap the next consonant. Try a shorter decay or a quieter return if that happens. Our vocal placement guide covers the surrounding level and tonal decisions.
Automating the send on selected words can be more effective than leaving a large reverb on every syllable. Pre-delay sets the entrance of the effect; send automation decides which parts of the performance enter it. Combining them thoughtfully can preserve a relatively dry verse while letting a phrase ending open into a bigger space.
Snare and percussion: check for an unintended second hit
A sharp source makes the reverb's entrance easy to notice. Compare a nearly immediate setting with one around 20–30 ms before trying a longer gap. Listen to whether the added space supports the backbeat or produces a distracting flam-like event.
Judge the snare with the kick and hats playing. A soloed reverb can seem exciting while making the rhythm less precise in context. If the tail washes over the next hit, revisit decay first. Increasing pre-delay simply pushes that response later and may make the overlap worse.
Pads and sustained instruments: contrast may matter less
A slowly swelling pad has no sharp consonant or drum transient to expose the gap. Pre-delay may be less perceptually important than the reverb's tone, density and decay. Keep the setting simple unless you can hear a specific benefit.
On piano or plucked guitar, check fast passages as well as long notes. Several delayed reverb entrances can accumulate into a blurred background even when each individual note sounds attractive. Lower the return before reaching for elaborate timing changes.
When ducking helps more than extra pre-delay
Pre-delay shifts the entrance by a fixed amount. Ducking reduces reverb level while a controlling signal is active, then lets the effect rise as that signal eases. That makes ducking useful for keeping a long tail quieter beneath ongoing words, where a short initial gap alone is not enough.
Start with restrained ducking and listen to the transition after a phrase. If the tail suddenly jumps forward, slow the recovery or reduce the ducking depth. You can combine ducking with pre-delay, but set them independently so you know whether you are changing the timing of the space or its level.
FabFilter Pro-R 2 provides both Predelay and Ducking controls. Our Crystalline vs Pro-R 2 comparison discusses the broader workflow choice. You do not need another reverb to learn pre-delay if your current plugin already includes it.
Common reasons the setting still sounds wrong
If increasing pre-delay barely helps, listen to the return alone for excessive low-mid buildup or very bright reflections. Those are tonal and density problems. If the original vocal becomes louder when you add the return, check whether a dry signal is leaking through that return.
If you hear a distinct echo before the tail, check for a separate delay plugin or a preset with an echo component. If the sound only becomes awkward on fast lines, revisit the choice using those lines as the test passage. A setting selected from a sparse introduction may not suit the chorus.
Conclusion
Use pre-delay to choose how the reverb entrance relates to the source, then use decay, tone and return level to control the space that follows. Compare a few clear timing options and check the fastest or most crowded phrase. Keep tempo sync when it helps the groove, and use an unsynced value when it fits the performance better.
Technical references: Fruity Reeverb 2 documentation, Pro-R 2 main controls and ValhallaRoom pre-delay guidance. Checked November 17, 2026.


