


Tape plugins can make a clean recording feel less clinical, but the controls matter more than the reels on the screen. Waves J37 and Kramer Master Tape both combine tape colour, level-dependent distortion and delay. The choice is whether you want to explore several tape formulas or work mainly with recording level, flux and the character of one modelled machine.
Choose J37 when tape formulas, separate modulation controls and creative delay options are part of the appeal. Choose Kramer Master Tape when you want a focused record-and-playback workflow with a Flux control. Either can process individual tracks or buses; the word “Master” does not restrict Kramer to mastering.
J37 vs Kramer Master Tape: the useful differences
| Decision | Waves J37 | Kramer Master Tape |
|---|---|---|
| Modelled approach | Abbey Road's Studer J37 multitrack tape machine | Vintage quarter-inch valve reel-to-reel tape machine |
| Main tone choices | Three tape formulas: 888, 811 and 815; Bias and SAT controls | Record Level, Flux, Bias and Input/Repro monitoring |
| Tape speeds | 7.5 and 15 ips | 7.5 and 15 ips |
| Movement | Separate Wow and Flutter rate/depth controls | Combined Wow & Flutter amount |
| Delay | Slap, feedback and stereo ping-pong options | Slap and feedback delay |
| Observed USD price | $34.99 sale; $149 listed MSRP | $29.99 sale; $149 listed MSRP |
Individual plugin prices checked directly on Waves on November 20, 2026. Offers and checkout taxes can change. Existing bundle ownership may make a separate purchase unnecessary.
What to expect from tape saturation
Tape-style processing can alter tone and the shape of transients as well as adding harmonics. That gives you several possible goals: softening an exposed drum attack, changing the density of a vocal, or giving a sample a more obviously processed texture. Those are different jobs, so they should not all start with the same amount of drive.
Start by naming the problem. “The snare is too sharp against this loop” gives you something to judge. “The mix needs warmth” is harder to evaluate and can lead to darker, louder playback that seems better only because it changed.
Neither plugin replaces balance, EQ or arrangement. If the low midrange already feels crowded, adding more colour may make it harder to separate parts. Our muddy-mix guide is a better first step when the issue is masking rather than a lack of texture.
J37: choose a tape formula, then shape the effect
J37's three formulas provide distinct starting points rather than a single drive curve. Waves describes 815 as the least coloured option of the three, with 811 and especially 888 offering more pronounced character. This makes J37 convenient when you want to compare a few tonal directions before adjusting the rest of the processing.
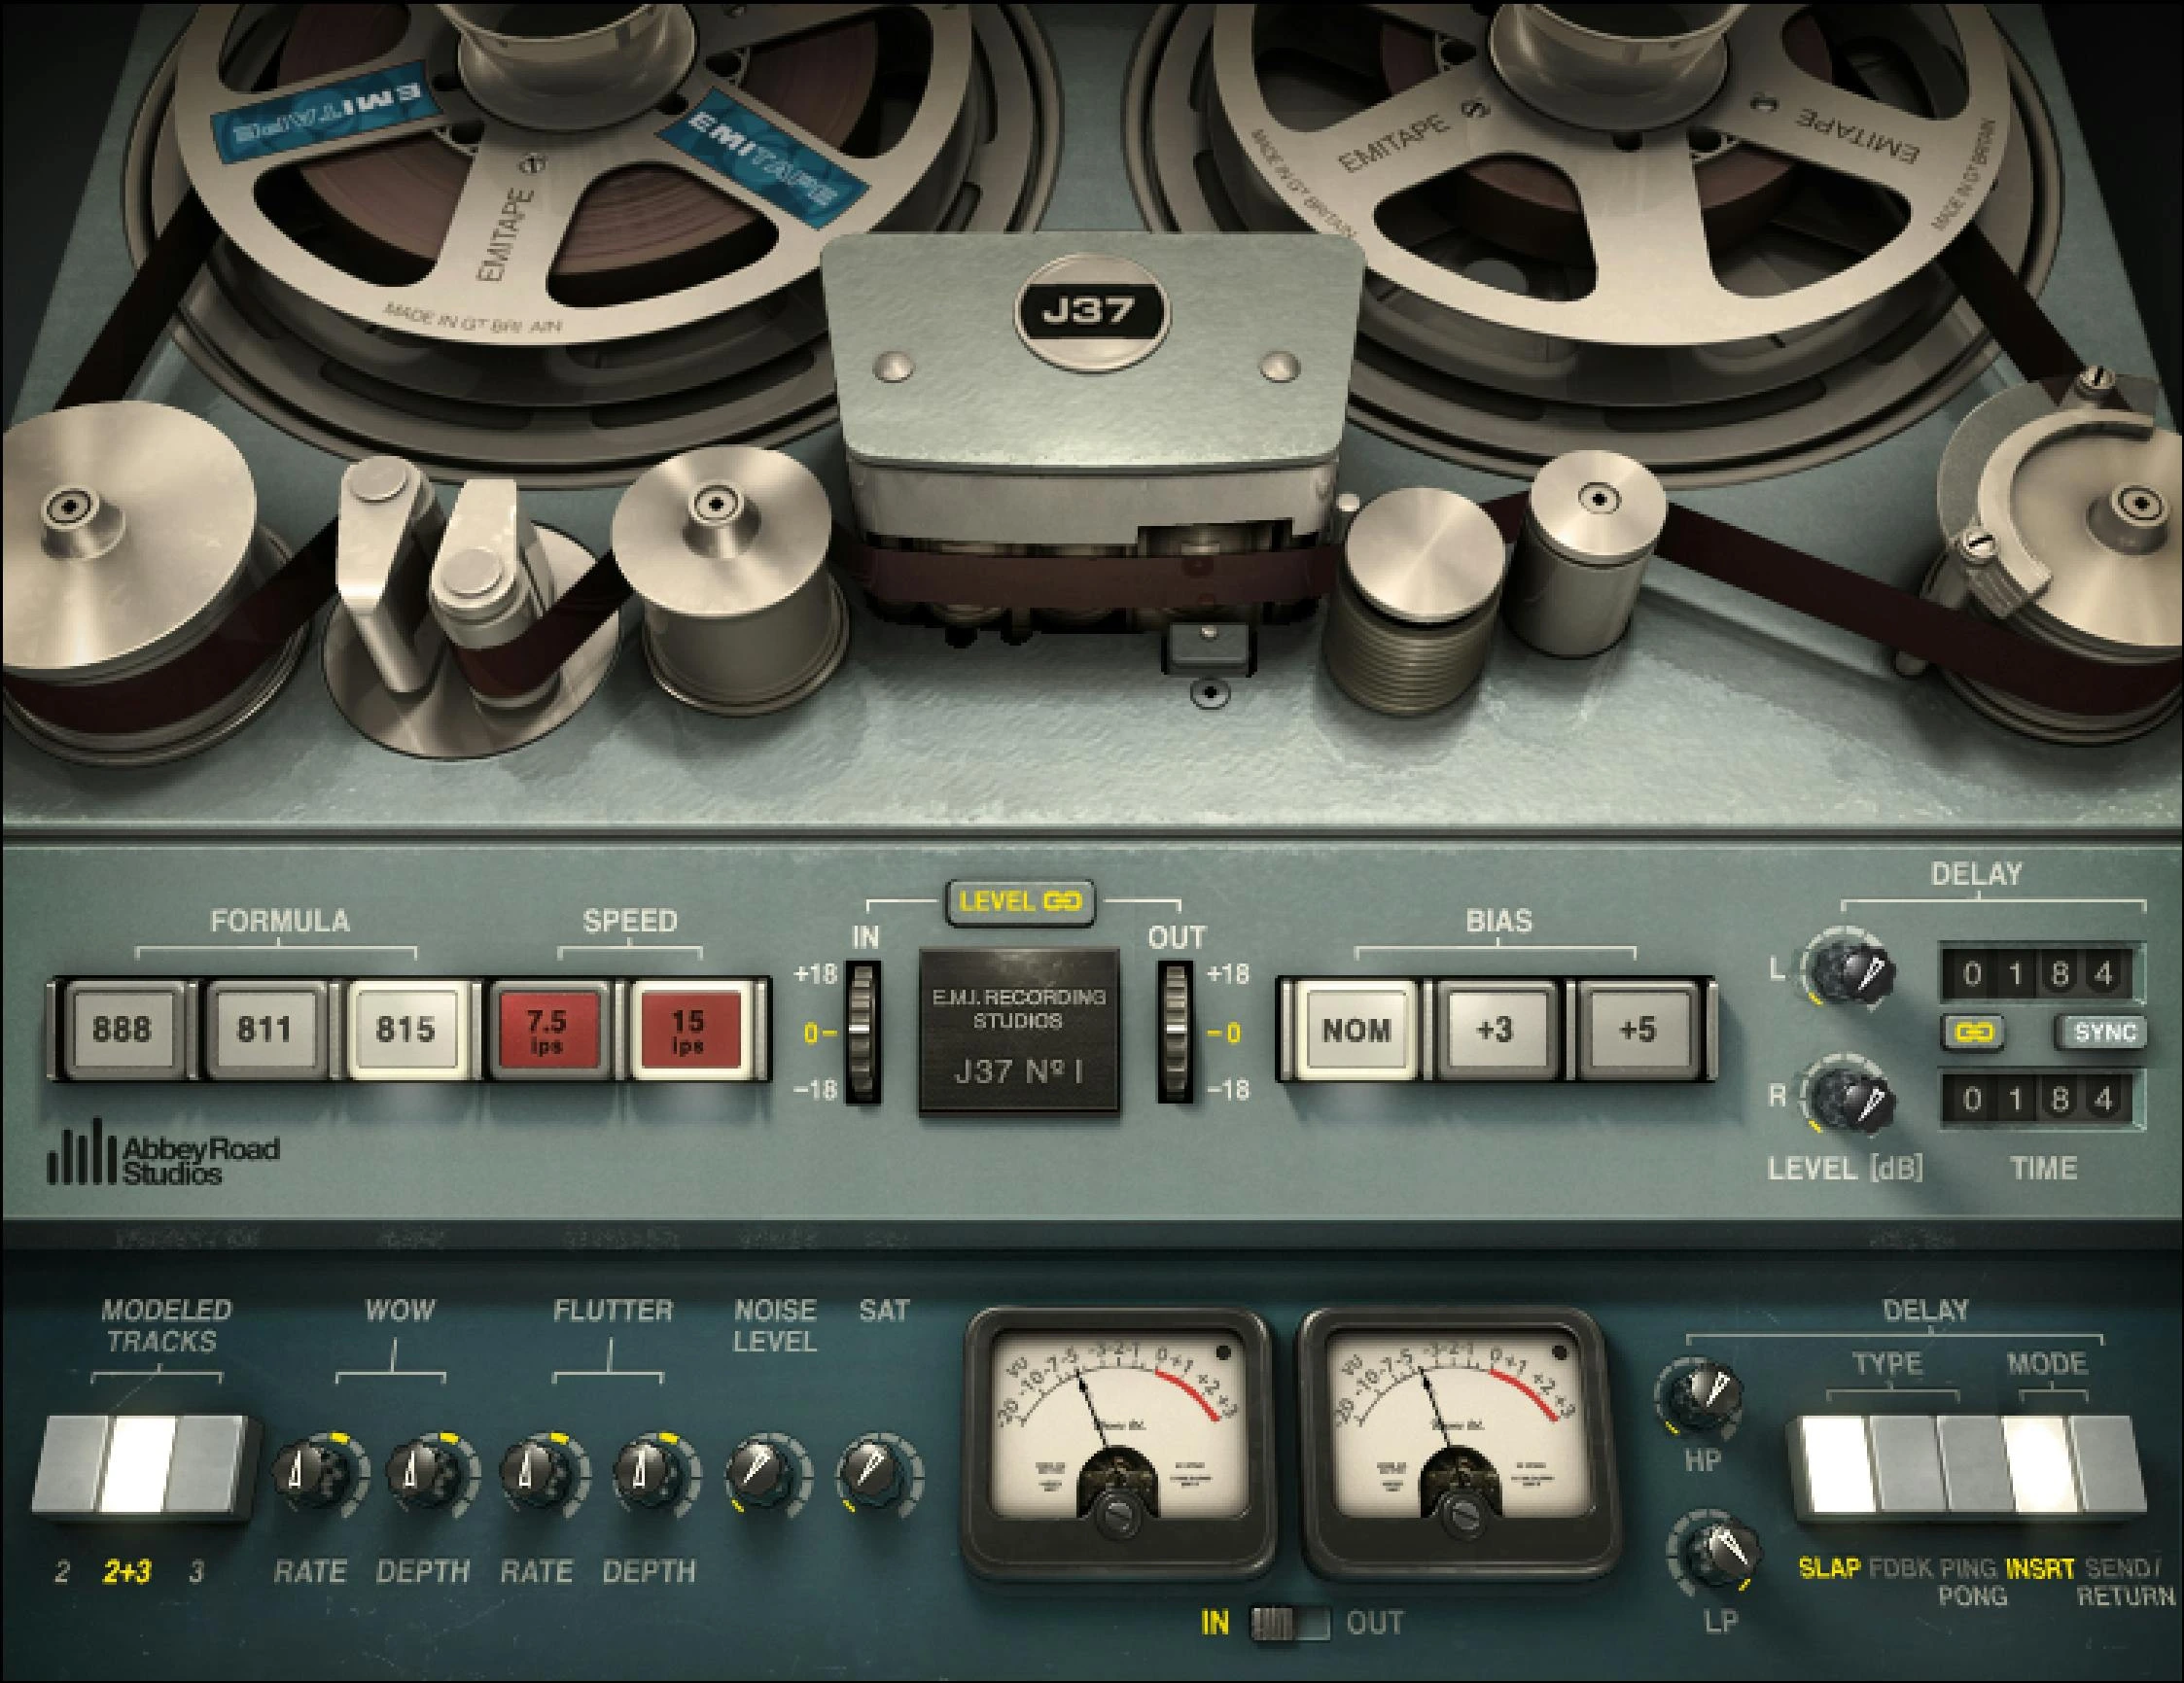
J37's interface shows the three Formula buttons, tape Speed, Bias, separate Wow and Flutter controls, and delay section. Image: Waves.
The practical attraction is the ability to separate several decisions. You can choose the broad tape character, establish how hard the source hits it, then decide whether noise, movement or echoes belong in the track. There is no requirement to make all of those features audible.
A starting pass for a vocal or instrument bus
Begin with Formula 815, 15 ips and nominal Bias. Leave Noise and Delay off. Use the linked input/output level controls to introduce a modest change, then fine-tune output level while switching between processed and bypassed playback.
Check the busiest phrase, not just a quiet opening. If the consonants or pick attacks become less distinct, reduce the input drive before changing other controls. If the result is merely louder, lower the output and decide again. The linked controls help with comparison, but they are not a guarantee of identical perceived loudness.
A starting pass for a deliberately worn sample
Once you have a restrained reference, try 888 and 7.5 ips as a second direction. Keep the output comparable, then introduce a little additional saturation or modulation only if the part benefits. Listen for the relationship between the sample and the kick: a darker texture can sit behind the drums, while excessive drive can blur the groove.
These are suggested experiments for your material. A bright percussion loop and a sustained piano phrase will expose different problems, even at identical settings. If you need to hear the effect clearly to learn its controls, exaggerate it briefly and then bring it back into the arrangement.
Kramer Master Tape: work with Record Level and Flux
Kramer Master Tape centres the workflow around Record Level, Playback Level and Flux. Its Input monitoring option isolates the modelled input stage, while Repro includes the tape and playback path. That distinction matters if you are trying to understand which part of the processing is changing the sound.
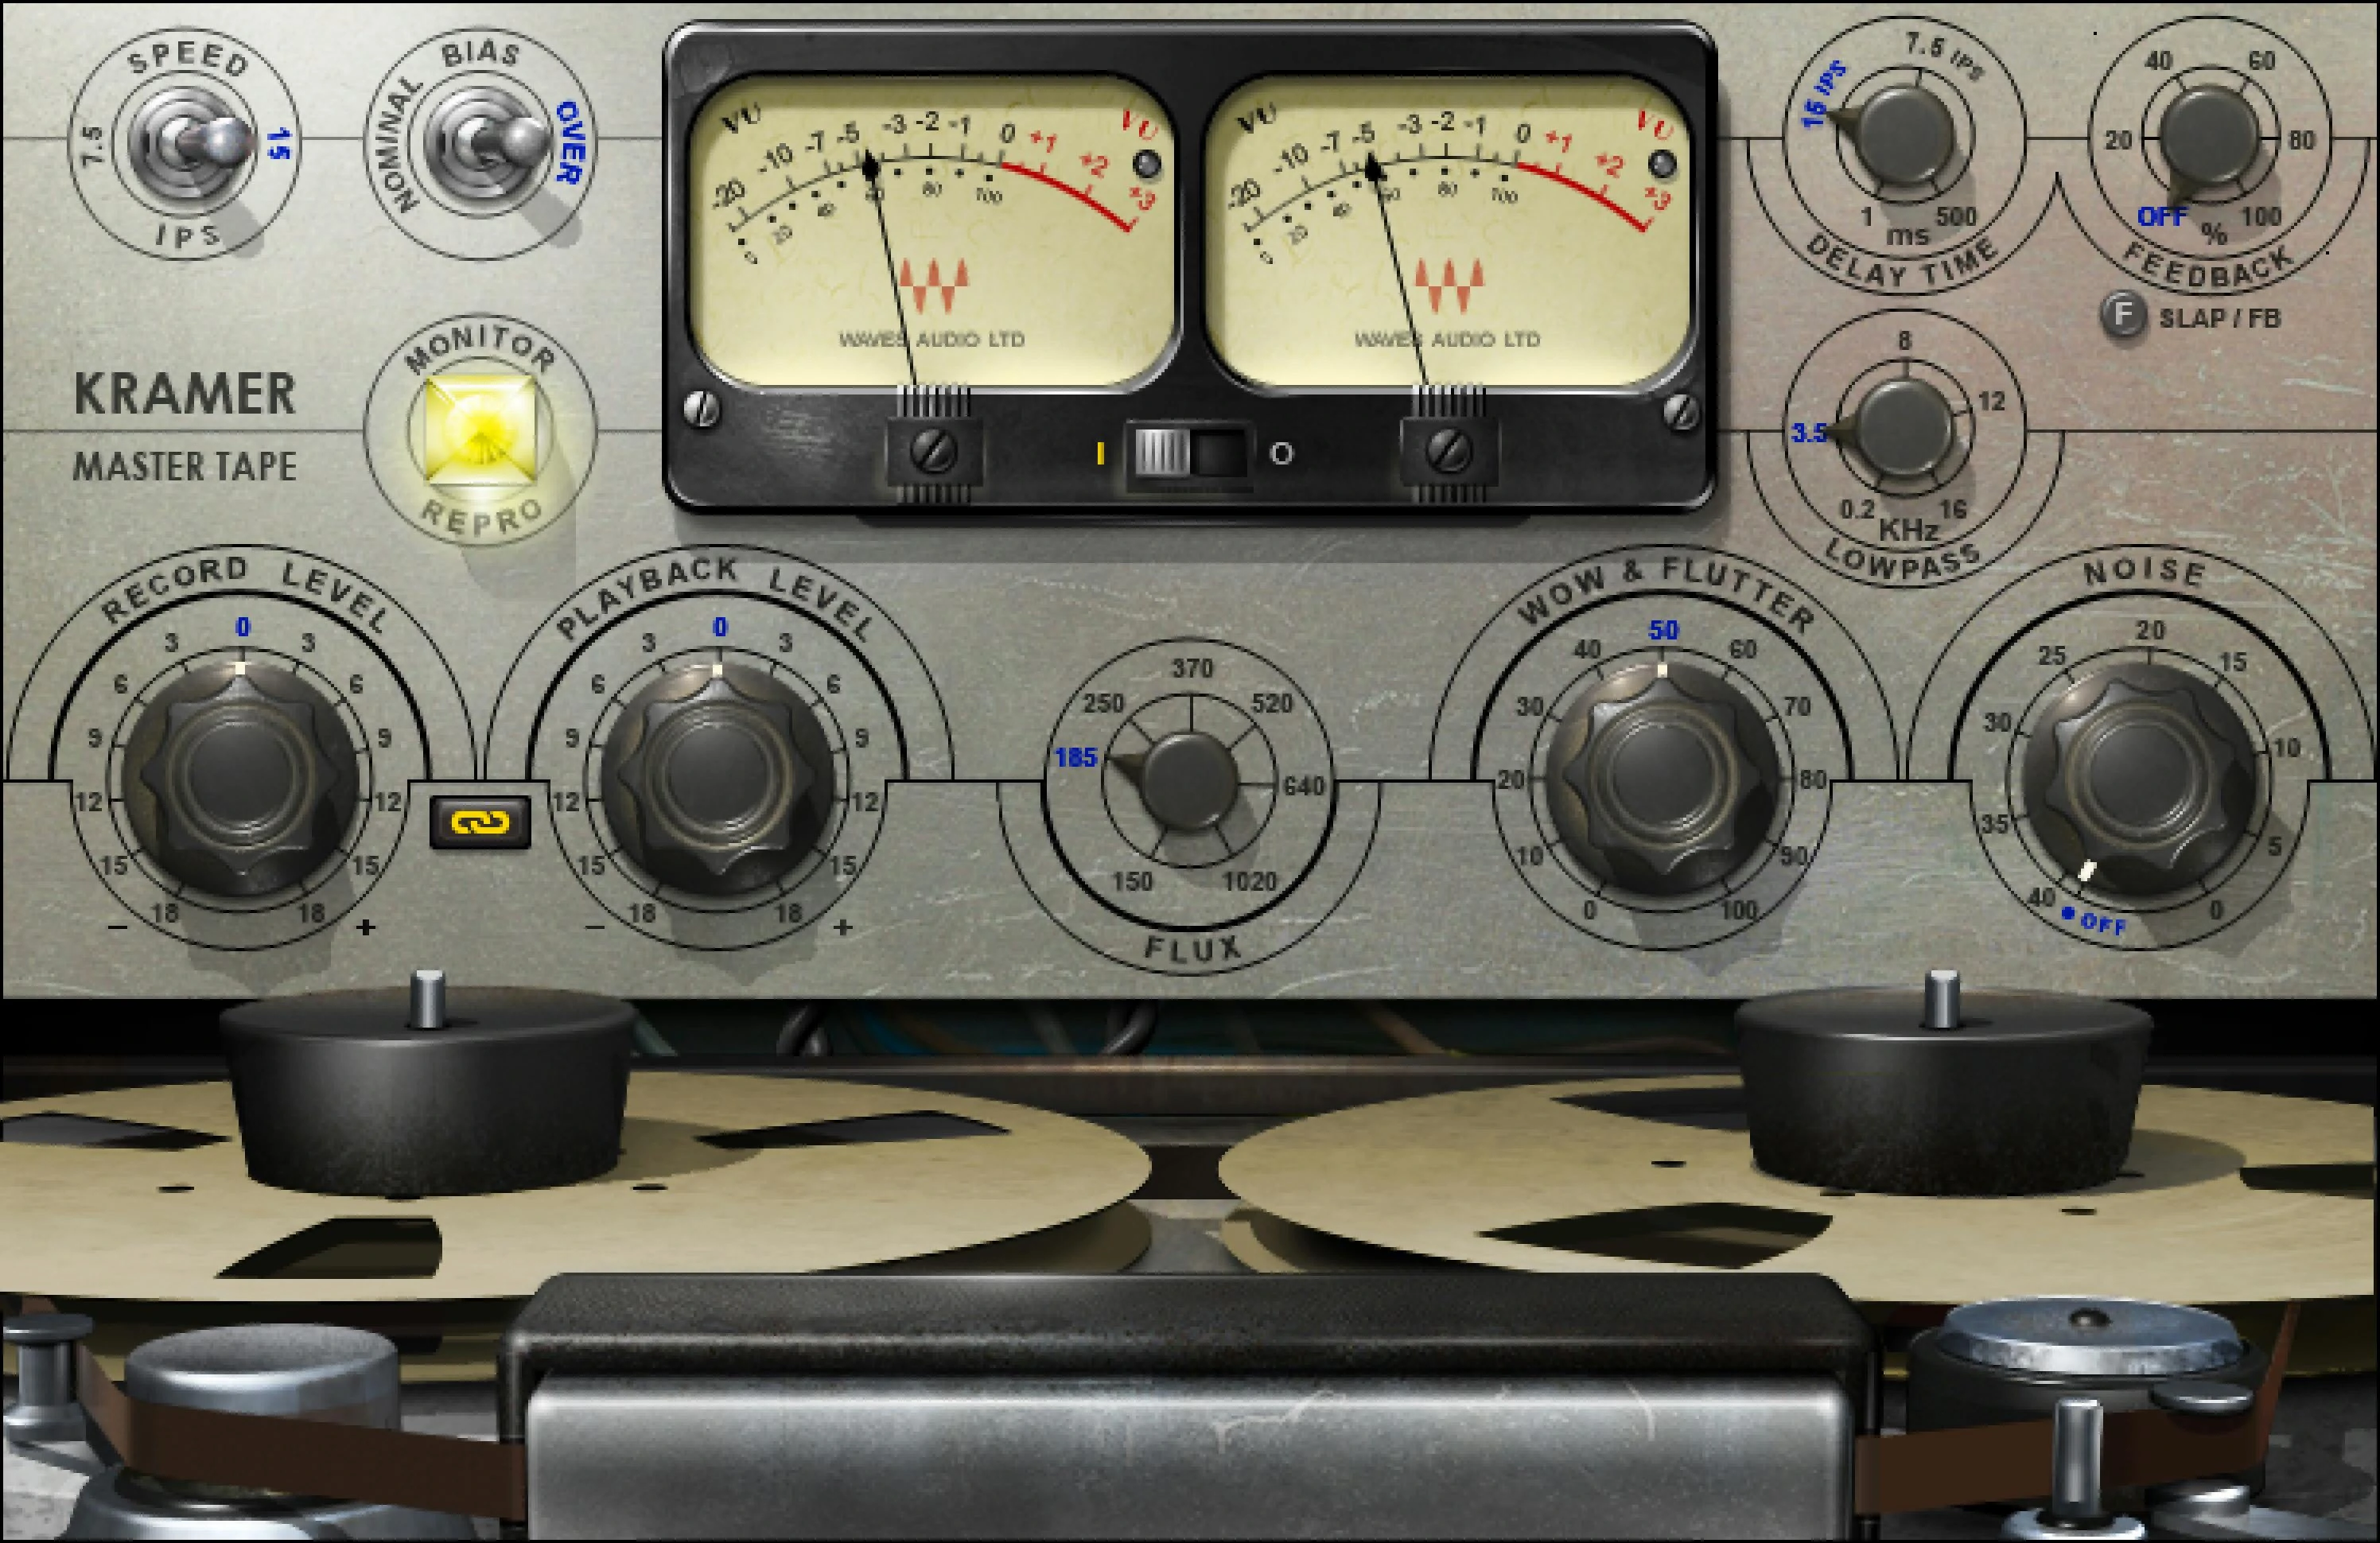
Kramer Master Tape's Record and Playback controls sit beside Flux, Wow & Flutter and Noise. The Monitor selector switches between Input and Repro. Image: Waves.
A sensible first comparison is in Repro mode at 15 ips, with Noise and Delay off and Flux at its 185 nWb/m default. Adjust Record Level in small steps, compensate with Playback Level and compare the busiest section of the track.
Then return Record Level to a known setting before exploring Flux. Changing both together makes it difficult to learn which adjustment helped. Treat a higher Flux value as a different operating condition, not as a quality score or a target to reach.
For drums, focus on whether the hit still has an identifiable front edge. For bass, check whether extra harmonics make the line easier to follow without making its relationship with the kick less stable. For a full mix, pay attention to the loudest vocal phrase and cymbal hits before deciding that the whole song benefits.
The smaller set of broad tone choices can be an advantage when you want to make a decision quickly. It can be a limitation if your ideal workflow is to switch between several tape formulas or control different kinds of movement separately.
7.5 vs 15 ips: choose by the arrangement
Both plugins offer 7.5 and 15 inches per second. Waves documents a brighter, more extended high-frequency response at 15 ips, with a different low-frequency balance at 7.5 ips. The slower option is therefore worth comparing for a darker effect, but it is not automatically the correct choice for every bass-heavy source.
Try a short section with bass, drums and vocal together. If the slower setting removes a distracting edge, check that it has not also made the vocal less intelligible or the hi-hats disappear. If 15 ips preserves the articulation you need, you can still add saturation without choosing the darker speed.
For more background on keeping levels sensible through a processing chain, see our gain-staging guide. You do not need to force every digital channel to the same peak level to make a tape plugin useful.
Do not confuse zero with “off”
One J37 detail is easy to miss: zero on its Wow and Flutter depth controls represents the modelled default, not the absence of movement. Their Off position is at the bottom of the range. If you want to isolate saturation from modulation, check that state rather than assuming a displayed zero is neutral.
This matters most with exposed sustained notes. When a piano, pad or held vocal seems less stable after processing, temporarily remove modulation and judge the tone again. Add movement back only when it serves the part.
Noise is also a separate creative decision. A little hiss may suit a texture on its own, but several noisy instances can accumulate. Listen through the gaps in the arrangement before leaving it enabled across multiple tracks.
Track, bus or master: where should you use them?
On an individual track, you can push the effect further without changing everything around it. This is often the clearest place to learn either plugin: one source, one problem and one audible consequence.
On a bus, judge the interaction between the grouped parts. A drum-bus setting that gives a snare useful density may also soften the kick more than you want. If that happens, move the processing to the part that actually needs it.
On the master, start cautiously and check more than one section. A setting chosen during a sparse verse may behave differently in the loudest chorus. Keep a bypassed reference available and make the decision at comparable loudness.
Neither product name establishes a rule about placement. You can use J37 on a mix bus and Kramer on a single instrument. The useful question is which controls help you reach the intended result without damaging another part of the arrangement.
What if you mainly want tape delay?
Both include delay, but a purchase based mainly on echoes deserves a separate comparison. Think about whether you need rhythmic repeats, stereo movement, filtering or a quick slap. J37's extra delay choices may be useful, while Kramer's smaller section can suit a straightforward echo.
If saturation is secondary and you want a delay-focused interface, read our Waves H-Delay review. Buying a tape model for one echo sound is less compelling when a delay you already own can do the job.
Who should buy each plugin?
J37 suits producers who want to explore. Its formulas and separate modulation controls make sense when you regularly build texture as well as applying subtle colour. Kramer suits producers who prefer a more focused tape workflow. Record Level, Playback Level, Flux and monitoring mode give you a clear set of decisions to learn.
Skip both for now if you cannot identify a job your existing saturation tools fail to do. For another approach to tape processing, our TAIP vs Satin comparison looks at two alternatives. A second tape plugin is most useful when it gives you a different workflow you will actually use.
Conclusion
J37 offers more ways to choose and animate a tape character. Kramer Master Tape gives you a concentrated record-and-playback workflow built around its machine model and Flux control. Pick according to the decisions you want to make, then judge the result at matched loudness. The right setting is the one that improves the part in the song, even when the change is small.
Technical references: J37 user guide, Kramer Master Tape user guide and Kramer modelling white paper. Specifications and prices checked November 20, 2026.


