

A lead vocal can feel too narrow in a chorus even when its level and tone already work. Waves Doubler builds extra voices from that recording so you can control how wide, late and detuned the surrounding layer becomes. It is useful when you want those decisions exposed individually, especially on an effect return that changes between sections. A new sung take is still the stronger choice when you need a different performance or phrasing.
What Doubler adds to a single recording
The basic task is to create differences around a stable original. Two identical recordings played at the same time mainly add level; differences in timing and pitch produce another relationship. With Doubler, the practical question is how much difference a part needs before the effect distracts from it.
That makes it suitable for more than an obvious doubled lead. You can place a quiet stereo layer behind a chorus, enlarge a backing-vocal stack, or make a clean guitar occupy more space without adding a long tail. Begin with one of those roles. An effect that works on a sparse guitar may be too much around a fast rap vocal.
The settings below are suggested exercises built around documented controls. They are not measurements from a controlled product test or a claim that every voice needs the same preset.
Doubler 2 or Doubler 4: choose the layer you need
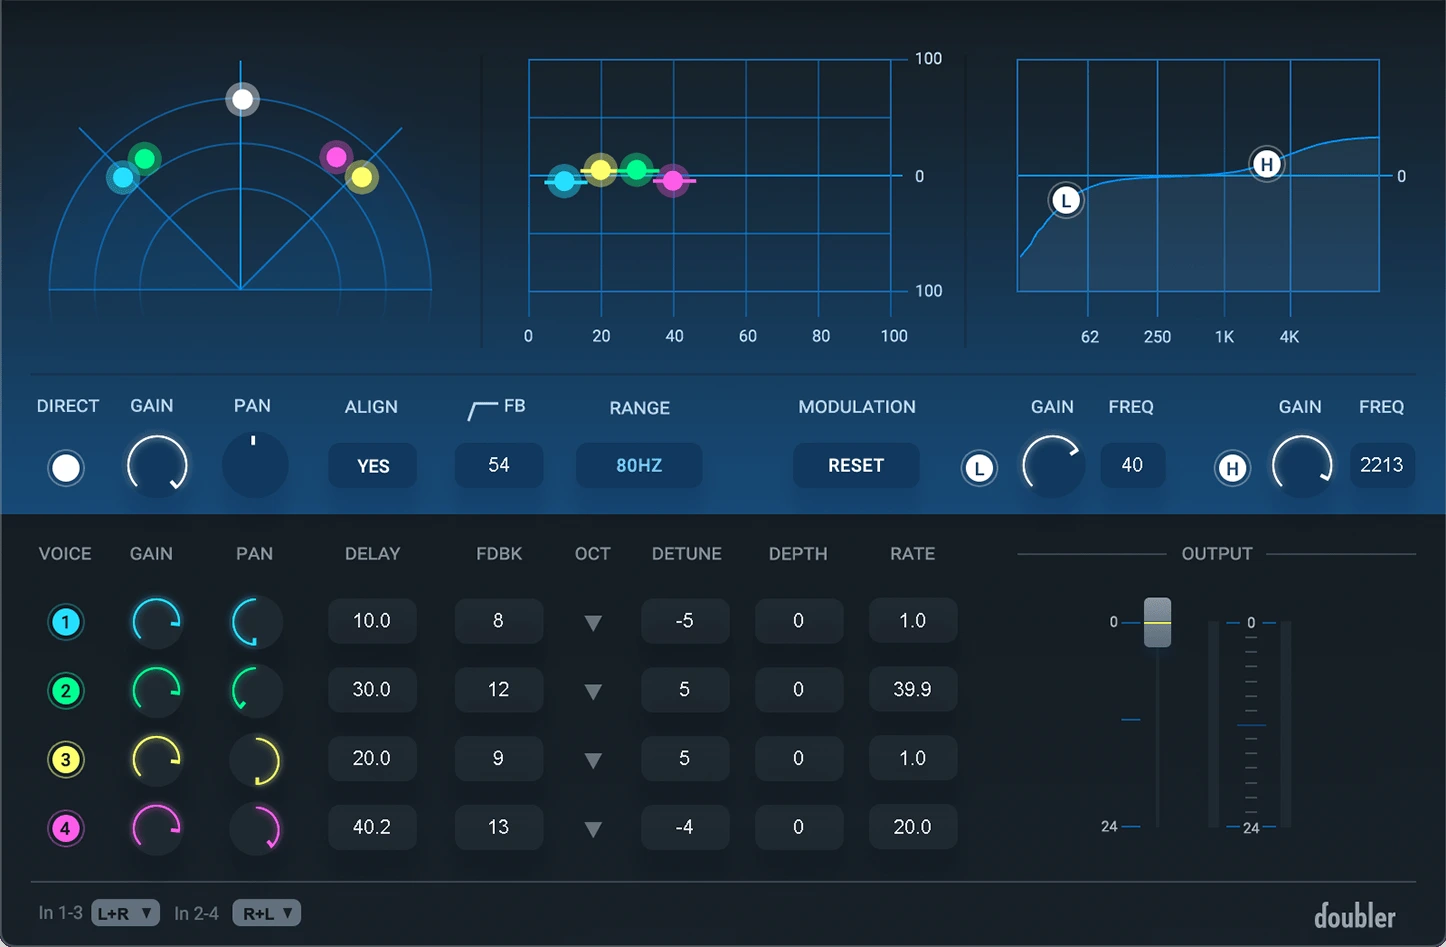
The two-voice and four-voice components offer mono, mono-to-stereo and stereo configurations. Each added voice has Gain, Pan, Delay and Detune, with modulation available through Depth and Rate. Use a stereo-output component for a stereo-width task.
Start with two voices for a lead. It is easier to hear which side contributes a useful layer when there are fewer moving parts. Four voices become more interesting when the intended result is a dense backing texture, rather than the impression of one close singer.
Do not switch to four voices simply because two sound weak. First check the voice levels, the return level and whether the rest of the arrangement leaves space. An additional pair can make an unclear effect more complicated without making the lyric more effective.
Set the dry path before judging the effect
Direct controls the original signal inside Doubler. Keep it centred for a conventional lead-vocal insert; switch it off for a wet-only send return. The plugin's EQ affects the added voices, while Master Output also affects Direct.
An insert keeps the whole vocal-plus-effect balance in one place. A return is more useful when you want to EQ, automate or mute the surrounding layer independently. On that return, the original vocal track already provides the dry performance. An extra dry copy makes the result louder before you have learned anything about the doubling.
To check routing, mute the return. The unprocessed lead should remain where you expect it. Then solo the return briefly to confirm that it contains the added texture you intended. Restore the full mix before adjusting the final amount. Our pre-fader vs post-fader sends guide explains the relationship with vocal-fader changes.
A restrained lead-vocal setup, step by step
Choose a phrase with a held vowel, a quick line and a short pause. Use a two-voice stereo-output component. The following is an insert exercise; for a return, turn Direct off and use the send and return faders to set the overall blend.
- Keep Direct centred. Begin with Feedback and modulation Depth at zero so the effect stays simple.
- Pan the extra voices left and right. Set their Gain to roughly −15 dB each as a quiet starting layer.
- Try −5 cents on the first voice and +5 cents on the second. These are small offsets, not harmony notes.
- Try Delay values around 18 and 27 ms with Range set to 80 Hz and Align off for this initial vocal exercise. Revisit timing if you change Range or Align.
- Raise the added layer while the instrumental plays, then reduce it slightly once the width is clear.
- Compare stereo and mono at similar listening level, paying attention to the centre of the lyric.
If held notes sound obviously out of tune, reduce the pitch offsets before changing the delay. If quick words feel late or doubled into separate syllables, lower the voice levels and shorten the longer delay. If the voice merely gets louder, lower the total output and compare again.
Finally, listen from the preceding verse into the chorus. A useful chorus layer should support that transition. If it makes the verse feel unnecessarily small, try a quieter version throughout and a modest lift at the chorus, rather than making the entire song equally wide.
Delay and Detune solve different problems
Delay separates the voices in time; Detune offsets their pitch in cents. One hundred cents equals a semitone. Small offsets suit a subtle width experiment, while stronger offsets make the processing easier to hear.
To learn the distinction, keep the same voice levels and compare two versions. In the first, use small pitch offsets and restrained timing differences. In the second, keep the offsets but lengthen one delay. Listen to word starts rather than only sustained vowels: they reveal when a surrounding layer begins to behave like an echo.
Then restore the shorter timing and increase the pitch difference a little. Pay attention to the end of each held note. The point is to recognise the unwanted symptom before changing another control. A smeared consonant suggests a different adjustment from a vowel that sounds noticeably detuned.
For tight rap, preserving word timing often matters more than producing a huge solo sound. Keep the effect quiet on dense lines and bring it forward on ad-libs or held endings. If the basic vocal still fails to sit against the beat, our vocal-balance guide addresses level, masking and arrangement first.
Align and Range: why timing can change
Align delays Direct to align it with the voices' inherent processing latency. Range chooses 80 Hz or 20 Hz; the lower setting accommodates lower-frequency material with more latency. Neither is a stereo-width amount. Consult the current Doubler guide when changing components or timing settings.
Make these choices before fine-tuning the Delay values. For an ordinary lead-vocal experiment, start at 80 Hz with Align off. If you change Range to work on a lower instrument, replay the same phrase and rebuild the timing decision. Copying the displayed numbers alone does not prove that the resulting relationship is unchanged.
Do not confuse the timing of an artistic double with the delay you feel while recording. Your interface buffer and the rest of the session also influence monitoring. If the singer struggles against a processed cue, record with a simpler monitor mix and add the detailed widening afterwards. Our FL Studio latency guide covers the broader recording path.
Build a larger backing-vocal layer
For a backing part, begin with the two-voice setting you already understand. If the arrangement still needs a denser texture, move to four voices and keep the new pair quieter. Try a different pan position and a slightly different timing for each new voice, changing one at a time.
A useful experiment is to keep the first pair relatively close in timing and let the second pair sit a little later. Judge the result with the lead present. If the stack grows larger but the lead's consonants become harder to follow, lower or darken the backing layer. The lead does not need to compete with every generated copy.
Automate the layer at phrase boundaries. Bring it forward for a held chorus line, then reduce it before a tightly phrased response. This lets the arrangement create a change in scale without maintaining the busiest effect setting throughout the song.
Use modulation for movement, then check the tuning
Depth adds pitch movement around each voice's Detune setting; Rate controls its speed. Modulation Reset restarts the modulators together. Feedback recirculates signal and can move the effect away from simple doubling.
Save the static setup first. Add a small amount of Depth to one voice and use a slow Rate as an experiment. Compare a held vowel before changing the other side. If the effect makes the note's pitch difficult to read, return to less movement rather than adding another layer to hide it.
For a deliberate chorus texture on a synth or guitar, stronger movement may be appropriate. Judge the start and end of each chord, where the effect can become exposed. Leave Feedback at zero until you specifically want repeated or more complex behavior. It is not necessary for a basic vocal-width layer.
Guitars, synths and bass: pick the right scope
On a clean mono guitar, try the restrained two-voice approach and compare the part beside the vocal. If the guitar needs more space but reverb makes the rhythm indistinct, a short surrounding layer is a useful alternative to evaluate. Keep the original performance prominent enough that the picking remains readable.
On a synth chord part, check whether the preset is already wide. Adding another stereo effect can increase complexity without creating a better arrangement. Temporarily bypass the synth's existing chorus and compare the two approaches separately. Keep the one that gives the part an identifiable place around the centre.
For bass, preserve a reliable central low end. A separate upper layer is often an easier place to explore widening than the entire sub-heavy signal. Change Range appropriately for the material, then recheck timing and mono balance. More width is not automatically a useful result on every frequency range.
Mono checks and common mistakes
Switch to mono while the whole chorus plays. Compare both the lead's level and its tone. If the words become hollow or the centre seems to recede, reduce the added voices and revisit their timing. Do not assume hard-panned copies are harmless when summed.
Check at a quieter listening level too. A wide layer that impresses on headphones can distract from a lyric when the arrangement is heard less loudly. Our mix-width guide explains how to judge the centre alongside the sides.
Another common mistake is leaving the effect equally loud in every section. Save automation decisions until the core sound works, then make the width follow the song. A narrower verse gives a chorus somewhere to grow; a completely dry bridge may be the right choice for an intimate line.
Price, alternatives and the buying decision
Waves listed Doubler at $29.99 on November 22, 2026, against a listed MSRP of $99. This is a promotional USD price before applicable taxes. Check existing bundle ownership and current offers, then verify host and operating-system compatibility in the Waves requirements.
Doubler is worth considering when you want to choose the level, position, timing and pitch of each voice directly. If that feels like too many decisions, MicroShift and Little MicroShift offer another workflow. For a different emphasis on moving tape-style doubling, read our Doubler vs Reel ADT comparison.
Skip it if your existing tools already create the layer you need, or if the arrangement really needs another performance. Doubler does not repair a poorly delivered line, create intentional new phrasing or make additional recording unnecessary. Its value is controlled support for a performance that already works.
Conclusion
Waves Doubler earns its place through direct control over the surrounding voices. Start with a clear dry path and two quiet voices, establish timing before modulation, and automate the result around the arrangement. The best setting gives the chorus more space while leaving the original vocal easy to understand.
Technical behavior checked against the current Waves Doubler user guide and product listing. USD price checked November 22, 2026. Numerical examples are suggested starting exercises for the reader's own recordings.


