

A sample can appear in your Splice library without being ready to use on the computer in front of you. Even after downloading it, dropping a loop into the wrong part of FL Studio can make a simple task feel confusing. The reliable workflow is to download the file locally, choose the right destination, then check its timing before building the arrangement.
For a loop, drag the downloaded sample from Splice into FL Studio's Playlist. For a drum one-shot you want to sequence, drag it into the Channel Rack. You can also add your Splice download folder to FL Studio's Browser and import the files from there.
1. Download the sample to your computer
Open the Splice desktop app and sign into the account that holds your sounds. Find a sample and use the + button to add it to your library. For a sound you already own but have not downloaded on this machine, use its cloud-download button in the Sounds tab. Wait for that download to finish before dragging.
Start with one loop and one drum hit so you can check the workflow without importing an entire pack. A melodic loop with clearly labelled BPM and key makes the next steps easier. For the drum, choose a short kick, snare or clap whose start is easy to identify.
Splice's desktop download instructions distinguish adding sounds, downloading existing library items and syncing the whole library. You do not need to sync everything just to start one project.
2. Choose Playlist or Channel Rack
Where you drop a sample determines how FL Studio presents it. Use the Playlist when the recorded phrase itself is the building block. Use the Channel Rack when you want individual notes or steps to trigger a sample.
| What you want to do | Drop destination | What to expect |
|---|---|---|
| Arrange a drum or melody loop | Playlist | An Audio Clip you can position and trim on the song timeline |
| Program kicks, snares or hats | Empty Channel Rack area | A Sampler channel triggered by steps or Piano roll notes |
| Play a melodic one-shot | Channel Rack | A Sampler channel; check its root note before writing the melody |
| Keep the downloaded library accessible | Browser extra search folders | A folder shortcut for browsing local files inside FL Studio |
Drag onto empty space for a new channel or clip rather than dropping over something you intend to keep. Image-Line documents the distinction in its Audio Clips guide.
For a loop, place its first intended downbeat on a bar line. For a drum hit, add a few steps and play the pattern. You now have a simple test of import and playback before worrying about effects, routing or a full arrangement.
3. Add your Splice folder to the FL Studio Browser
If dragging between apps is awkward, use the files directly. In Splice, open Preferences and choose Go to folder to reveal the actual download location in Finder or File Explorer. This is more reliable than copying a default folder path from someone else's setup, particularly if your samples are on an external drive.
- In FL Studio, open Options → File settings.
- Under Browser extra search folders, choose an empty folder slot.
- Select the Splice folder you just located.
- Give it a clear display name if needed, then open it from FL Studio's Browser.
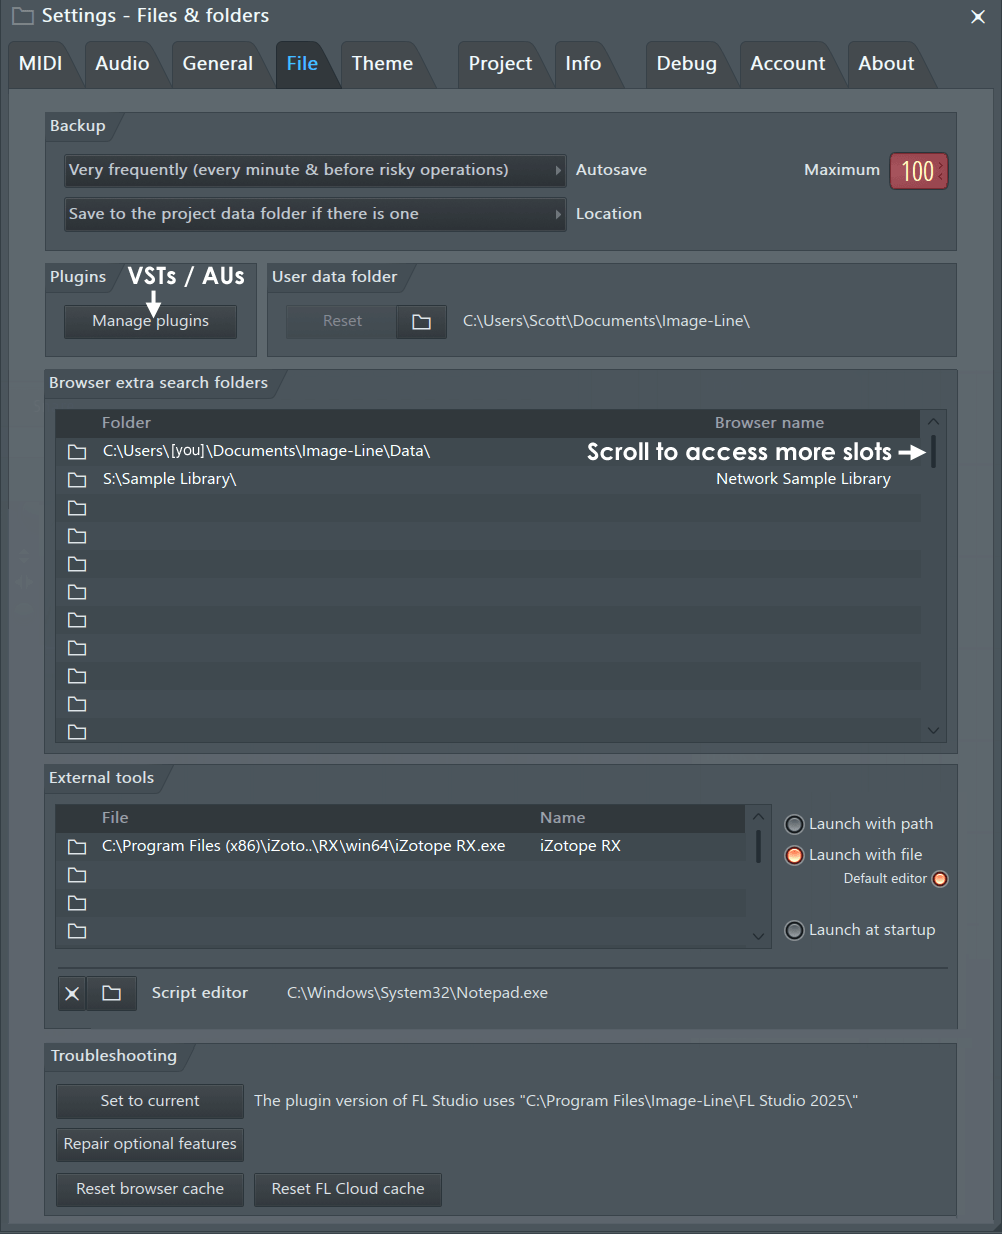
FL Studio's File settings. Browser extra search folders links a local sample folder to the Browser; it does not move the files. Interface image: Image-Line.
Add the relevant sample folder rather than the root of your entire drive. FL Studio also searches these folders for missing project samples, so a focused location is easier to manage. The File settings manual explains how those paths are used.
If you move the library later, update its location in both Splice Preferences and FL Studio's Browser settings. An old shortcut does not follow a folder automatically just because the files still exist somewhere on the computer. Splice's folder guide covers its side of that change.
4. Match a loop to the project tempo
A filename that says 120 BPM describes the source loop. It does not guarantee that every import will automatically match a 100 BPM project. Check both the stretch method and the loop's intended length.
- Set the FL Studio project tempo.
- Open the imported clip's channel settings and locate the Time stretching section.
- Choose Stretch when you want timing changes without the pitch shift of tape-style resampling.
- For a clean loop of a known length, right-click Time and choose the matching beat/bar duration.
- Play across the loop boundary and check that the next downbeat meets the grid.
For example, a clean four-bar loop in 4/4 at 120 BPM lasts eight seconds. At 100 BPM, those same four bars last 9.6 seconds. The phrase should still fill four bars; it simply takes longer to play. That makes the bar grid a useful check when automatic tempo detection produces the wrong result.
This example assumes the file is exactly four bars long. A pickup before beat one or a reverb tail after the phrase changes the file length. Do not force the whole file into four bars if that compresses a tail into the rhythm. Work from the musical downbeats and trim or handle the extra material separately.
Image-Line's Sampler and time-stretching documentation explains Time, Stretch and Resample. Large tempo changes can still expose artifacts, so compare a closer-tempo source if the loop becomes smeared.
5. Check pitch separately from timing
Once the loop follows the grid, compare its notes with the bass or chords in your project. Tempo and key are separate checks. A rhythmically perfect loop can still clash harmonically.
For a simple example, a loop in A minor moved up two semitones becomes B minor. That does not guarantee it will suit every B-minor progression: the actual chords and melody still matter. Make a short arrangement around the phrase before committing to it across the song.
For a pitched one-shot in the Sampler, check which source note is assigned as the root. A sample that plays the wrong musical note from a correctly labelled Piano roll note can be a mapping issue. If a drum unexpectedly repeats while a note is held, inspect its loop settings instead of immediately blaming Splice.
Why Splice samples will not drag into FL Studio
The sound is in your account but not on this computer
Download the specific file first. Then try importing it from the local Splice folder. If that works, the audio file is usable and you have narrowed the problem to the app-to-app step. A preview you can hear online is not proof that a usable local file has finished downloading.
FL Studio is running as administrator on Windows
Image-Line identifies elevated administrator privileges as a cause of blocked drag-and-drop. Save your project, close FL Studio and launch it normally. If the shortcut always runs elevated, open its Properties → Compatibility settings and disable Run this program as an administrator. Follow the Image-Line drag-and-drop troubleshooting steps if the restriction persists.
The file is not an audio sample
Splice also offers presets and MIDI. A synth preset belongs in its compatible instrument, while MIDI contains performance instructions rather than a finished audio waveform. Check the item type before treating a failed import as a broken sample. Our MIDI vs audio guide explains the difference.
The import works but you cannot hear it
Check whether you are playing the song arrangement or a pattern, then inspect the clip/channel mute state and Mixer routing. Test one known working sound in the same project. Our FL Studio no-sound guide covers the wider playback checks.
Save the samples with the project
A normal .flp file does not embed the audio samples. It can therefore reopen with missing sounds after you move folders or switch computers. For a self-contained archive of samples used by Audio Clips and Sampler channels, choose File → Export → Zipped loop package.
Keep that archive with your project backups. Open a copy from a different folder and check that the important parts still play before relying on it. Image-Line notes that this does not automatically collect sample libraries loaded inside every third-party plugin; those need their own appropriate save or archive workflow.
The project-file documentation explains what each format contains. An archive for your own project is different from packaging a sample library for redistribution.
Do you need Splice Bridge or a paid plugin?
You do not need Bridge, Serum or a Rent-to-Own instrument merely to import a downloaded audio sample. FL Studio's Audio Clips and Sampler handle that job. Bridge is an optional auditioning tool; learning the ordinary file workflow first makes troubleshooting simpler.
For new downloads, choose a Splice Sounds plan that fits how many sounds you actually use. On November 20, 2026, Splice displayed Sounds at $12.99 per month, billed yearly, equivalent to $155.88 for a year before applicable taxes. That is an annual billing option, not a promise of month-to-month billing at the same rate. Check the current terms before subscribing.
If you already have a suitable sample collection, you can practise the import and timing steps with it first. For ideas about what to download next, see our FL Studio sample-pack guide and drum sample-pack selection.
Frequently asked questions
Can I use downloaded Splice samples offline?
Yes. Splice supports browsing and dragging locally downloaded samples in its desktop app's offline mode. You cannot download new sounds or retrieve cloud-only library files without a connection. Check the files you need before travelling; the offline-mode guide lists the available functions.
Why does the sample sound different from its preview?
Check project playback speed, the clip's pitch and stretch settings, and processing on its Mixer channel. Compare the original downloaded file with the project version at a similar level. Change one setting at a time so you can identify what is responsible.
Conclusion
The dependable Splice-to-FL Studio workflow is to download locally, send loops to the Playlist and one-shots to the Channel Rack, then verify timing and pitch separately. Add the actual download folder to the Browser for easy access, and archive the audio with the project once the arrangement matters. That gives you a repeatable process you can use with your next sample instead of troubleshooting from scratch.


