

Our recommended FL Studio export starting point is a stereo 24-bit WAV at your project’s sample rate, with Full song selected, Leave remainder for the ending, and the effects you want included. For a small listening copy, export a 320 kbps MP3 as well.
The best export settings for FL Studio depend on where the file goes next. A mix for mastering, a finished release and a set of stems are different deliverables. Start with that decision, then follow the relevant setup below.
SoundShaper Opinion: We would spend more time checking the exported file than chasing the largest numbers in the export window. A wrong selection, missing part or cut-off ending matters more than a setting you changed without a reason.
Best FL Studio Export Settings: Our Quick Setup
These are our working recommendations, not a requirement from every distributor or mastering engineer. The recipient’s file specification takes priority.
How to Export a WAV from FL Studio
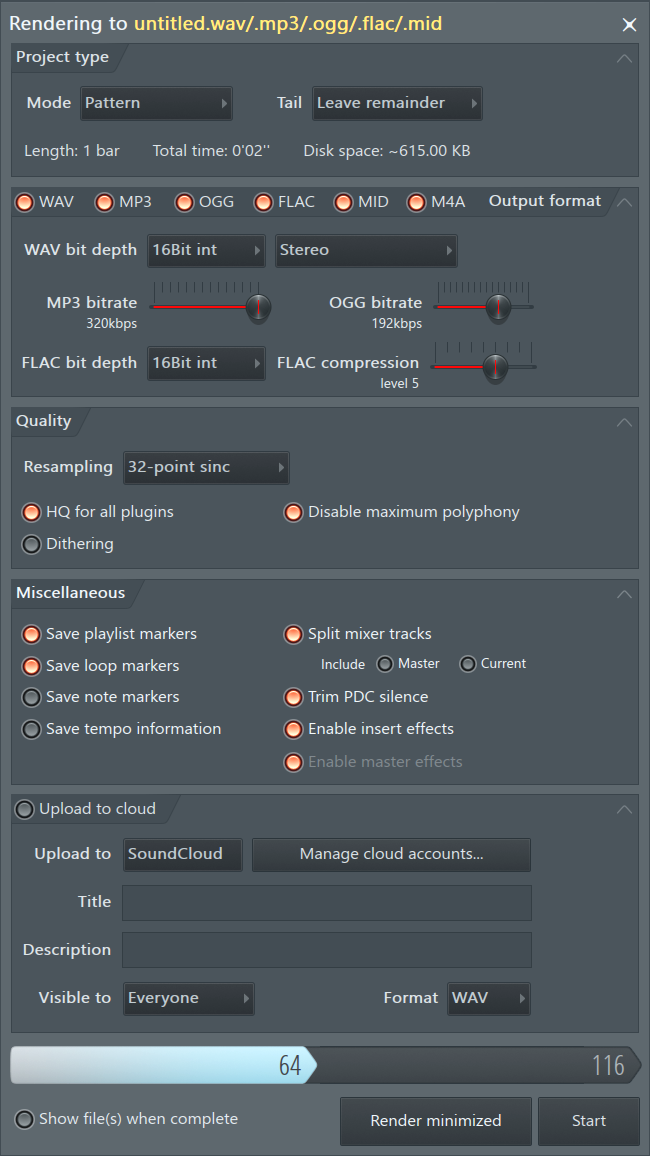
FL Studio’s export dialog, from the Image-Line manual. This is an interface reference, not a screenshot of our recommended preset. Layout and options can vary by version.
Our advice: Include the track name, version and purpose in the filename. For example: TrackName_Premaster_v03.wav. We would rather receive one clearly identified file than several files called “final,” “final2” and “final_new.”
WAV or MP3: Which Should You Use?
WAV keeps uncompressed audio; MP3 uses lossy compression to reduce size.
We would keep a WAV as the main delivery file and make an MP3 for convenient sharing. Follow the platform’s requirements when submitting a release.
For an MP3 listening copy, our recommendation is 320 kbps. Do not send only that copy when the recipient needs audio for further production. If the WAV is available, start the next processing stage from the WAV.
SoundShaper Opinion: Treat the MP3 as a convenience version. A smaller file is useful for a quick listen, but we would keep the production file separately and avoid confusion between the two.
24-Bit or 32-Bit Float?
We would choose 24-bit WAV for a straightforward handoff unless the recipient asks otherwise. We would choose 32-bit float for further editing when the receiving software supports it.
A floating-point file cannot repair distortion already created inside a plugin or earlier recording. Check the processing chain rather than assuming a file format fixes the mix.
SoundShaper Opinion: Ask the person receiving the file what they want. We would not send a less familiar format just because its number is larger. A compatible, clearly labelled file is the more useful delivery.
44.1 kHz or 48 kHz?
FL Studio’s sample rate is set in Options → Audio settings. Our recommendation is to keep the rate you used for the project unless a delivery requirement calls for another.
For a new music-only session we would normally start at 44.1 kHz; for a video workflow we would normally start at 48 kHz. Check the production specification first.
Read our 44.1 vs 48 vs 96 kHz guide for the broader decision. Changing the rate at the end can also change how rate-dependent processing behaves, so compare the result if you make that change.
Leave Remainder, Wrap Remainder or Cut Remainder?
Leave remainder preserves decaying audio beyond the song end. Wrap remainder carries ending audio into the beginning for a loop. Cut remainder stops at the export boundary.
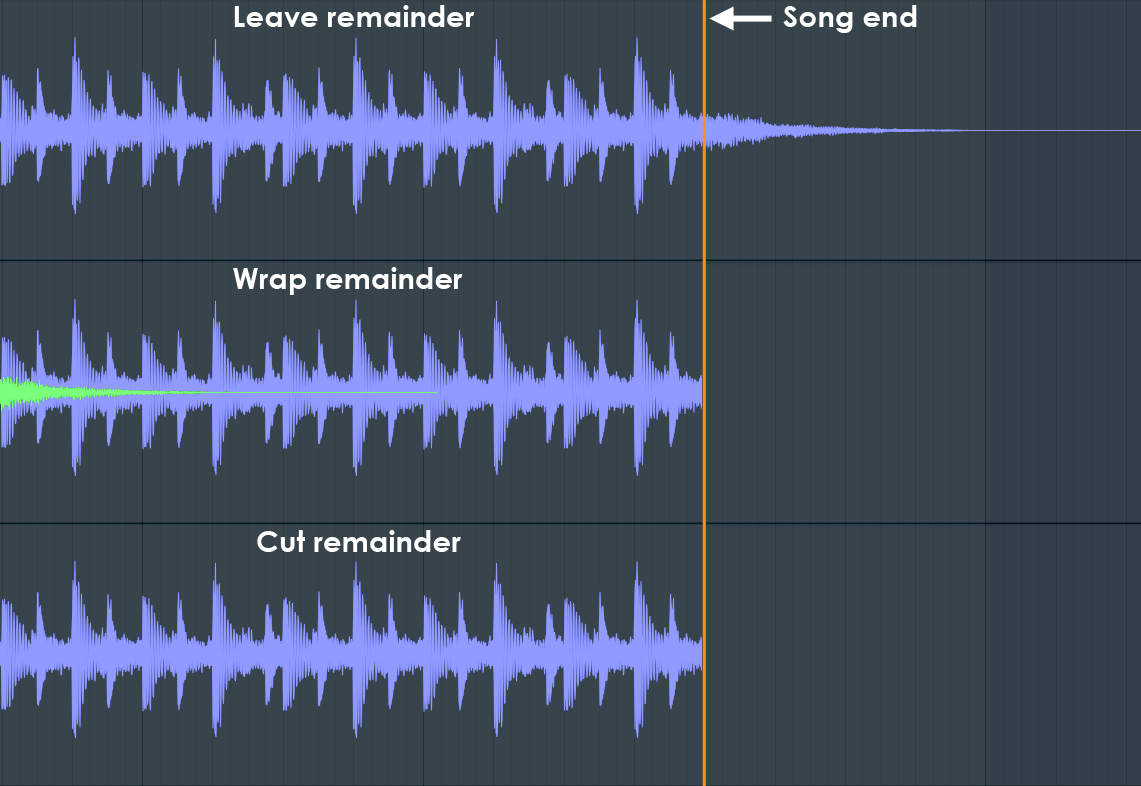
Image-Line’s illustration of the three tail options. The setting affects how audio is handled at the end of the render.
For a complete song, we would start with Leave remainder and listen to the final decay. For a loop, test the join by repeating the exported file several times. We would not choose a loop ending based only on the waveform looking tidy.
SoundShaper Opinion: Listen to the very last second on headphones. If the music ends naturally, keep it. If the tail creates an awkward gap for the intended use, revise that delivery deliberately.
Resampling and HQ: Do You Need the Highest Settings?
Resampling controls interpolation for sample-based playback. HQ enables higher-quality modes in supported native plugins; other plugins may have their own quality controls.
We would begin at 64-point sinc and enable HQ for the final render. If a transposed sample has an unwanted high-frequency artefact, compare a higher setting on a short section first.
We would not describe 512-point sinc as a guaranteed audible upgrade for every song. Keep a short reference render and compare useful differences. The official manual also explains that default quality settings do not normally ruin a mix.
Should Dithering Be On?
Dither adds very low-level noise to reduce quantization distortion when converting to a lower integer bit depth. It belongs at the relevant final bit-depth conversion, after processing and sample-rate conversion.
FL Studio’s built-in dither option targets 16-bit output. For a final 16-bit WAV, we would use one dither stage and make sure a mastering plugin is not also applying it. For 32-bit float, leave dither off.
For a 24-bit integer handoff, follow the chosen mastering workflow. If you apply 24-bit dither in a plugin, use an appropriate setting and avoid adding another stage. The noise floor at that depth is very low.
Our advice: Know which tool handles the conversion. Do not turn on multiple dither options because they all sound like quality improvements.
Exporting a Mix for Mastering
We would send a clean stereo mix, the requested format and a short note about the sound you want. Keep a loud reference version separately if that helps communicate the direction.
For the premaster, review any master limiter used only for preview loudness. If master processing is an intentional part of the sound, discuss it with the engineer rather than removing everything automatically.
Check that the mix does not clip. Leave useful headroom, but do not rebuild the balance just to hit a universal “minus six” rule. Ask for the engineer’s preferred delivery level and format.
SoundShaper Opinion: A good handoff includes context. We would mention intentional distortion, important transitions and anything the engineer should preserve. That is more useful than an unlabeled file with no explanation.
How to Export Stems from FL Studio
A stem is usually a grouped part, such as drums or vocals. Decide whether the recipient wants grouped stems or every individual track before exporting.
FL Studio’s Mixer routing determines what reaches each Mixer track and the Master. Name the tracks and review buses, sends and mute states before splitting files.
Split mixer tracks exports separate Mixer-track WAVs. Master processing is included on the Master export, not automatically on every split file.
Our suggested check is to import the exports into an empty session at the same start point. Listen for missing effects, repeated bus content and timing problems. Send an accompanying stereo reference so the recipient knows the intended result.
We would agree on dry versus processed parts in advance. “Stems” alone does not explain whether the vocal tuning, reverb or drum-bus processing should be included.
Why Does the Export Sound Different?
Start by comparing the same passage at the same listening level. Use the same output device, and check whether the media player or operating system applies enhancements.
Then inspect routing, mute states and the processing included in the export. The Master is where final levels and master effects are normally handled. A part routed elsewhere may not follow the signal path you expected.
Also compare plugin quality settings and any processors that behave differently during rendering. Change one thing at a time and export the short problem section again.
For playback glitches while working, see our FL Studio crackling guide and buffer-size guide. We would diagnose the playback and export separately instead of assuming one setting solves both.
Do You Need a Paid Plugin to Export Properly?
No. We would learn the export workflow before buying anything. Paid mastering tools address processing decisions before export; they are optional additions to that workflow.
If you are ready to compare mastering tools, read our FabFilter vs Ozone 12 guide or mastering-plugin roundup. Compare the exact edition and included products before paying.
Our Final Export Checklist
SoundShaper Opinion: Save a repeatable routine for your own projects, then check the exceptions for each delivery. We would trust a file we have listened to more than a preset we have never verified.
Frequently Asked Questions
What is SoundShaper’s recommended everyday export?
A stereo 24-bit WAV at the project rate, with the intended processing and a checked ending. Keep an MP3 separately if you need a small listening copy.
Should I use 96 kHz for every export?
We would only change the project rate for a clear reason. Start from the recipient’s requirements and your existing workflow.
Should I disable all master effects for mastering?
We would agree that with the engineer. Separate preview loudness processing from effects that form part of the intended sound.
Are the screenshots a preset to copy?
No. They are Image-Line’s reference images. Use the recommendations and your delivery requirements to choose the actual settings.
Sources checked on 12 October 2026: Image-Line export documentation, Audio settings, Mixer documentation and iZotope’s dither guide.
![[background image] image of recording equipment (for a musician & band)](https://cdn.prod.website-files.com/68efa70811edd8e5af30a90d/6acd3f9347bd0dd62b202621_ShaperBox%203%20vs%20Infiltrator%202.png)
![[background image] image of recording equipment (for a musician & band)](https://cdn.prod.website-files.com/68efa70811edd8e5af30a90d/6acd3d99fa68785e0f58960e_Kontakt%208%20vs%20Decent%20Sampler.png)