
The best audio mastering plugin depends on the job your mix still needs: tonal balance, controlled peaks, more cohesive dynamics or a reliable measurement of the finished file. A limiter, an EQ and a loudness meter solve different problems. No single purchase guarantees a release-ready master, and mastering cannot replace a well-balanced mix.
My shortlist starts with FabFilter Pro-L 2 for detailed limiting, iZotope Ozone 12 Advanced for an integrated mastering workflow and FabFilter Pro-Q 4 for precise tonal adjustment. For a free starting point, pair TDR Nova with Youlean Loudness Meter 2 Free and a suitable limiter from your DAW. Below, eight recommendations explain what I would choose, why, and when I would leave it out.
Best mastering plugins at a glance
These choices cover different stages of mastering; you do not need to stack all eight. Paid product buttons lead to full licenses rather than upgrades that require an existing purchase. Check current prices, activation requirements and DAW compatibility on the product page.
Jump to the example mastering chain, LUFS and true-peak advice, buying recommendation or FAQ. If you are deciding between a suite and separate tools, our FabFilter vs Ozone 12 comparison covers that workflow choice in more detail.
1. FabFilter Pro-L 2: my pick for detailed mastering limiting
Best for: producers who want control over the final limiting stage and clear feedback about loudness and peaks.
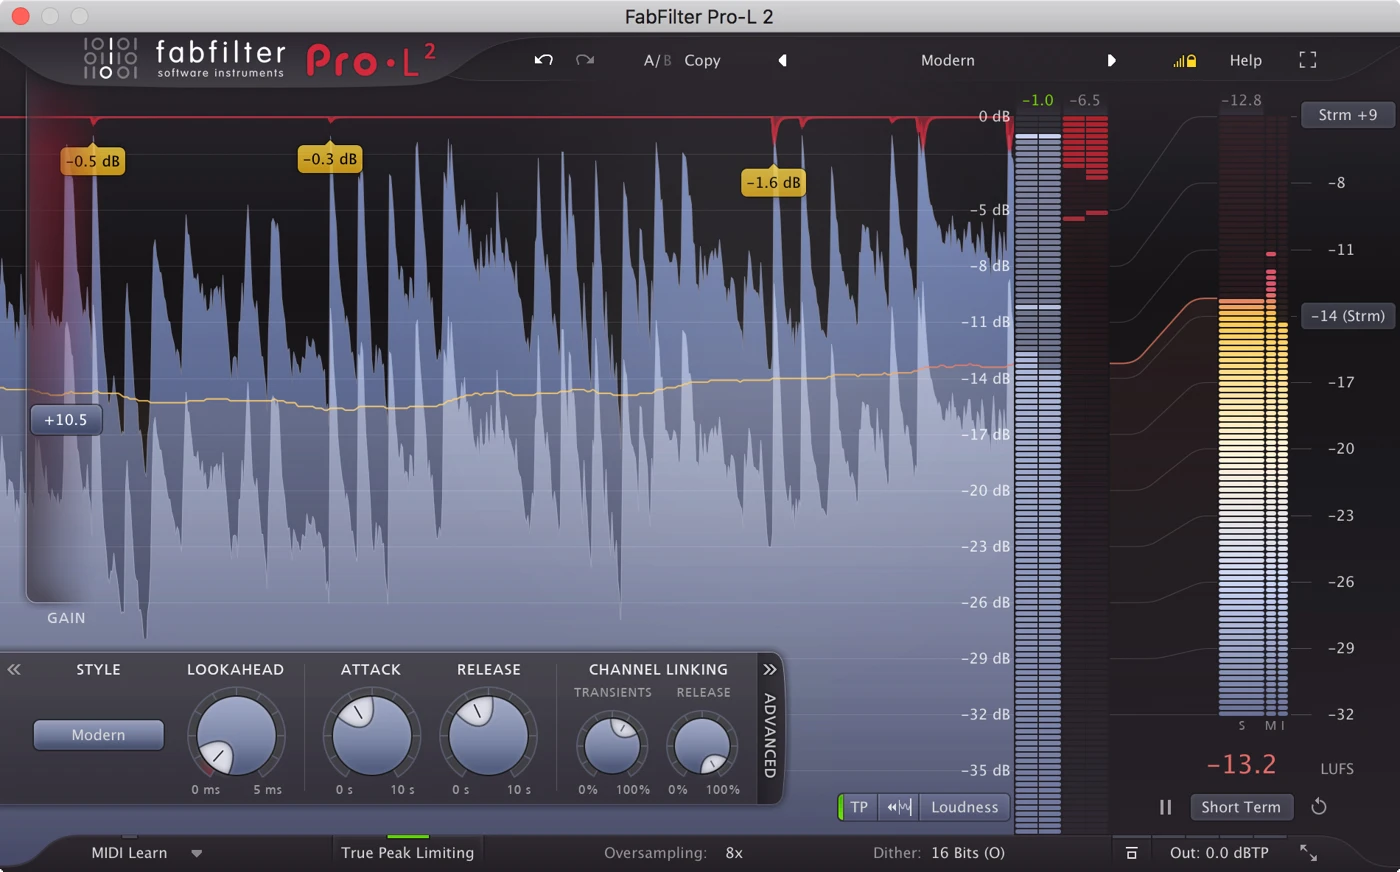
Pro-L 2 combines eight limiting styles with true-peak limiting, loudness metering, adjustable channel linking and oversampling. Its Unity Gain option helps you evaluate the effect of limiting without simply rewarding the louder version. It also provides dithering options for situations where the final export requires them.
My take: this would be my first paid limiter shortlist entry when I wanted to understand why a louder master starts losing its shape. The important question is not how far the Gain knob can go. It is whether the kick still lands, the vocal remains clear and the chorus feels larger than the verse after a fair level-matched comparison.
The limitation is that excellent limiting cannot rebalance the song. If a bass note makes the whole track duck, I would investigate the low end before looking for a more aggressive limiting style. Pro-L 2 is also a detailed tool, so someone wanting guided settings may prefer Mastering The Mix LIMITER.
Try this: enable true-peak limiting, choose a restrained starting style and increase gain gradually on the loudest section. Use Unity Gain to compare the processing at a similar level, then check the quiet section and the transition into the chorus. Stop pushing when the musical impact deteriorates, even if the meter has not reached the number you hoped for.
2. iZotope Ozone 12 Advanced: my pick for a complete mastering suite
Best for: producers who prefer an integrated chain with an assistant-generated starting point and editable processing.
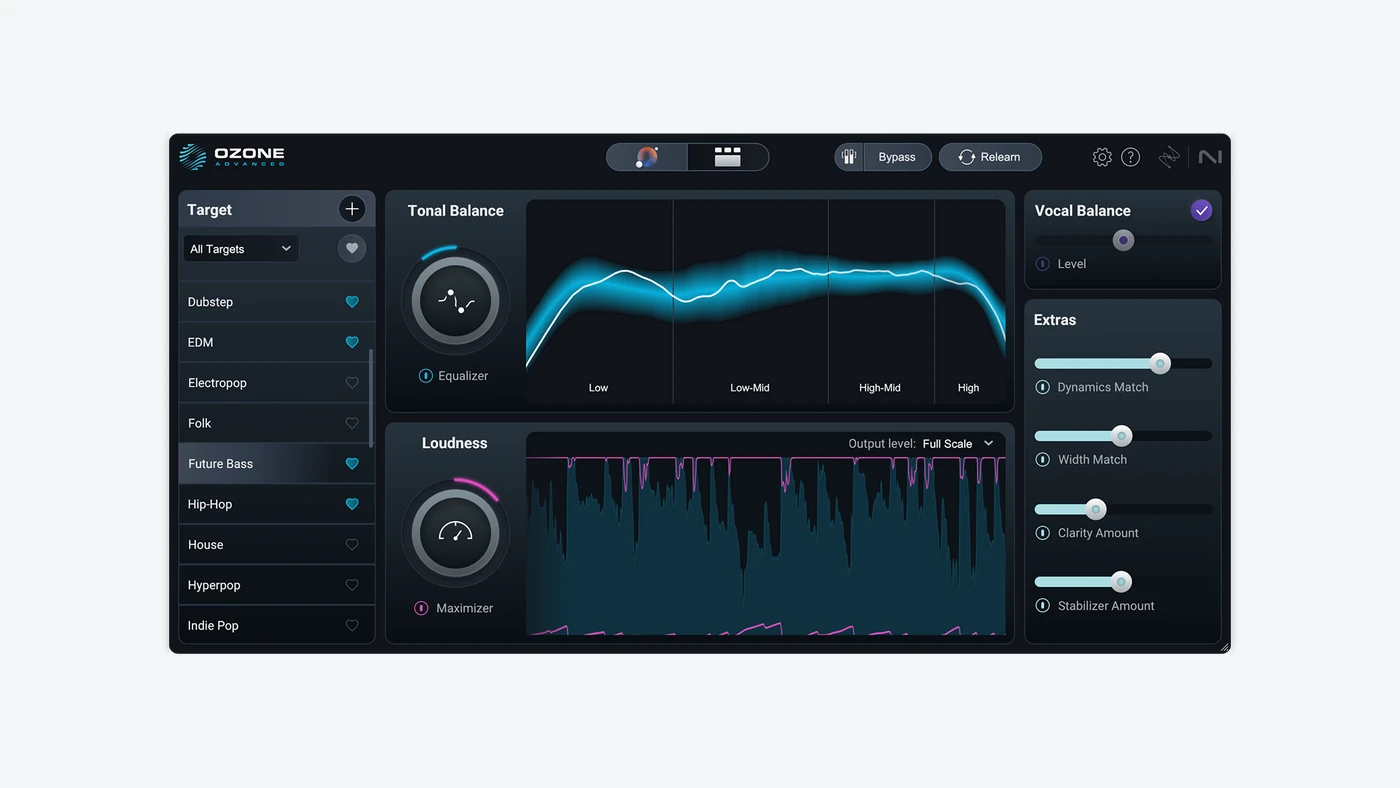
Ozone 12 Advanced brings EQ, dynamics, stereo tools and Maximizer limiting into a single mastering workflow, with component plugins also available for separate use. Its Master Assistant analyzes material to suggest processing. Advanced-specific tools include Stem EQ and Unlimiter, alongside other detailed correction modules. Stem EQ lets you address separated vocal, drum, bass and instrument content within a stereo mix.
My take: I would choose Ozone when I wanted a coherent environment for examining several mastering decisions together. Its assistant is most useful as a proposal: bypass a module, ask which problem it addresses, and keep it only if that change improves the track. That is a much better learning exercise than accepting the entire chain because it was generated automatically.
Advanced is not automatically the sensible purchase for every producer. If your work mainly needs conventional EQ and limiting, compare the Standard edition before paying for features you rarely use. Stem separation and transient reconstruction can also have limitations; an Unlimiter result is not a guaranteed recovery of the exact original performance. When the mix session is available, correcting that session is often the cleaner solution.
Try this: run Master Assistant on a representative loud section, then audition each proposed module at matched loudness. Pay particular attention to widening and brightening: an exciting first impression can become tiring across a full song. Check the complete track after the initial analysis, including fades and quieter passages.
3. FabFilter Pro-Q 4: my pick for precision mastering EQ
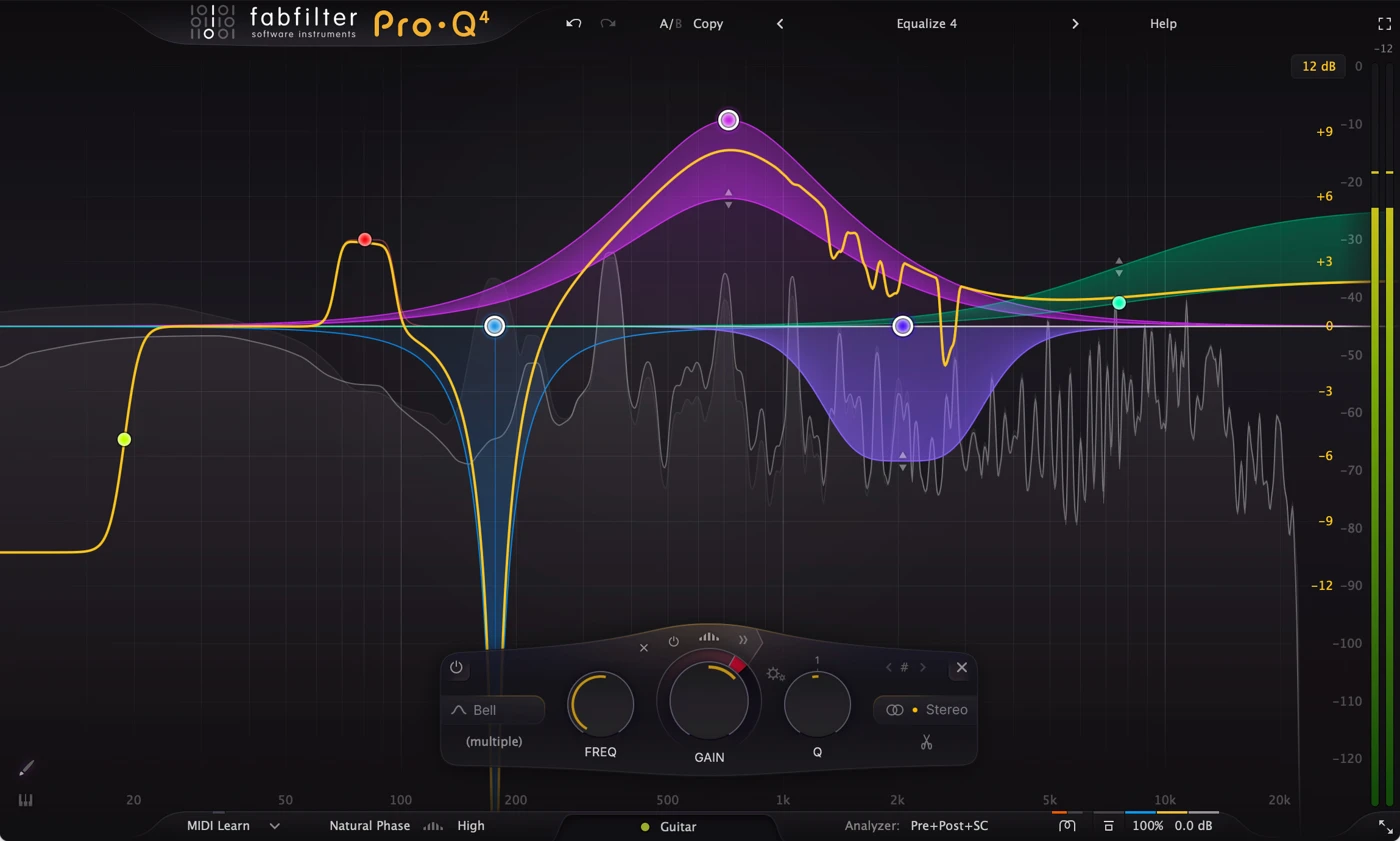
Best for: small tonal adjustments, dynamic frequency control and targeted stereo EQ decisions.
Pro-Q 4 offers static, dynamic and spectral EQ processing, per-band mid/side or left/right targeting and multiple phase modes. Its analyzer, band controls and adjustable display range help you work with the smaller changes that mastering often calls for. It is an EQ, so it still needs another tool when the job is final limiting.
My take: I would choose it for a mix that is already balanced but needs a careful adjustment to its overall presentation. A slightly heavy low-mid area or an upper range that becomes tiring only in the chorus is a more useful reason to add EQ than drawing a curve that looks like a reference track. Different arrangements are not supposed to produce identical spectra.
I would also avoid automatically selecting Linear Phase for “higher quality.” FabFilter explains that Zero Latency or Natural Phase suits most normal mixing and mastering tasks. Linear Phase can solve particular phase-related problems, but it introduces latency and can produce pre-ringing, especially with demanding low-frequency filters. The correct mode is a practical choice, not a prestige setting.
Try this: make one broad adjustment of around half a decibel, then compare at matched loudness. If a harsh range is only excessive in certain moments, try a restrained dynamic band instead of permanently cutting it. Return to the full mix after soloing a band; a frequency can sound unpleasant in isolation while remaining important to the song.
For a deeper look at the workflow, read our FabFilter Pro-Q 4 review.
4. LANDR Mastering Plugin PRO: my pick for quick AI-assisted mastering
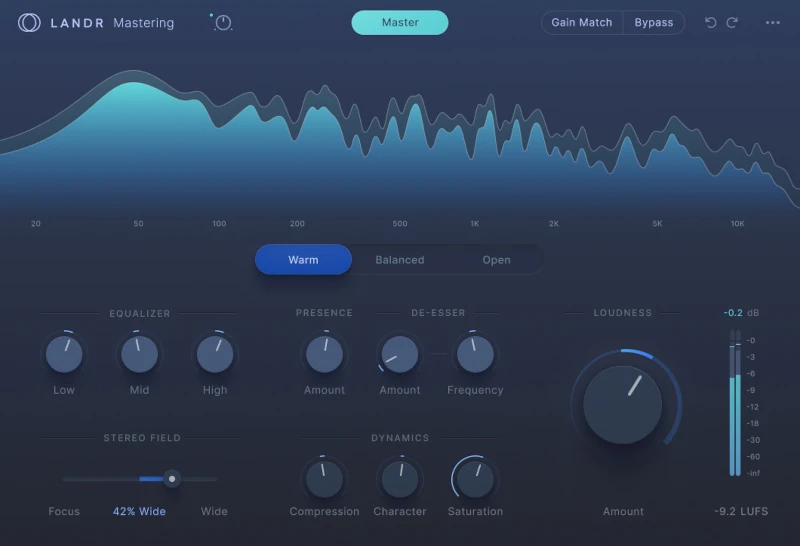
Best for: a quick mastering proposal that you can audition and adjust inside your DAW.
The LANDR Mastering Plugin PRO is distinct from LANDR's online upload-and-master service. It analyzes your track and provides Warm, Balanced and Open approaches, with controls for tone, dynamics, stereo width, loudness, saturation, presence and de-essing. Gain Match helps compare the processed result more fairly. LANDR offers a perpetual plugin license as well as access through relevant Studio plans.
My take: I would use it to quickly establish a second perspective on a finished mix, particularly when I wanted to compare a more restrained result with a brighter or denser interpretation. Having the processing inside the session is convenient when I am still making small mix revisions. Speed has practical value, provided it does not replace the final listening check.
The trade-off is that broader controls provide less direct access to individual processing decisions than a chain of dedicated EQs and dynamics tools. I would choose Ozone or separate plugins if I wanted to inspect and adjust every stage more precisely. AI assistance also cannot know whether a deliberately dark, narrow or highly dynamic sound is part of the artistic intention.
Try this: compare all three styles using Gain Match before turning up Loudness. Choose the direction that preserves the vocal, low-end rhythm and chorus contrast, then make one tone or dynamics adjustment at a time. Finish by checking the export independently rather than relying on the appealing sound of the louder preview.
5. Mastering The Mix LIMITER: my pick for guided limiting
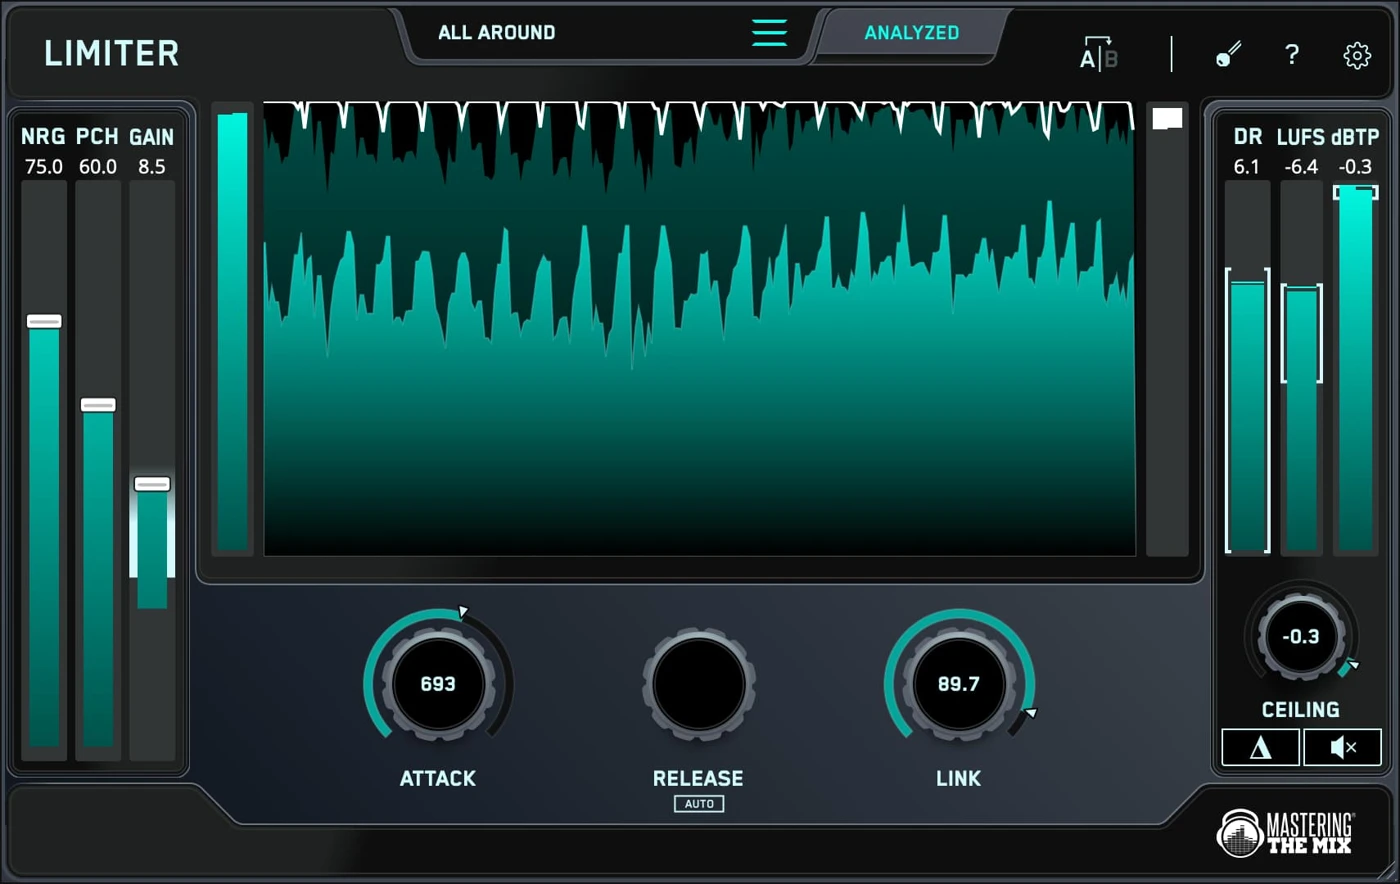
Best for: producers who want a dedicated limiter with analysis-based suggestions for its controls.
LIMITER analyzes your material and presents targets for settings such as input gain, attack, channel linking and ceiling. It includes loudness and true-peak metering, an adaptive release option, an NRG control for harmonic drive and a PCH control for transient enhancement. It is a guided dynamics processor, not a complete mastering suite.
My take: I would shortlist it for someone who understands what limiting does but feels unsure how to begin setting it up. Suggested positions turn a blank interface into something you can audition. The useful skill is learning when to overrule those suggestions: maintaining the stereo image or preserving a fragile transient may matter more than the proposed loudness.
I would not call it automatically distortion-free or assume it is always the cheapest professional option. Offers change, and every limiter can sound inappropriate when pushed too far. The NRG and PCH controls also make meaningful sonic changes; they should earn their place rather than being treated as mandatory upgrades to the sound.
Try this: analyze the loudest section, begin with the suggested clean-gain and timing settings, and leave additional drive or punch processing low. Compare a slightly lower gain setting at matched loudness. If the lower setting preserves more movement without weakening the song, the more conservative master may be the better choice.
6. TDR Nova: my pick for free dynamic EQ
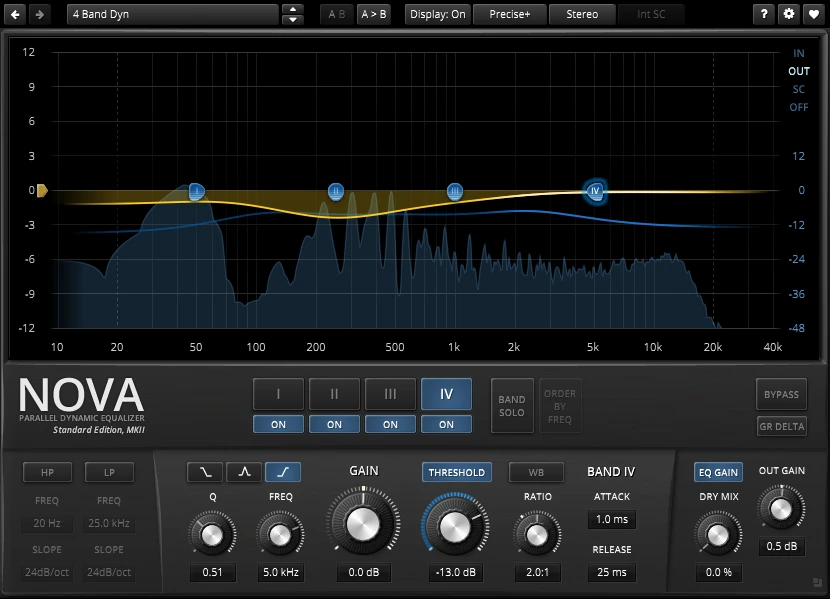
Best for: frequency-specific control on a budget, especially when a tonal problem is intermittent.
The free standard edition of Nova combines four dynamic EQ bands with high-pass and low-pass filters. Each band can apply level-dependent processing, so you can address a frequency range when it becomes excessive instead of always making the same cut. Nova GE is a separate paid edition; the free Nova discussed here is not a trial.
My take: I would start here when a master has a particular range that jumps forward in busy sections, but I do not need a large paid EQ toolkit. A restrained dynamic band can leave the quieter section's tone intact while controlling the moment that causes trouble. That is a concrete mastering task a free plugin can handle.
The limitation is that Nova does not replace final limiting or loudness measurement. It is also easy to build several moving bands before deciding whether one broad static EQ move would be simpler. If a single vocal or instrument is causing the problem and the mix is available, processing that source directly usually gives you more precise control.
Try this: identify one problem range by listening in context, set a broad enough band to address it, and lower its threshold until the troublesome passages trigger modest reduction. Check the quietest relevant section as well. The aim is consistency across the song, not a visibly active dynamic curve at every moment.
7. Shadow Hills Mastering Compressor Class A: my pick for deliberate character
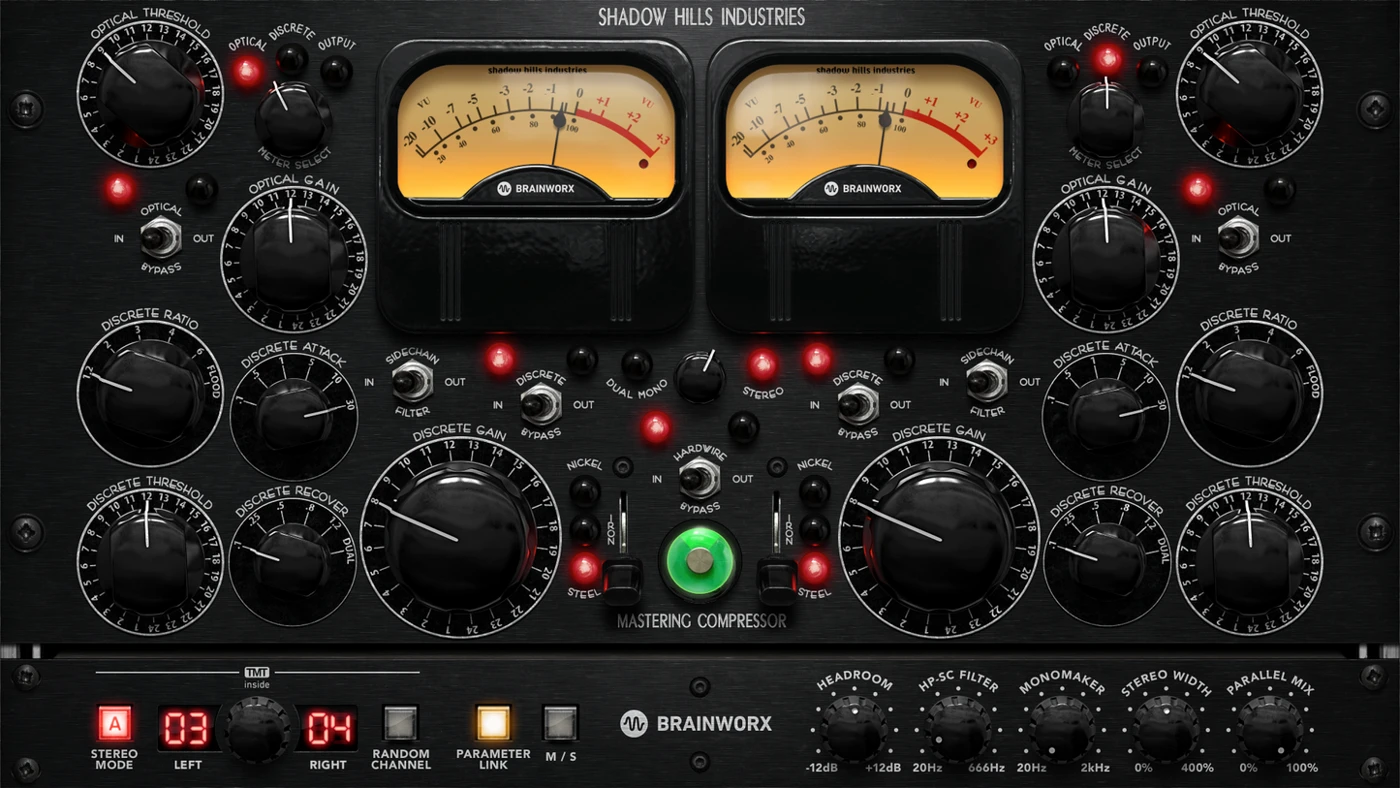
Best for: producers who specifically want two-stage compression and modeled hardware character.
This recommendation is the Brainworx native Class A version distributed by Plugin Alliance. It combines separate optical and discrete compression sections, selectable transformer models and plugin additions such as parallel Mix, sidechain filtering, mid/side operation and stereo controls. It runs as a native plugin without requiring an Apollo interface.
My take: I would audition it when an already convincing mix needs a particular kind of density or movement, rather than routine cleanup. Its two compression sections allow different jobs within one processor, but I would begin with one stage so I could hear exactly what it contributes. Adding an impressive-looking compressor is not the same as improving the master.
This is the least essential purchase on my starter shortlist. The interface is detailed, its character can be unnecessary, and a clean master may benefit more from a simpler compressor or no compression at all. Optical and discrete stages are not a blend of optical and vari-mu circuits, and this native product should not be confused with a UAD-specific license.
Try this: begin with modest compression in one section, match the output level and listen to the relationship between drum impact and sustained instruments. Then compare transformer options at comparable loudness. Only introduce the second stage if it addresses a separate audible need. Check mono compatibility after any mid/side or width adjustment.
For cleaner alternatives and practical bus-compression advice, see our compressor plugin guide.
8. Youlean Loudness Meter 2 Free: my pick for an independent final check
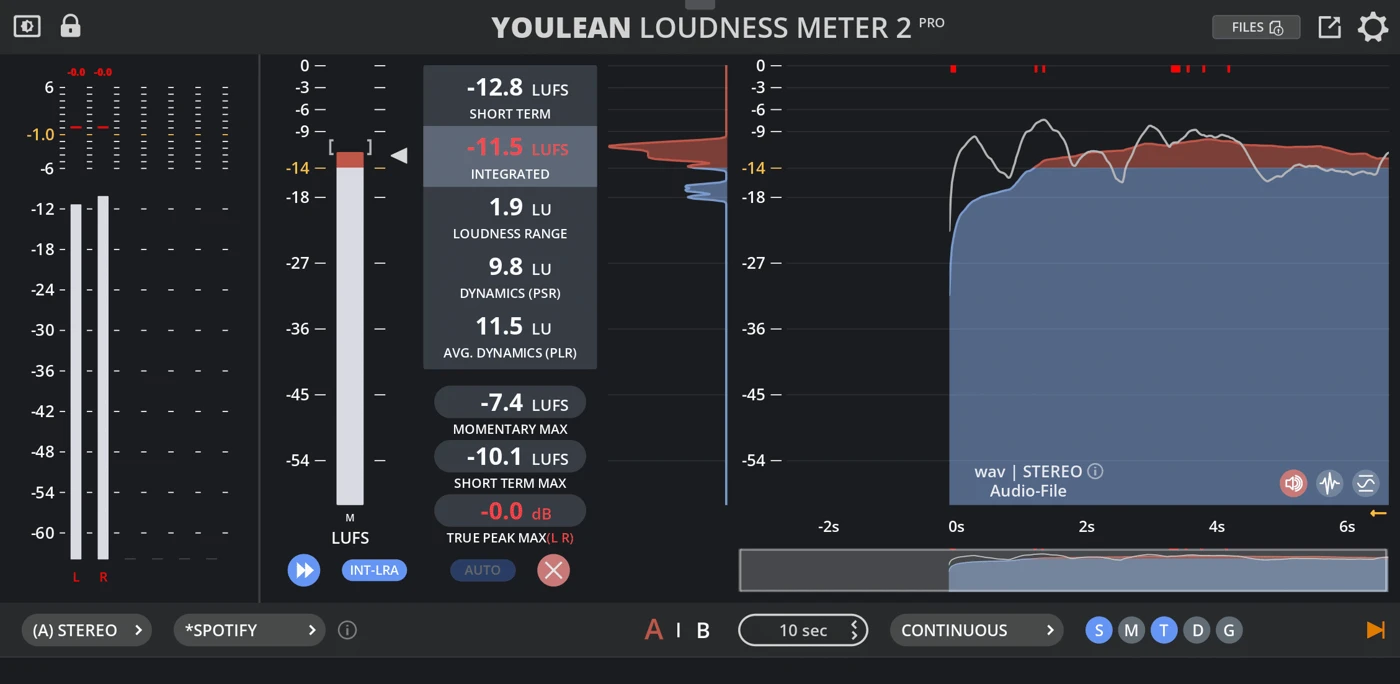
Best for: checking loudness, true peaks and the behavior of the completed master.
Youlean Loudness Meter 2 Free provides integrated loudness, true-peak and loudness-range readouts with a resizable interface and history display. It is a meter, so it does not compress, limit or make the track louder. The paid PRO edition adds conveniences including drag-and-drop file analysis, exports and additional presets; those extras are not required for basic playback measurement.
My take: a separate meter is one of the most useful additions to a small mastering setup. It helps you distinguish a loud chorus from the integrated loudness of the whole track, and it gives you a check after the processing rather than relying only on a limiter's display. Understanding the measurement is more valuable than chasing a streaming preset.
The limitation is simple: correct numbers do not prove the master sounds good. A flat, tiring mix can sit comfortably below a peak ceiling. I would use the meter to inform a listening decision, then compare suitable references at matched level and check other playback systems.
Try this: place the meter after the complete chain, reset it and play the song from beginning to end. Then import the exported file into a clean session and repeat the measurement. With the free version, play the file through the plugin; drag-and-drop analysis is a PRO feature. Listen to the export's start, ending and busiest section as part of the same check.
A practical mastering plugin chain
A useful starting chain is corrective EQ → optional compression or color → final limiter → loudness meter. This is a practical example, not a rule that every song needs every stage. Ozone or LANDR can handle multiple stages internally, so adding another full processing chain afterward can create unnecessary duplication.
Use high-quality references that fit the arrangement and genre, then level-match them before comparing tone and impact. If the reference is simply louder, it can seem fuller even when its balance is not more suitable for your track.
LUFS, true peaks and streaming: what to aim for
LUFS measures loudness; dBTP measures true-peak level. Integrated LUFS describes the measured program over time, while short-term loudness helps examine sections. True-peak measurement estimates peaks in the reconstructed waveform, which can exceed the highest stored sample value. These are different checks, and neither replaces listening.
Spotify documents a Normal playback setting of -14 LUFS and recommends targeting -14 integrated LUFS with true peaks below -1 dBTP. For masters louder than -14 integrated LUFS, its guidance recommends keeping true peaks below -2 dBTP to reduce encoding distortion. See Spotify's loudness-normalization guidance for the current details.
My practical approach: distinguish a platform's guidance from the artistic loudness choice and the delivery specification you actually need to meet. Do not force every song into one loudness value or assume more limiting guarantees a stronger normalized result. Compare the impact at matched level and leave sufficient peak headroom for the chosen destination.
Oversampling and true-peak limiting can improve control, but they are not permission to push indefinitely. After export, measure again. If delivering a reduced integer bit depth, handle dither deliberately at the appropriate final conversion rather than adding it repeatedly throughout the chain.
Which mastering plugin should you buy first?
For a small manual toolkit, I would shortlist Pro-L 2 first if you lack a suitable limiter. Pair it with an EQ you already understand and a loudness meter. Add Pro-Q 4 when its dynamic, spectral or stereo workflow solves a problem your existing EQ handles poorly.
For an integrated workflow, compare Ozone 12 Standard and Advanced. Advanced makes sense when its additional correction tools earn their cost. LANDR PRO is the more direct choice when you value a quick AI-generated proposal over detailed module-by-module editing. Mastering The Mix LIMITER sits between those approaches as a focused processor with useful setting guidance.
For a free start, use Nova, Youlean Free and a capable stock limiter. Confirm what that limiter provides, including whether it has true-peak control. Shadow Hills is an optional character purchase after the core workflow is working, rather than a requirement for a professional result.
Frequently asked questions about audio mastering plugins
What is the best audio mastering plugin for beginners?
Ozone is my shortlist choice for a producer who wants an editable suite with assistant guidance. Compare Standard before choosing Advanced. For learning the stages separately, start with your DAW's tools, TDR Nova and a loudness meter, then add a paid limiter when you identify a practical need.
Can I master a song using free plugins?
Yes. Nova can handle tonal and dynamic-EQ adjustments, Youlean Free can measure loudness and true peaks, and a suitable stock or free limiter can handle final peak control. The result depends on the mix, monitoring and decisions; free does not automatically mean unsuitable for release.
Is Pro-Q 4 enough to master a track?
It can handle tonal processing, but it is not a final limiter or complete mastering suite. If your master needs peak-ceiling control, use a suitable limiter as well. Measure the finished file rather than assuming the EQ alone handles every delivery requirement.
Should every master be exactly -14 LUFS?
No. Spotify provides -14 integrated LUFS guidance and normalizes Normal-mode playback around that level, but songs, artistic choices and delivery requirements differ. Avoid choosing the level by habit. Check the destination's specifications, preserve the intended dynamics and compare normalized or level-matched results.
Do mastering plugins fix a bad mix?
They can improve overall balance and dynamics, but broad processing affects multiple elements together. When possible, fix a problematic vocal, bass or drum in the mix session. Advanced separation tools offer additional options without guaranteeing the same result as editing the original tracks.
Does Shadow Hills Class A require UAD hardware?
The Brainworx native Plugin Alliance edition recommended here runs without an Apollo interface. Other platform-specific products have their own requirements. Buy the intended native edition and check its supported operating system, format and activation process.
Is Youlean Loudness Meter 2 Free enough for mastering checks?
It covers essential loudness and true-peak playback measurement. PRO adds workflow features such as drag-and-drop analysis and report exports. Use the free version by playing the completed file through the meter in your DAW.
Should I use two limiters on the master?
Only when you have a reason to split the work between them and can hear the benefit. If Ozone, LANDR or another chain already performs limiting, adding a second limiter automatically can reduce dynamics further. One well-set limiter may be all the song needs.
How this mastering shortlist was researched
Versions, core functions, free-versus-paid editions and native product requirements were checked against developer documentation and retailer listings. Recommendations and listening exercises are editorial judgments, not claims of a controlled hands-on comparison. The images show actual plugin interfaces, with the Youlean PRO illustration labeled separately from the free edition.
Developer references: FabFilter Pro-L 2, Ozone 12 Advanced, FabFilter Pro-Q 4, Pro-Q phase modes, LANDR Mastering Plugin, LIMITER manual, TDR Nova, Shadow Hills Class A and Youlean Loudness Meter.
![[background image] image of recording equipment (for a musician & band)](https://cdn.prod.website-files.com/68efa70811edd8e5af30a90d/6acd43b8998701bbde84e11a_Best%20Export%20Settings%20for%20FL%20Studio.png)
![[background image] image of recording equipment (for a musician & band)](https://cdn.prod.website-files.com/68efa70811edd8e5af30a90d/6acd3f9347bd0dd62b202621_ShaperBox%203%20vs%20Infiltrator%202.png)
![[background image] image of recording equipment (for a musician & band)](https://cdn.prod.website-files.com/68efa70811edd8e5af30a90d/6acd3d99fa68785e0f58960e_Kontakt%208%20vs%20Decent%20Sampler.png)