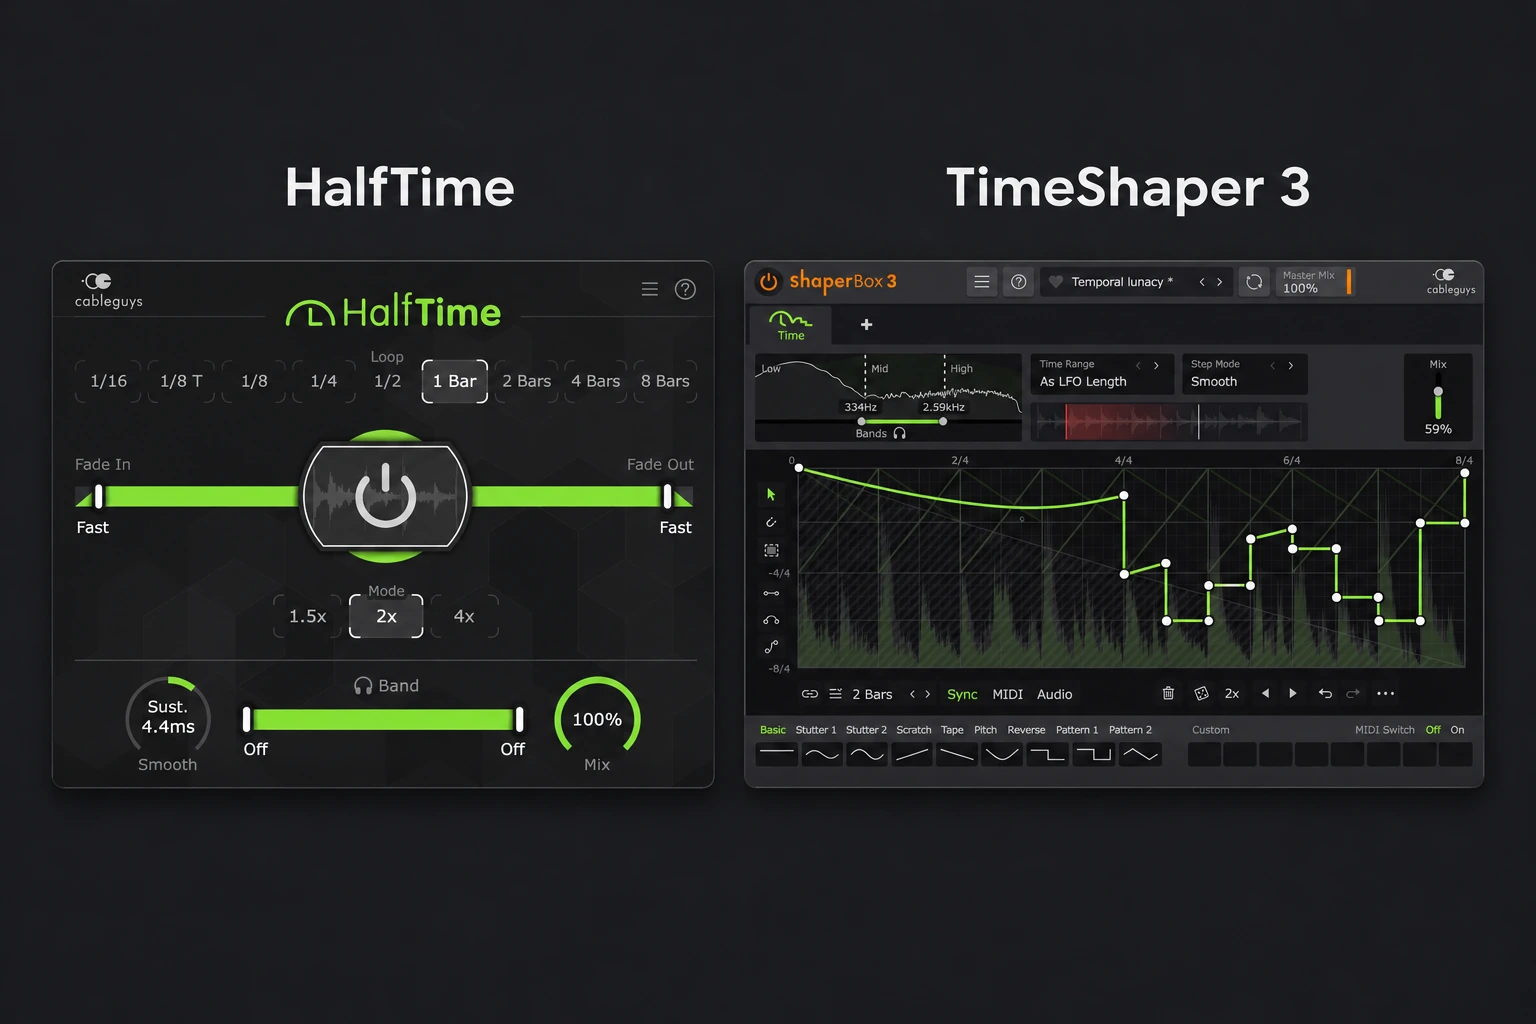

A slower melody can transform a beat, but a plugin that produces that sound quickly is a different purchase from an editor for precise time manipulation. HalfTime is our first choice for a repeatable slowdown with a few direct controls. TimeShaper 3 makes more sense when you need to place a stutter, reverse or stop at a specific point in the phrase. If you already own TimeShaper through ShaperBox, try its half-speed waves before paying for another route to that result.
Both Cableguys plugins can give a piano loop that slower, lower-pitched feel. The choice becomes clearer when the effect needs to change within a phrase: HalfTime gives you a small set of controls for a recurring slowdown; TimeShaper lets you design what the playback does moment by moment.
Quick Comparison
| Feature | HalfTime | TimeShaper 3 |
|---|---|---|
| Best for | Quick, repeatable slowdowns | Custom time edits, fills and transitions |
| How you edit | Speed mode, loop length, fades, Smooth and Mix | Preset waves or a curve you draw yourself |
| Frequency control | Choose a range to slow with Band Split | Use different time curves for lows, mids and highs |
| Timing | Loop-based playback with an automatable Power control | Tempo sync, MIDI triggering or audio triggering |
| Licence | Separate effect plugin | Individual Shaper or part of a bundle, running inside ShaperBox 3 |
| U.S. price reference | $12 | $29 for TimeShaper alone |
HalfTime: find the slower version of your melody
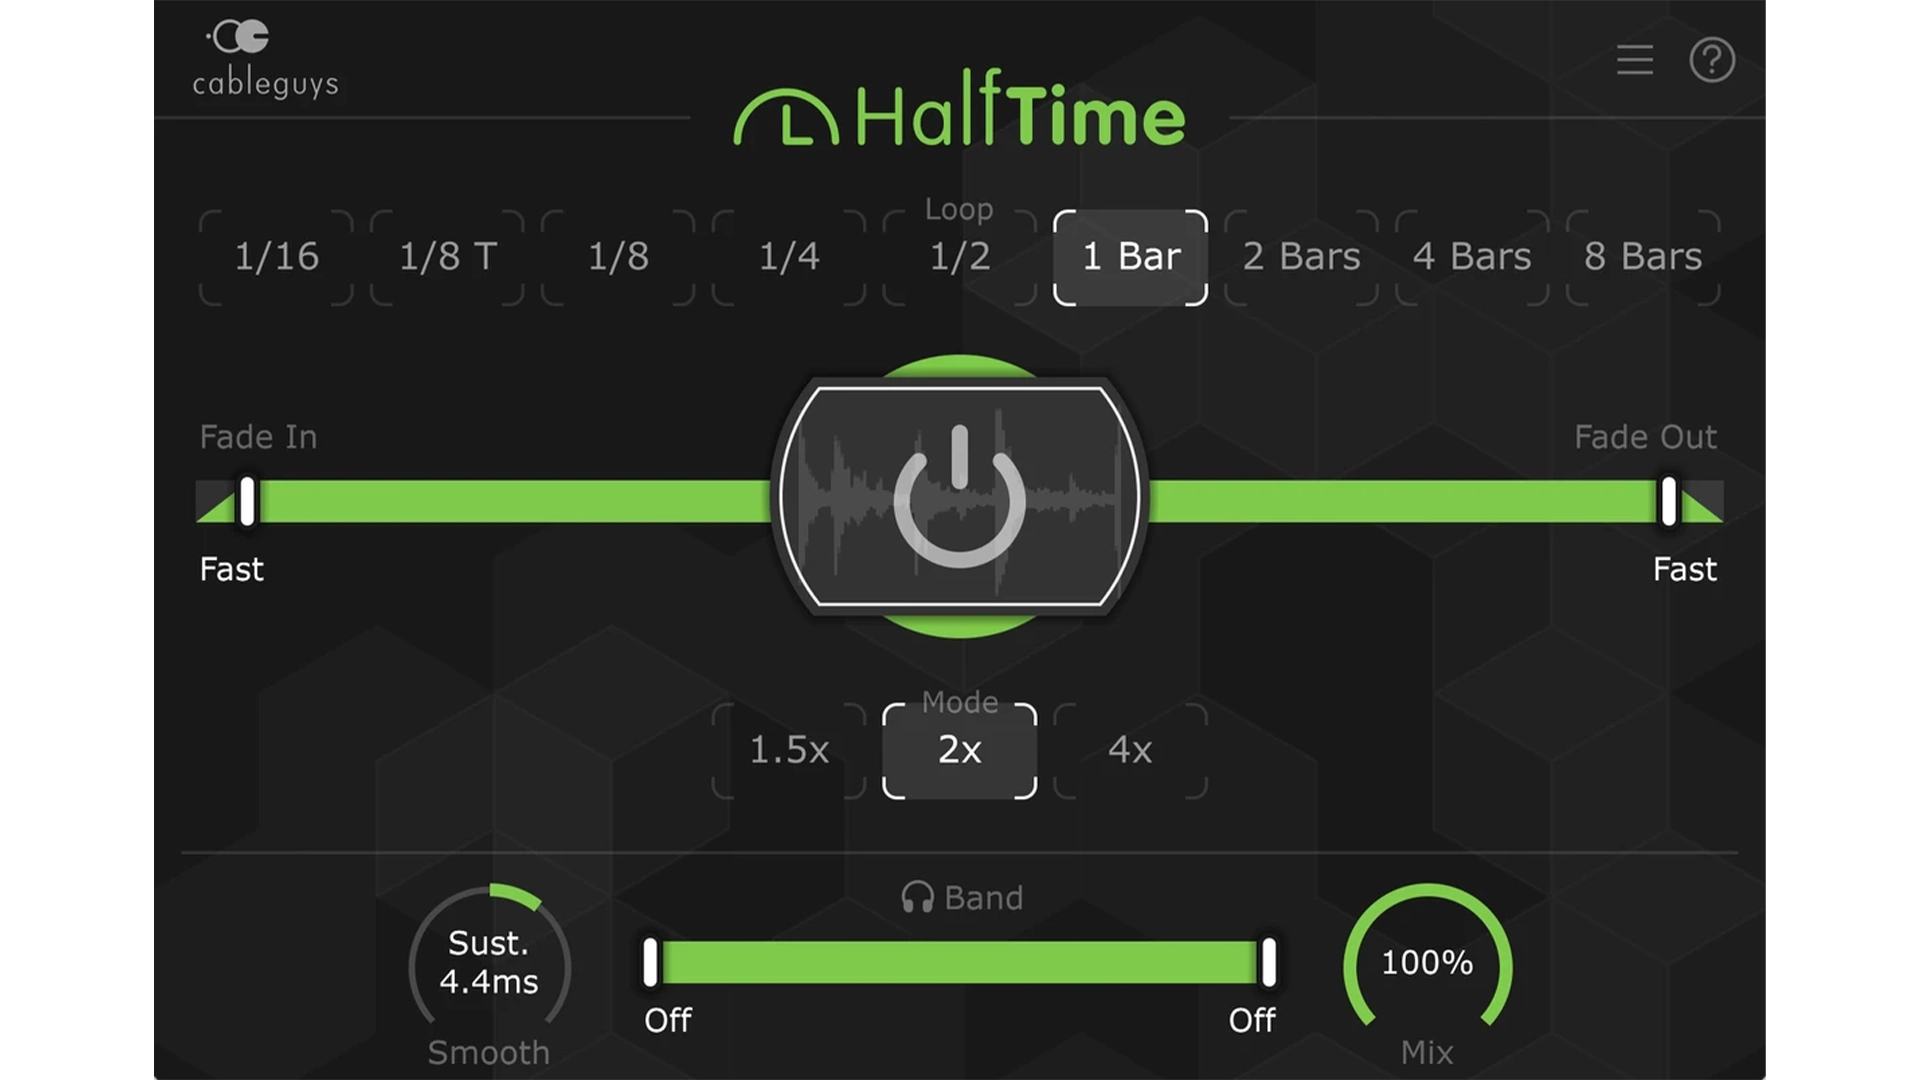
Start with 2x mode: playback runs at half speed and drops an octave. A one-bar source needs two bars to play out at that rate, so compare Loop lengths with the intended phrase boundary in mind. Short windows recycle fragments before the whole source has played; they can change the groove as well as the pitch.
On a piano or bell melody, turn Mix down if you want some of the original attack and pitch to remain. If the dry and slowed notes sound cluttered together, use the fully processed version on a duplicate and bring it in only for selected sections. Hear the transition back to the original part before committing to the effect.
The 1.5x and 4x modes give you other rates, and the fades help bring the effect in or out. Band Split is worth trying when slowing the whole sound makes it feel too heavy. On a loop with both bass and bright notes, process only the area that benefits and check what happens to the groove.
TimeShaper 3: put the edit on the beat you choose
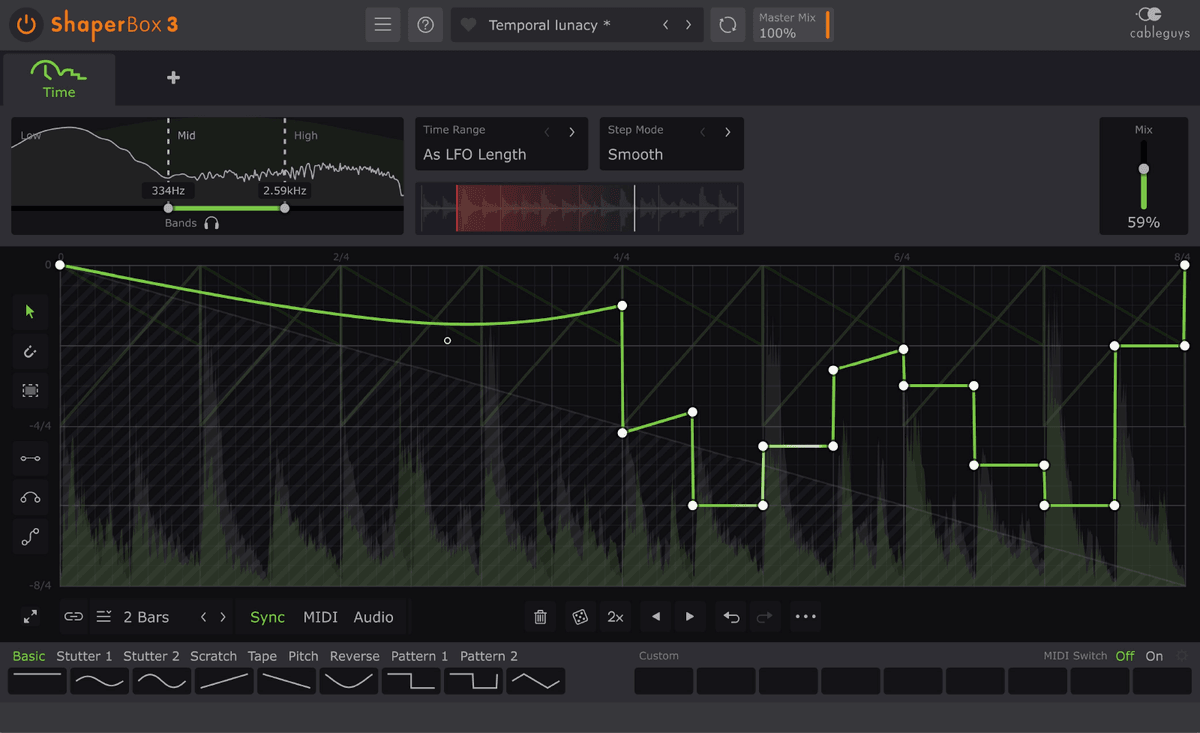
TimeShaper stores incoming audio and uses a curve to control where it reads from that buffer. Start with a preset wave to hear how the editor works, then change one part of the curve. That is a quicker way to learn what the graph does than starting with an elaborate pattern.
Imagine a two-bar percussion loop that works as it is until the very last beat. Draw or adapt a stutter for that spot and keep the rest of the phrase straightforward. If the fill buries the kick, try applying it only to the upper frequencies or put the effect on the percussion track before it reaches the drum bus.
For a reverse or tape-stop transition, start playback before the edit so TimeShaper has incoming audio in its buffer. It cannot play material that has not arrived yet. Check both the approach and the first beat after the effect, then render the transition with that lead-in intact.
A two-bar melody: set HalfTime's Loop deliberately
HalfTime continuously receives live audio. Its Loop setting determines the output cycle, rather than promising to replay every incoming note. At 2x with a one-bar Loop, it stretches the first half of that input cycle across the full bar and leaves the later input material out of that cycle. That explains why changing Loop can replace part of the melody instead of merely making it deeper.
For a two-bar phrase you want to hear completely at half speed, Cableguys recommends a four-bar Loop. Make room for that four-bar result in the arrangement. If the bass changes chords after two bars while the melody is still halfway through its slowed phrase, the mismatch is an arrangement problem rather than a faulty plugin setting.
- Begin with 2x and a four-bar Loop. Use a two-bar piano or bell phrase with a clear final note. Set Mix fully wet so you can identify which notes survive the processing.
- Play from the phrase start. Listen through all four output bars. Confirm the final note lands where the following section can accommodate it.
- Compare a shorter Loop. Try one bar without changing the mode. Now assess the new fragment pattern as its own musical idea. Keep it if the rearranged groove works; do not describe it as the full original phrase slowed down.
- Decide whether to blend. Reduce Mix only after choosing the timing. The original and slowed melody may contain different notes at the same moment, so a middle blend can make the harmony more crowded.
- Print the useful variation. Render with enough preceding playback for the effect to receive its source, and retain the phrase ending. Label the resulting clip so you can arrange it as an intentional four-bar variation.
In 2x mode the pitch drops an octave, so the note names remain related even though their timing changes. Other speed modes need another harmony check. A heavier low register can also collide with an 808 without introducing a wrong note: reduce competing low content or choose a higher source register before assuming the slowdown itself is unusable.
Smooth and fades address different moments
HalfTime's Smooth control changes how the repeated playback boundaries behave. If a click appears every time a fragment restarts, make a small Smooth adjustment and replay that boundary. Stop when the click is controlled; excessive smoothing can soften the very attack you wanted to keep.
Try the Sustain side for connected melodic material and compare the Percussive side when drum attacks lose definition. More extreme Smooth settings become audible effects, so they are creative alternatives rather than increasingly accurate repairs. A small change is easier to evaluate when Loop and Mode stay fixed.
Fade In and Fade Out govern the transition when the effect is switched through its Power control. Use those when the musical entrance needs to sink into the slowed version instead of changing abruptly. A long fade can blur the new downbeat; a short one can preserve contrast. Listen to the entrance and exit as separate events.
Multiband: one selected range or separate patterns?
HalfTime can slow a chosen frequency range. That is enough if the goal is simply to leave the low end alone while slowing the brighter part of a sample. TimeShaper becomes more useful if two ranges need different movements, such as a repeat on the highs and a slower midrange.
Set up the full-range effect first. Split into bands only after you hear a specific problem or have a clear idea for the second pattern. Separating the ranges gives you control, but also makes it easier to build an effect that sounds busier than the music needs.
Read TimeShaper's graph before drawing the fill
The horizontal axis is the pattern's time; the vertical axis is its offset into the audio buffer. A flat segment keeps a fixed offset, allowing playback to move forward at its normal rate from that earlier position. It does not mean the sound is frozen. Changing the offset as the pattern progresses changes how the source is read.
The diagonal buffer-reference line helps explain stops and reverses. A segment parallel to that reference holds the playback position; a steeper movement in that direction reads backwards. Start with a factory wave and adjust one segment while listening. That connects the graph to an audible event before you try to draw a whole transition from scratch.
Time Range controls the scale of the offset axis. With it linked to LFO Length, changing the pattern length also changes that scale. If a previously subtle edit suddenly becomes a large jump after a timing change, inspect Time Range before redrawing every point. Use a small range for small movements and a longer range when the effect needs to reach further into earlier audio.
A final-beat stutter without changing the whole drum loop
For a suggested exercise, work on a percussion track and set the LFO to a two-bar cycle. Begin with a straightforward wave outside the final beat. Adapt a stutter pattern only within that ending, leaving the first part of the phrase intact. Keep Step Mode on Smooth while finding the repeat so hard steps do not distract you with clicks.
Replay from the start of the two-bar phrase. First listen to which hit is being repeated, then to when the repeats fall. If the wrong hit appears, change the buffer offset. If the right hit arrives at the wrong musical subdivision, change the pattern's timing. Those are different edits, and altering both at once makes the fill harder to control.
Check the final repeat against the next kick. Shorten the fill or reduce its contribution if it weakens the arrival. If only the cymbals should repeat, apply the pattern to the upper band and keep the low band straightforward. That preserves the kick's role while the bright layer supplies the transition.
MIDI triggering is useful when the fill should start at selected positions rather than on every cycle. Audio triggering is useful for a pattern that responds to incoming hits, but extra transients can restart it unexpectedly. Begin with tempo sync, then add a trigger only if the arrangement needs that behaviour. Verify the exact passage, including quieter hits and gaps.
Slowdown, reverse and clean time stretching are different jobs
These time effects deliberately change playback movement and often pitch with it. If your goal is simply to fit a vocal to the project tempo while preserving its pitch, compare your DAW's time-stretching workflow first. A convincing creative slowdown and a transparent tempo correction are different targets.
For a reverse swell at one fixed location, a rendered clip can be easier to finish: you can trim its start and see exactly where the attack lands. TimeShaper becomes more useful when the movement needs to vary, retrigger or differ across frequency ranges. HalfTime is convenient when the recurring lower, slower version is already the musical idea.
Before bouncing either effect, replay from before the edit and listen through its ending. Compare the exported clip with the live passage. If the first event differs, investigate the buffer's lead-in and the render range before changing the sound-design settings.
Which one fits your project?
- Trap melody variation: use HalfTime to audition a slower verse or breakdown. Check whether the changed pitch still works with the 808 and chords.
- Glitch fill: use TimeShaper when you need the repeats to hit exact subdivisions or want to combine several movements in one phrase.
- Triggered edit: consider TimeShaper when you want MIDI notes or audio transients to restart the pattern. Test it on the actual passage, including gaps and quiet hits.
- One fixed edit: try your DAW’s resampling or clip editing first if the phrase is already printed and you only need to change it once.
FL Studio users can also compare the stock option in HalfTime vs Gross Beat. For other effects in the rack, see our ShaperBox 3 review.
Do you need HalfTime if you own TimeShaper?
Usually, we would start with the plugin you have. Set up one half-speed wave in TimeShaper and save it as a starting preset. If that gets you to a usable melody variation quickly, there is little reason to buy another tool for the same job.
HalfTime still makes sense if you repeatedly want its direct loop, fade and Smooth controls without opening the curve editor. The case for owning both is convenience. If you want more Shapers, compare the actual bundle contents and account upgrade price before buying individual modules.
Price references and licensing
The $12 HalfTime and $29 TimeShaper amounts above are U.S. reference prices recorded on November 2, 2026, not freshly checked sale offers. Check the linked current USD listing and the final regional checkout total. TimeShaper is an individual licensed Shaper running in ShaperBox 3; buying it does not unlock every other Shaper. Compare your account upgrade offer with the modules you will actually use.
Conclusion
HalfTime is the better first buy for a producer who keeps reaching for the same slowdown. TimeShaper 3 is worth the extra cost when the time edit itself is part of the composition. Try the same melody and drum phrase in both. Pick the effect you can set up and revise without breaking the flow of the session.
Sources
Features rechecked November 20, 2026; U.S. price references recorded November 2, 2026 against Cableguys’ HalfTime page, TimeShaper page and ShaperBox manual. The HalfTime manual explains its Loop and Smooth behaviour. This comparison uses documented features and suggested exercises, without a controlled listening or CPU benchmark.


