

When the mix bus needs a little control, TDR Kotelnikov Free already gives you separate release controls for short peaks and sustained material. We’d start there if the goal is to smooth a stereo mix while keeping the snare and bass in balance. The $50 Gentleman’s Edition makes more sense when you repeatedly need level-matched bypass, a gain-reduction cap or control over how much different frequencies are compressed. Try both versions on the same passage before paying for any of those extras.
The feature comparison is based on Tokyo Dawn Labs’ documentation, and U.S. pricing was checked November 10, 2026. The settings are starting points for comparing the editions in your DAW.
TDR Kotelnikov Free vs GE Quick Comparison
| Control or task | TDR Kotelnikov Free | TDR Kotelnikov GE |
|---|---|---|
| Regular U.S. price | Free | $50 at Plugin Boutique |
| Transparent bus compression | Peak Crest, Soft Knee, separate Peak and RMS release | The same core controls plus additional timing and shaping options |
| How strongly bass triggers compression | Low Freq Relax with selectable detector slopes | Low Freq Relax with more detailed slope adjustment |
| How much different frequencies are compressed | Wideband ratio control | Frequency Dependent Ratio adds a frequency curve |
| Level-matched checks | Manual level matching, Bypass and Delta | Equal Loudness Bypass, automatic output Trim and Delta |
| Extra control over gain reduction or triggering | Threshold, Ratio and internal detection | GR Limit and an external sidechain in compatible hosts |
How far can you get with Kotelnikov Free?
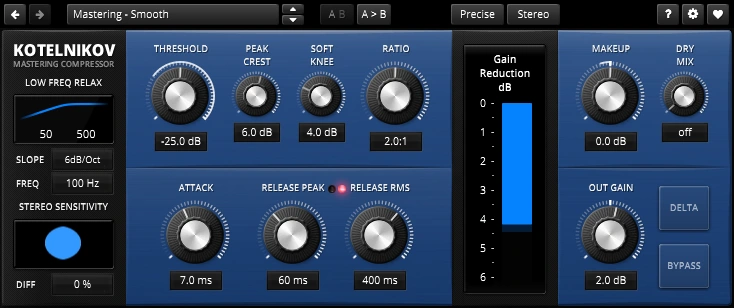
Both editions are designed around the same approach to wideband compression. Release Peak controls recovery after short events such as snare hits. Release RMS gives sustained material such as bass or pads its own recovery time. The release indicators show which path is active. Peak Crest changes how readily short peaks trigger compression relative to the sustained part of the signal. You can work on how the bus reacts to percussion without making the same adjustment to the body of the mix.
Set up the same chorus in both editions
Use a chorus with a strong kick, a snare and a bass note that lasts across more than one hit. Put the versions on separate copies of the mix and audition one copy at a time. In both, start with a 1.5:1 ratio, 20 ms Attack, 60 ms Release Peak and 220 ms Release RMS. Keep Peak Crest at the same moderate setting on both, around 6 dB as a starting point. Lower Threshold until the louder moments produce about 1 to 2 dB of reduction. Match Output Gain by ear or meter before switching between the copies.
Listen to the snare and the vocal immediately after it. If the snare loses its first edge, try a slower attack or raise Peak Crest a little to make the peak path less sensitive. If the whole mix stays down after a sustained bass note, compare a shorter Release RMS with a slightly higher Threshold. Make one change at a time so you can tell whether the problem is recovery time or simply too much compression.
Use Delta to hear what the compressor is taking away
Turn on Delta and listen for what dominates the difference signal. If it follows each kick much more than the rest of the passage, try Low Freq Relax before touching the timing again. Turn Delta back off to make the decision in context. A busy difference signal can still produce a good result in the mix, so treat it as a way to find what changed. The free edition’s Bypass and output control are enough to make this comparison manually.
If the free edition already gets you to the amount of movement you want, stay with it. That is a complete workflow for light stereo-bus compression, and it gives you a useful baseline if you later try GE.
Try the free edition on a drum bus before upgrading
For a drum-bus check, start around 2:1 and aim for only a few dB of reduction. Listen to the snare’s initial edge and the room sound afterward. If the room stays suppressed, check which release indicator is active before changing a time.
Save the setting to A and copy it to B. Raise Peak Crest slightly in B without changing the releases, then compare at the same loudness. That isolates peak sensitivity from recovery time; keep the version that supports the groove when bass and vocals return.
GE makes level matching easier when you compare small changes
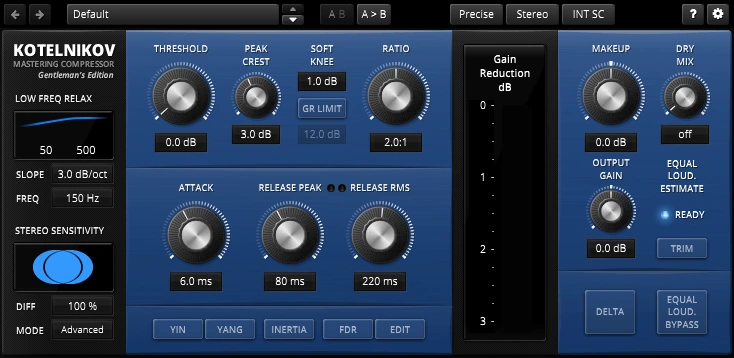
If you compress a mix by a decibel or two, even a small difference in output volume can make the louder version feel better. The free edition lets you handle this with Output Gain. GE adds a loudness estimate and two ways to use it. Trim adjusts the processed output toward the estimated input loudness. Equal Loudness Bypass adjusts the bypassed signal to make the comparison easier at the current processed output level.
Compare the verse and chorus without chasing a gain knob
Start with the chorus loop and watch the indicator near Trim. Wait for green or blue, then try Equal Loudness Bypass. Listen for whether the vocal stays more stable or the drums have lost too much impact. Release bypass and play the verse before you decide. If you change the threshold or move to a substantially different passage, give the estimate time to settle again.
This is the first GE feature we’d pay for if we were comparing subtle compression across several mixes. For a single bus in an occasional session, matching the free version manually can be quick enough. Either way, make the choice with the rest of the mix audible and at a level you can compare comfortably.
Low Freq Relax and FDR solve different bass problems
Low Freq Relax changes the detector. It reduces how much the low end contributes to the signal driving compression, while the bass remains in the audio path. Both editions have it. Frequency Dependent Ratio, or FDR, changes how strongly different parts of the frequency range are compressed once gain reduction is happening. GE adds this second control when you want the compressor to react to the mix and still preserve more movement in a chosen frequency range.
Start with the detector when the kick ducks the whole mix
Play a passage where each kick makes the vocal or cymbals sink slightly. In Free, set Low Freq Relax to a gentle slope and try a frequency around 100 Hz. Move it while the same kick and bass loop plays. Stop once the rest of the mix stays steady enough. If the kick suddenly jumps forward, dial back the adjustment. Use the same starting point in GE so you can hear whether finer slope control helps with that particular beat.
Try FDR when the detector responds well and the bass still feels too held

Keep the detector setting that already works. In GE, turn on FDR and open Edit. Try a broad shelf and move its frequency toward the area occupied by the bass, around 100 to 150 Hz as a starting point. Adjust Amt while looking at the graph until the low end is a little closer to 1:1 than the mids. Check that you moved the intended side of the curve. FDR reduces ratio relative to the main Ratio setting, so start with a small adjustment.
Listen to a sustained bass note while the mids are being controlled. Toggle FDR at a matched level and see whether the note breathes a little more without making the chorus bottom-heavy. The audible effect increases as gain reduction increases, so also listen to a quieter verse. If the change only helps during the loudest moments, decide whether that is exactly what the track needs. If you simply want the kick to trigger less compression across the whole mix, go back to the detector.
Use GR Limit when the loudest passage compresses too far
A setting can sound right in the verse and still flatten the chorus when extra layers come in. In GE, enable GR Limit and try a cap around 2 dB for gentle bus work. Keep Threshold and Ratio where the verse feels right and replay the transition. The cap restricts how far the compressor can reduce gain, with Soft Knee affecting how gradually the limit comes in. Listen for whether the first chorus hit regains its shape.
GR Limit caps attenuation inside the compressor. Use your output or limiter meter separately to check headroom if you are delivering a final mix. In Free, try raising Threshold, easing Ratio or automating the amount of compression around the transition. GE is convenient when you need the quieter section’s behavior and want a consistent maximum reduction on the louder section.
Check external sidechain and Live mode if they are part of the purchase
GE can take an external detector input. If you want to trigger compression from a different track, route that track to the plugin’s sidechain in your DAW and select EXT SC in GE. Check the detector with a short loop before relying on the setup. Host and format support vary. GE also offers a lower-latency Live quality mode. Free already has Eco and Precise modes, so for offline bus compression the additional Live mode may be a small part of the decision.
Conclusion
We’d keep Kotelnikov Free if the goal is one or two decibels of clean bus control and the shared timing controls solve the problem. We’d choose GE if level matching is part of every session, or if a particular mix benefits from FDR or a gain-reduction cap. Try one of those controls on a passage where you can describe what you want to change. A clear improvement on that passage is a better reason to upgrade than the size of the feature list.
Plugin Boutique’s regular U.S. price was $50. On November 17, 2026, the regional listing displayed €18.84 against €49.58, with an advertised November 19 end date; verify the final local total. Check the retailer for the current price. If you are choosing between this and a compressor with more obvious color, our compressor plugins under $100 guide covers FET, VCA and parallel options as well.
Tokyo Dawn Labs’ Kotelnikov documentation
Shared timing, detector and monitoring controls. Kotelnikov manual
Loudness matching, frequency-dependent ratio and the external detector. Kotelnikov GE manual


