

A loud consonant can jump out of a vocal even when the rest of the performance sits well. Arturia Comp FET-76 is worth trying when you want fast peak control and some of the character of an 1176-style compressor. Its main panel gets you there with Input, Output and two timing knobs, and the advanced panel gives you more control over what triggers the gain reduction. At $99, we’d consider it if you regularly shape vocals, bass or drums this way.
This review uses Arturia’s documentation and the U.S. Plugin Boutique listing checked on November 10, 2026. The settings are starting points to try on your own tracks.
How the input-driven FET-76 works
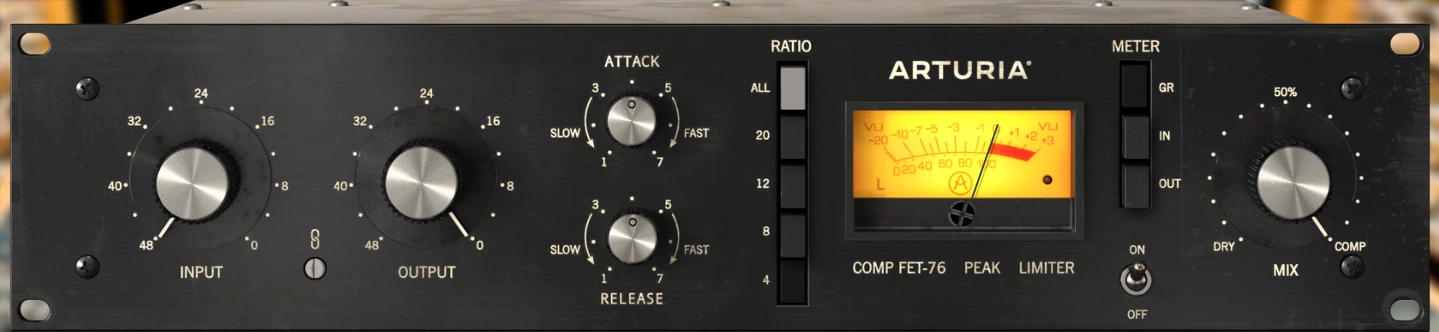
Arturia models an 1176-style FET compressor. On this design you drive the signal into compression with Input. The threshold follows the chosen ratio and has no separate dial on the front panel. Select the ratio first, set the meter to GR and turn Input up until the peak you care about moves the needle. Readjust Input after changing ratios. A higher ratio can also move the threshold, so the meter may react differently from what you expect.
Output controls the level afterward. With Link engaged, Output moves in the opposite direction when you turn Input. That gets you closer to a fair comparison, especially if you are making several small changes in a row. Once the compressor is working, check the output against bypass. If the processed track sounds appreciably louder, switch Link off and adjust Output separately before deciding that the extra compression helped.
Read the timing dials by direction
Both Attack and Release run from 1 for slowest to 7 for fastest. These are dial positions. The response also depends on the material, so use the numbers to repeat a setting and the sound to choose it. A faster attack catches more of the front of a hit. A faster release lets gain recover sooner, which can be useful between words or hits. If you hear low notes grow rough or the room level swing between hits, compare with a slower release before adding more compression.
Choose the ratio before setting Input
| Ratio button | Where to try it | What to check after adjusting Input |
|---|---|---|
| 4:1 | Lead vocal, bass or guitar | The louder hits settle while quieter notes still have shape |
| 8:1 | A source with more pronounced peaks | The body of the sound still comes through after the peak is controlled |
| 12:1 or 20:1 | More obvious peak control or an effect layer | The transient and recovery fit the rhythm after you rematch output |
| All | A deliberately dense drum or room layer | How much grit and cymbal sustain you can blend back into the dry signal |
Use All as its own sound. It changes the behavior of the compressor and adds distortion. The switch is useful if the dry track is staying in the mix and you want a more aggressive layer behind it. For a lead vocal, start at 4:1 so you can hear what Input and timing do before you audition a stronger effect.
Catch vocal peaks while keeping the words clear
Find a phrase with a loud syllable followed by a quieter word. Start at 4:1, set Attack around 3 and Release around 4, and put the meter in GR. Set Mix fully toward Comp for the first pass. Turn Input up until the loud words move the needle by roughly 3 to 5 dB. Match Output to the bypassed vocal, then listen with the beat playing.
If a T or K still jumps out, move Attack a little toward 7. If the consonant goes soft and the vocal starts to lose definition, move Attack back toward 1 or reduce Input. Listen to what happens to the next quiet word. If it sounds held back after the loud one, try a faster release. If the vocal level seems to rise too quickly between syllables, back it off. Repeat the same phrase each time so that you are listening to the effect of the control.
If the quiet and loud phrases need very different settings, use a little clip gain before the compressor. Bring the most uneven phrases closer together first, then use FET-76 to shape the peaks that remain. It keeps you from setting the whole vocal around one unusually loud line.
Use the sidechain panel when the meter follows the wrong sound
Stop a plosive or a low bass note from driving the whole response
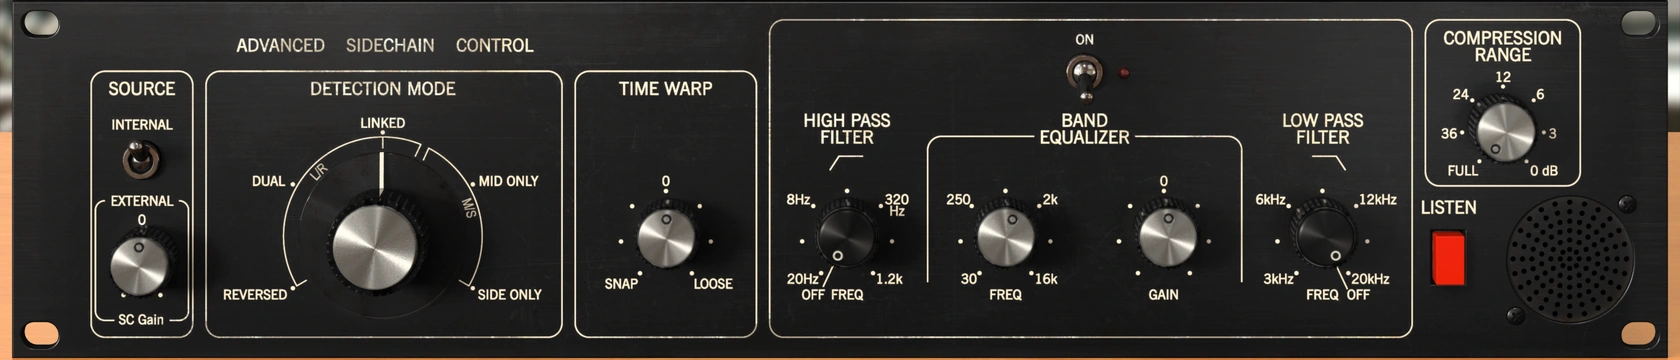
Open Advanced using the double-arrow button at the top. Keep Source on Internal and engage the High Pass Filter in the sidechain EQ. Use Listen while you sweep the filter. On a vocal, listen for the low puff of a P sound dropping away from the detector. Turn Listen off and check whether the sung note after the plosive sits more steadily.
For a bass track, compare two long notes at different pitches. Use a 4:1 ratio and try a moderate Attack with Release around 3 to 4. If the lowest note causes much more compression than the next note, raise the sidechain high-pass just enough that the meter responds more evenly. Then check whether the note remains audible on small speakers. The detector filter changes what triggers gain reduction. Use an EQ on the audio path if the bass itself needs less low end.
Cap the strongest hits with Compression Range
Set the main panel so it works on most of the track. Then try Compression Range around −4 dB and replay the few hits that were being pulled down too far. The control limits the amount of reduction the compressor can apply. Move it closer to zero for a stricter cap or farther toward Full to let the stronger hits compress more. At 0 dB, the gain circuit remains available for color with gain reduction disabled.
This is useful if the usual vocal lines sound right and only the loudest word feels over-controlled. Check the peak level after making the change. Compression Range limits attenuation in FET-76. A peak meter elsewhere in the chain tells you how much output headroom remains.
Blend an aggressive drum sound underneath the original kit
Put Comp FET-76 on the drum bus and loop a groove with an open hat or some room sound. Try 12:1, Attack toward the slower half and Release toward the faster half. Move Mix toward Comp so the processed signal is easy to hear. Bring up Input until the hits feel closer together and the room is easier to hear after the snare. Match the output level and switch to All to compare how much more texture you get.
Then bring Mix back to around 15 to 25% compressed and listen with the rest of the arrangement. The dry kick and snare should still read as the first sound. If the room or cymbals take over, bring down Mix or return to 12:1 before adjusting the whole drum bus level. If the added density fits but the kick makes the layer pump, try the sidechain high-pass and compare again.
Try Time Warp after the main timing controls
Time Warp at zero leaves detection unshifted. Negative values provide up to 5 ms of lookahead toward Snap; positive values delay detection by up to 10 ms toward Loose, letting more of a short transient escape. Compare a small change from zero on one repeated snare hit before using the extremes. It changes detector timing, so keep Attack and Release fixed during that comparison.
Two checks that tell you more than the gain reduction meter
Compare the FET color and compression separately
On an electric bass or a clean guitar, make a setting with modest gain reduction and copy it to the second A/B slot using the arrow between A and B in the toolbar. In the second slot, set Compression Range to 0 dB while leaving Input where it is. Adjust Output if the change makes the track louder. Switch between A and B to hear how much of the result comes from changing the envelope. Then compare B with full bypass at similar loudness to hear what the gain circuit contributes by itself.
Watch the stereo image when you change detection
On a stereo room or drum track, begin with Linked detection so both sides follow the same gain changes. Listen to a wide cymbal or room hit with the kick in the center. If you audition Dual, listen for the left and right sides moving by different amounts. That can be useful when the change is part of the effect, and it can make the center feel less stable. Return to Linked if you want the original placement to stay steady. For this check, listen to the whole stereo bus as well as the meter, which displays one channel at a time.
Conclusion
We’d reach for Comp FET-76 when a lead or bass part needs fast peak control, or when a drum layer needs obvious character and an easy dry blend. The biggest reason to buy this Arturia version is the combination of that familiar front panel with detector EQ, Compression Range and Time Warp. Try one of those controls on a track where your current FET-style compressor feels limited. A quick, repeatable fix in the demo is a reason to consider the purchase.
The main compromise is that the interaction of Input and ratio takes a little learning. If your priority is small, clean changes across a mix bus, the compressor plugins under $100 guide covers a more transparent starting point and a VCA bus option. If you already have an 1176-style plugin that gives you the timing and sound you want, compare them on the same loud phrase at a similar level before paying for another one.
For the audition, use the lower-toolbar Bypass or your DAW’s bypass to compare the whole plugin. The On/Off switch on the main panel bypasses the compression circuit while the plugin remains active. That distinction helps when you want to hear what the compressor is doing separately from what the plugin’s gain circuit contributes.
Plugin Boutique listed Comp FET-76 at $99 USD when checked. Check the retailer for the current price and run the demo in your own DAW if compatibility or sidechain routing is part of the decision.
Arturia’s Comp FET-76 documentation
Timing dials, ratios, meter modes and Advanced Mode. Comp FET-76 user manual
Input and Output, Mix, sidechain filtering and A/B controls. Arturia’s control guide


