In music production, dynamics play a huge role in how professional a track feels. A vocal that jumps out too much, a snare that hits too aggressively, or a master that clips can all make a mix sound unbalanced. That is where compressors and limiters come in.
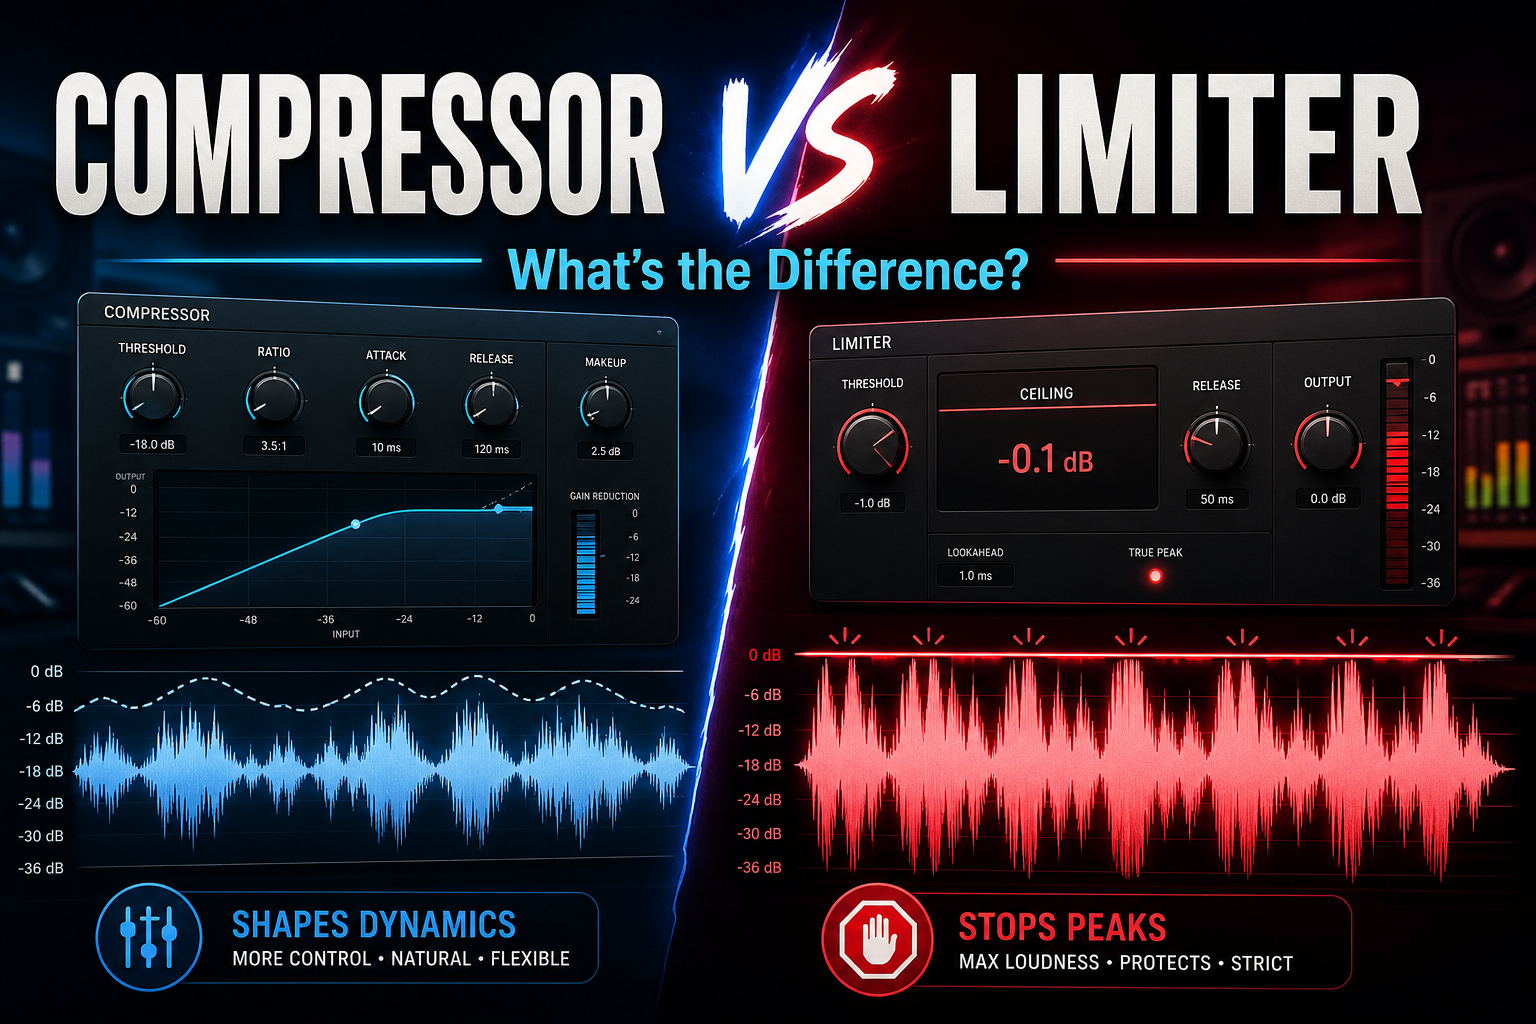
At first, these tools can seem similar because both control volume peaks. However, they are not used in the same way. A compressor is usually used to shape and control the movement of a sound, while a limiter is mainly used to stop audio from going above a certain level.
Understanding the difference between a compressor and a limiter helps you make better mixing and mastering decisions. Instead of adding plugins just because they are common, you will know exactly why you are using them and what result to listen for.
A compressor is a dynamics processor that reduces the difference between the loudest and quietest parts of an audio signal. In simple terms, it turns down the parts that are too loud so the full sound becomes more controlled.
This does not always mean making something sound smaller. A compressor can make a vocal feel more stable, a bassline more even, or a drum loop more glued together. When used well, compression helps a sound sit better in the mix without constantly jumping forward or disappearing.
A compressor starts working when the audio signal passes a set threshold. Once the signal goes over that point, the compressor reduces the gain based on the ratio you choose. A low ratio can sound smooth and natural, while a higher ratio can create a more controlled or aggressive effect.
For example, a light compressor setting on vocals can help keep the performance steady while still sounding natural. On drums, compression can add punch, body, or energy depending on how the attack and release are set. On bass, it can make the low end feel more consistent across different notes.
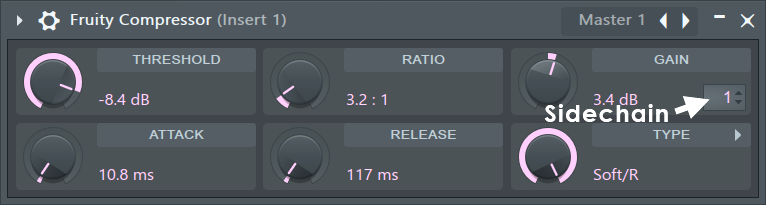
The most important compressor settings are:
Threshold
The level where the compressor starts reacting.
Ratio
How much the signal is reduced once it passes the threshold.
Attack
How fast the compressor reacts to loud peaks.
Release
How quickly the compressor stops working after the signal drops back down.
Makeup gain
Extra gain added after compression to bring the volume back up.
Attack and release are especially important because they change the character of the sound. A slower attack can let the first hit of a drum come through, making it feel punchier. A faster attack can smooth out sharp peaks, which can be useful for controlling vocals or harsh instruments.
Compression is not only about volume control. It can also change tone, movement, energy, and groove. That is why many producers use different compressors for different purposes. Some are clean and transparent, while others add color, warmth, or saturation.
A limiter is a dynamics processor designed to stop an audio signal from going above a set level. You can think of it as a strict ceiling for your sound. Once the audio reaches that ceiling, the limiter prevents it from passing through.
Limiters are most often used in mastering, where the goal is to raise the overall loudness of a track without creating digital clipping. If the peaks of a song go above 0 dB, distortion can occur. A limiter helps avoid that by controlling those peaks before they cause problems.
Unlike a regular compressor, a limiter usually works with a very high ratio. This means it reacts much more strongly when the signal reaches the limit. Instead of gently reducing the loud parts, it stops them from crossing the ceiling.
A limiter can make a track sound louder because it controls the highest peaks, allowing the overall level to be pushed up. This is why limiters are common on the master channel. They help a finished track compete in loudness while keeping the output level under control.
However, limiting too much can damage the sound. If a limiter is pushed too hard, the track can lose punch, depth, and movement. The drums may feel flat, the vocals may become harsh, and the entire mix can start to sound squeezed.
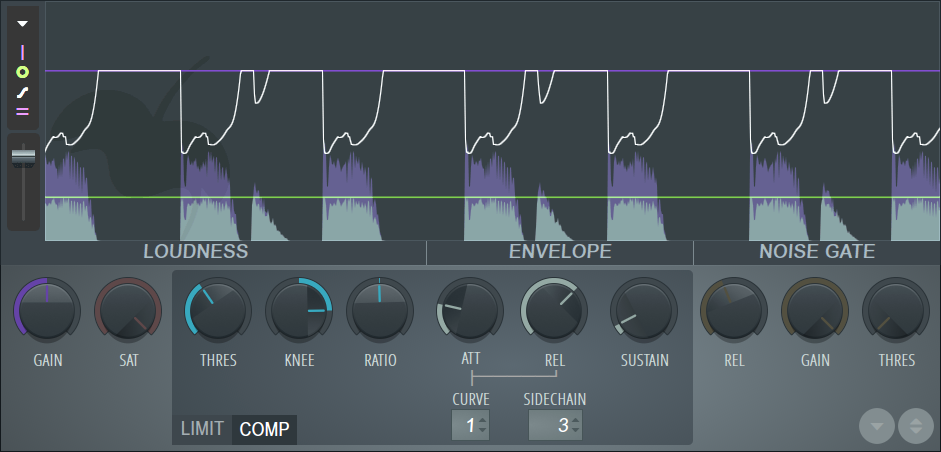
Common limiter controls include:
Ceiling
The maximum output level the audio is allowed to reach.
Threshold or input gain
How hard the signal is pushed into the limiter.
Release
How quickly the limiter recovers after reducing peaks.
Lookahead
A short delay that allows the limiter to catch peaks before they happen.
A limiter is not only for mastering. It can also be used on individual tracks when you need strict peak control. For example, a limiter can tame sudden snare hits, stop a vocal from clipping, or control a sound effect with unpredictable volume spikes.
Still, it should not replace compression. A limiter is more of a safety and loudness tool, while a compressor is better for shaping the feel of a sound.
The easiest way to understand the difference is to look at how each tool reacts to loud audio.
A compressor starts reducing volume once the signal passes the threshold, but it still allows the sound to move. That makes it useful for shaping dynamics without completely stopping the peaks.
A limiter is more strict. Once the signal reaches the ceiling, the limiter strongly reduces anything that tries to go above it. This makes it better for final peak control, but less flexible for shaping the natural movement of a performance.
The difference is not only technical. It also affects the sound. Compression can make a track feel tighter, smoother or more energetic. Limiting mainly affects how loud and controlled the final output feels.
Ratio and threshold are two of the biggest reasons compressors and limiters behave differently.
With a compressor, the ratio is adjustable. You can use a gentle ratio for smooth control or a stronger ratio for a more noticeable effect. This makes compressors useful for many different mixing tasks.
For example, a vocal might use a 2:1 or 3:1 ratio for natural control, while a drum bus might use a 4:1 ratio for more energy. A bassline can often handle stronger compression because the goal is usually to keep the low end steady.
A limiter works differently because the ratio is much higher. In many cases, it behaves almost like an infinite ratio. The goal is not to gently shape the performance, but to stop the loudest parts from crossing the output ceiling.
The threshold also has a different role. On a compressor, the threshold decides when the compression begins. On a limiter, the ceiling is often the most important setting because it defines the highest level your audio can reach.
This is why a compressor can help shape dynamics over time, while a limiter is better for catching peaks and protecting the output.
Although compressors and limiters are related, they are not interchangeable. A compressor is usually used to shape the movement of a sound, while a limiter is used when the signal needs a clear maximum level.
Compressor:
Best for: vocals, bass, drums, guitars, buses
Main job: controlling dynamics and shaping tone
Typical use: mixing
Sound: subtle, musical, punchy or smooth
Risk when overused: flat vocals, weak drums, lifeless mix
Limiter:
Best for: master channel, loud peaks, final output
Main job: preventing clipping and controlling maximum level
Typical use: mastering and peak control
Sound: clean when subtle, aggressive when pushed hard
Risk when overused: crushed drums, harsh vocals, less depth
A compressor is most useful when a sound has too much movement in volume or when you want to shape how that sound behaves inside the mix. Instead of only making audio quieter, a compressor helps control energy, improve consistency, and make individual elements feel more stable.
In a mix, compression is often used before the mastering stage. It gives you control over vocals, drums, bass, guitars, synths, and even full instrument groups. The goal is not always to make the sound louder. In many cases, the goal is to make the performance more even, more focused, or easier to place in the track.
Some instruments naturally have big volume changes. A bass guitar may have certain notes that jump out, a clean guitar may have uneven strums, and drums can create strong peaks that dominate the mix. A compressor helps reduce those sudden jumps so the instrument stays in a more controlled range.
For example, a snare drum can sometimes hit too hard compared to the rest of the drum kit. By using compression, you can reduce the strongest peaks and make the snare sit better with the kick, hi-hats, and other percussion. This helps the drum section feel more balanced without lowering the entire snare track.
Compression is also useful on bass. Low-end instruments can easily become inconsistent because some notes naturally sound louder than others. A compressor can make the bassline feel more steady, which helps the groove of the track stay strong.
This is especially important in genres like hip-hop, pop, rock, EDM, and R&B, where the low end and rhythm section need to feel tight.
Compressors can also change the character of a sound. One of the most common reasons producers use compression is to add punch to drums or sustain to melodic instruments.
When working with drums, the attack setting is important. A slower attack can let the first part of the drum hit come through before compression starts. This can make the kick or snare feel more punchy because the transient remains strong.
A faster attack does the opposite. It catches the beginning of the sound more quickly, which can smooth out sharp peaks. This can work well when a drum sound is too aggressive or when you want a softer, more controlled feel.
For guitars, pianos, and synths, compression can help extend the tail of the sound. This creates more sustain and makes the instrument feel fuller in the mix. A compressed guitar part, for example, can feel more present without needing to be turned up too much.
This is why compression is not only a technical tool. It can also be a creative effect that changes how a sound moves and feels.
Vocals are one of the most common places to use compression. A vocal performance naturally changes in level. Some words are soft, some phrases are louder, and certain consonants or emotional moments can jump forward.
A compressor helps keep the vocal more consistent so the listener can hear every word clearly. This is especially important for lead vocals, where clarity is one of the main priorities in the mix.
Without compression, a vocal may disappear behind the beat in some parts and become too loud in others. With the right settings, the vocal stays present without sounding forced.
For modern vocals, producers often use more than one stage of compression. One compressor may gently control the general performance, while another adds tone or extra stability. This can sound more natural than using one compressor too aggressively.
Compression can also help backing vocals blend better. Instead of every backing vocal fighting for space, controlled dynamics can make them sit behind the lead vocal more smoothly.
A limiter is useful when you need strict control over peaks. While a compressor shapes dynamics, a limiter is usually used to stop audio from going above a set level.
Limiters are most common on the master channel, but they can also be used on individual tracks when a sound has sudden peaks that need to be controlled. The key is to use a limiter with purpose. It should solve a specific problem, not simply make everything louder by default.
Clipping happens when the audio signal goes above the maximum level the system can handle. In digital audio, this can create harsh distortion that makes the track sound rough or damaged.
A limiter prevents this by placing a ceiling on the signal. The ceiling determines the highest level the audio can reach. This is why limiters are often placed at the end of a mastering chain.
For example, if the output ceiling is set to -1 dB, the limiter will stop peaks from going above that point. This gives the final track a safer level for streaming platforms, exports, and playback on different systems.
A limiter can also be helpful inside a mix. If a clap, snare, vocal shout, or sound effect creates random peaks, a limiter can catch those moments before they overload the channel or bus.
Still, limiting should not be used as a lazy fix for poor gain staging. If many tracks are clipping, it is better to lower levels in the mix first instead of forcing a limiter to solve everything.
Limiters are often used to increase perceived loudness. By controlling the highest peaks, the overall level of the track can be pushed higher without crossing the output ceiling.
This is one of the main reasons limiters are used in mastering. A track may sound clean but too quiet compared to commercial releases. A limiter can help bring the master to a more competitive level.
This matters in genres like EDM, pop, trap, hip-hop, and dance music, where loudness and impact are important. However, pushing a limiter too hard can quickly damage the mix.
When a limiter is overused, drums can lose punch, vocals can become sharp, and the full track can start to feel flat. The master may be louder, but it can also become less exciting.
A good limiter setting should increase loudness while keeping the track alive. The best result is not always the loudest result. It is the loudest version that still sounds clean, open, and balanced.
During mastering, the limiter is usually one of the last plugins in the chain. Its job is to control final peaks and prepare the track for release.
This is where small decisions matter. The ceiling, gain, release, and true peak settings can all affect how the final master sounds. A limiter that works well on one song may not work the same way on another.
For example, a heavy EDM track may handle more limiting because the arrangement is built around loud drums and dense synths. A soft acoustic track may need much lighter limiting to keep the natural dynamics intact.
A limiter also helps the final track translate better across different playback systems. A controlled master is less likely to distort on phones, laptops, car speakers, headphones, and club systems.
The goal is not just volume. The goal is a finished track that feels controlled, polished, and ready for distribution.
Using compressors and limiters well takes practice. The settings depend on the sound, the genre, and the role of the track in the mix. There is no perfect preset that works every time. Still, there are a few practical ways to make better decisions and avoid common mistakes.
Before adding a compressor or limiter, decide what problem you are trying to solve.
- Are you trying to make a vocal more consistent?
- Are you trying to make drums hit harder?
- Are you trying to stop the master from clipping?
- Are you trying to make the track louder?
The answer determines which tool makes the most sense. A compressor is usually the better choice when you want movement, tone, balance, or control over a performance. A limiter is the better choice when you need a strict ceiling or final peak control. This simple decision can prevent over-processing. Many beginners add both plugins without knowing why, which can make the mix sound smaller instead of better.
Compression and limiting are not one-click processes. Small changes in attack, release, ratio, and threshold can completely change the result.
With compression, experiment with attack and release first. These controls have a big influence on feel. A slow attack can add punch, while a fast attack can smooth the sound. A short release can add energy, while a longer release can feel more controlled.
With limiting, focus on how hard the signal is hitting the limiter. If the limiter is constantly reducing too much gain, the track may lose impact. Pull back the input or threshold until the sound feels cleaner.
It also helps to compare different settings at the same volume. Louder almost always feels better at first, but that does not mean the processing improved the mix.
Most modern compressors and limiters include visual meters. These can be useful, especially when learning how dynamic processing works.
The gain reduction meter shows how much the plugin is turning the signal down. If the meter barely moves, the effect may be too light to matter. If it is constantly working hard, the processing may be too strong.
Waveform displays can also show how peaks are being controlled. This is helpful when using limiters on drums, vocals, or the master bus.
However, visual tools should support your ears, not replace them. A compressor can look right and still sound wrong. A limiter can show safe levels and still make the track feel lifeless.
Use meters to understand what is happening, then make the final choice by listening.
One of the best tips for using compressors and limiters is to avoid doing too much at once.
A little compression can make a vocal feel stable. Too much can make it sound flat. A little limiting can make a master louder. Too much can remove the punch and space from the track.
Subtle processing often sounds more professional because it keeps the original energy of the performance intact. Instead of forcing one plugin to do all the work, use small amounts of control in the right places.
For example, you can use light compression on individual tracks, gentle bus compression on groups, and a limiter only at the final stage. This creates a more natural result than crushing the full mix with one aggressive limiter.
The best compression and limiting often go unnoticed. The listener should hear a better mix, not the plugin working.
![[team] image of team member (for a mobile gaming)](https://cdn.prod.website-files.com/68efa70811edd8e5af30a90d/690abaa8987a07a672c4cd2c_channels4_profile.jpg)
![[background image] image of recording equipment (for a musician & band)](https://cdn.prod.website-files.com/68efa70811edd8e5af30a90d/69f2747f65722108a0ebe9ad_Fabfilter%20Pro-Q%204%20Review.png)
![[background image] image of recording equipment (for a musician & band)](https://cdn.prod.website-files.com/68efa70811edd8e5af30a90d/69f26d64b5543d116976bdcb_Serum%202%20Review.png)