Producers search for Soft Clipper vs Limiter FL Studio because both tools change peak control and loudness in different ways. This article explains how each tool works in FL Studio, where each tool fits, and why we at SoundShaper pick one tool over the other in common mixing cases. You will see exact setups for drums, 808, synth groups, and the master. You will also get a test method with meters so you can verify results. The goal is a method that repeats across projects and gives you predictable loudness without guesswork.
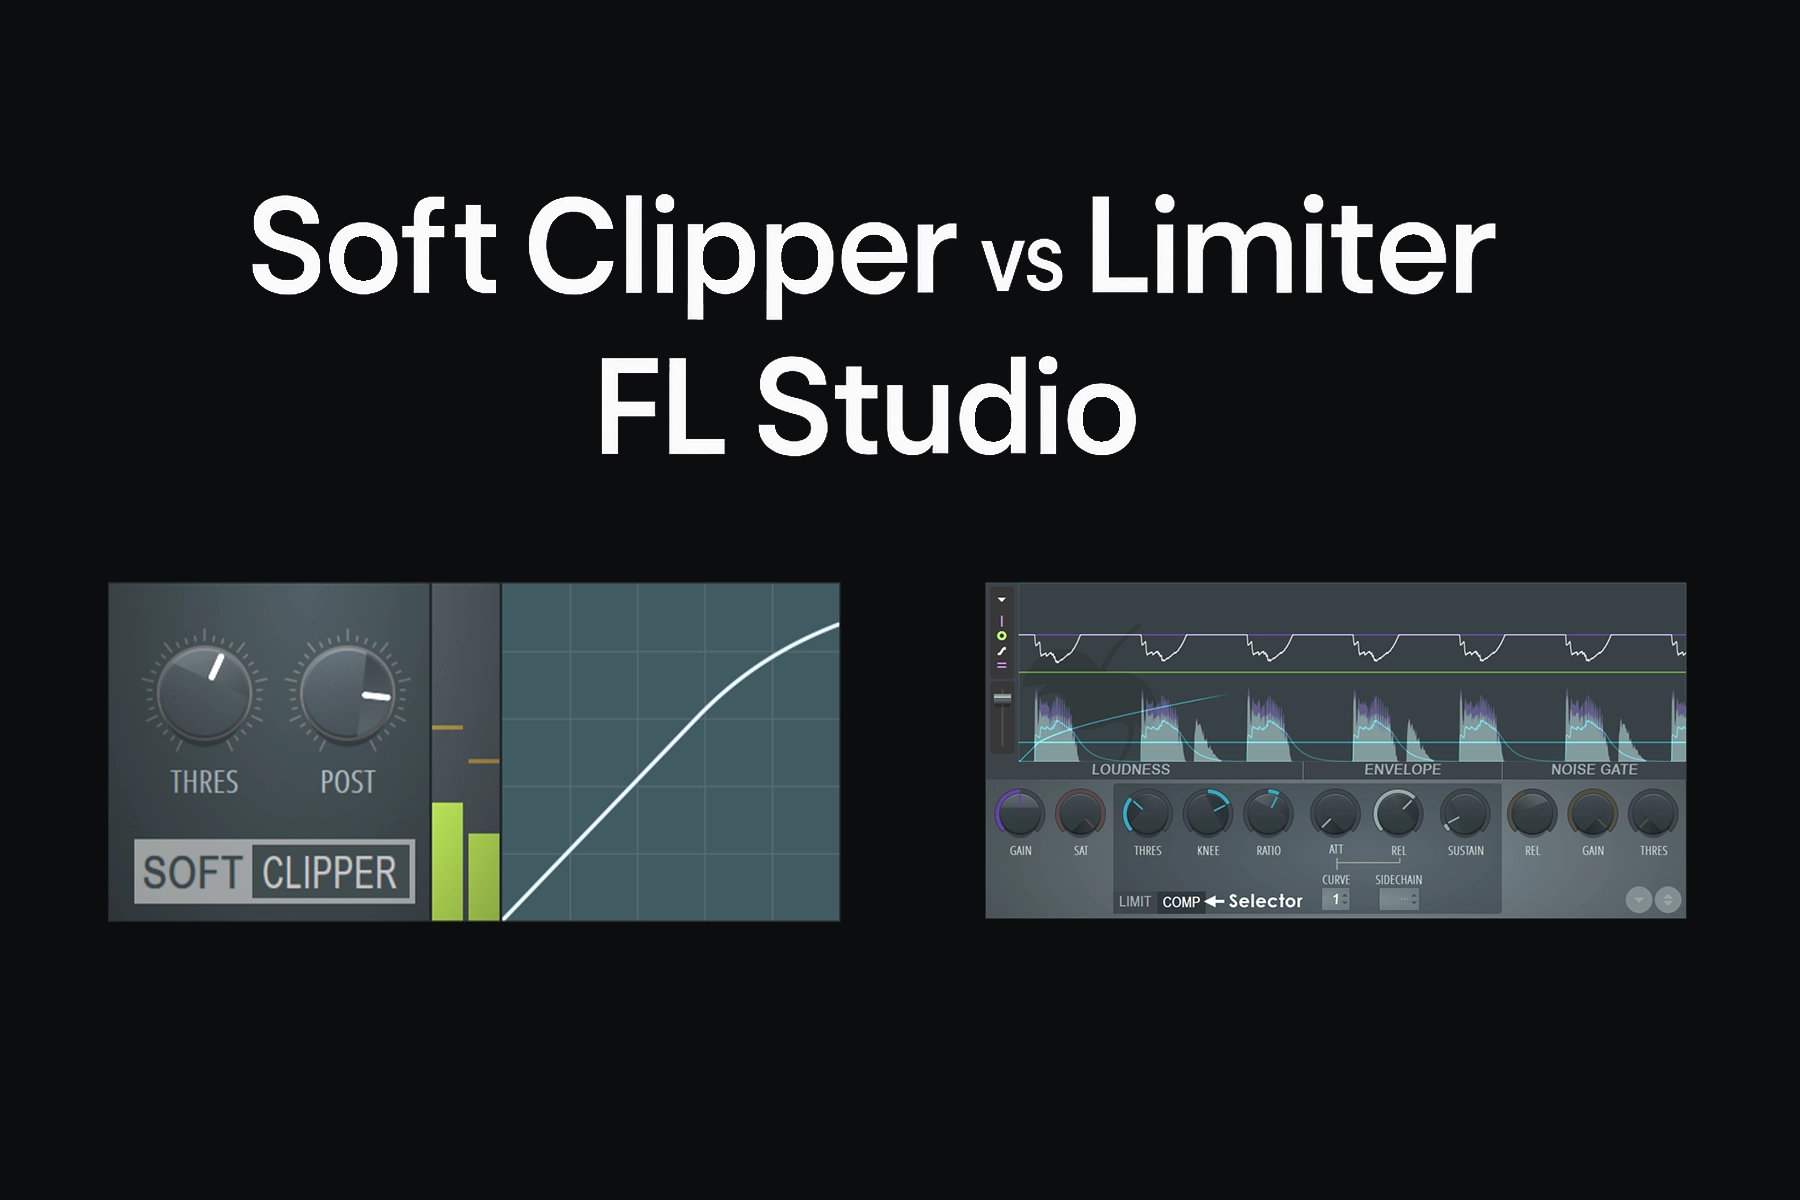
A soft clipper bends the top of a signal when the level passes a threshold. The bend creates a ceiling that is not hard. The process reduces crest factor by shaving fast peaks while much of the body of the sound remains similar. In FL Studio the everyday option is Fruity Soft Clipper. The control set is simple. Pre sets input level into the clipper. Threshold sets the start point of clipping. Post sets the output level so you can match loudness.
A limiter places a ceiling and applies gain control so that peaks do not pass that ceiling. The gain envelope reacts to the shape of the signal. Attack chooses how fast the limiter reacts. Release chooses how fast the limiter returns. In FL Studio you can use Fruity Limiter or set Maximus to work like a wideband limiter. A limiter is the last authority on the master when you need a fixed ceiling and when a delivery platform requires a specific true peak value.
Clipping adds harmonic content above the source. The amount depends on how far you push Pre into the Threshold. Because the curve is not a brick wall, transients can keep a clear start while the very top is rounded. This often reads as more punch at the same LUFS because the top is controlled without slow envelopes.
Limiting does not add harmonic content by design, though in practice some saturation can appear when the limiter works a lot. A limiter controls peaks by turning the overall level down for a short time. This maintains a cleaner top. It also affects the envelope of the source more than a clipper when the reduction is heavy.
We mix a lot of trap, drill, and pop crossovers at SoundShaper. Our placement rules are consistent.
Drums group and 808 group are the main candidates. A soft clipper reduces jumpy hits that cause inter sample peaks later. It also stabilizes kick and 808 interaction before the master.
The master needs a final ceiling for delivery. A limiter sets that ceiling and controls the last two or three decibels in a predictable way. On a vocal bus or a full music bus a limiter can hold an exact top level when the performance has large swings.
Pre drives the clipper. Threshold sets the start of the curve. Post matches level after clipping. Start with Post at minus 1 dB to keep headroom. Set Threshold between minus 8 and minus 3 dB. Raise Pre until you see between 1 and 3 dB of shaving on hits. When you match level with Post you can do a fair A B.
Kick and snare should keep a clear start. Low notes on the 808 should keep pitch definition. If the low notes smear, reduce Pre or raise Threshold. If peaks still jump on the master, lower Threshold or raise Pre in small steps and rematch level.
Set ceiling to minus 1 dB true peak for delivery to common platforms. Raise input gain until loud sections show between 1 and 4 dB of gain reduction. Set attack short so peaks are caught. Set release between 100 and 300 milliseconds. If the meter pump is obvious, adjust release toward a value where the meter returns in time for the next hit. Match level for the A B.
Set Maximus to a single band behavior for a simple start. Set ceiling to minus 1 dB true peak. Set threshold and gain so that the loudest hits touch the ceiling. Watch for pumping when release is slow. Watch for distortion when the ceiling is low and the gain is high. For many beat projects a single band is enough and keeps behavior predictable.
We use the same path on every project. This is a practical map you can follow.
If the drums and the 808 create peaks that jump, place Fruity Soft Clipper on each bus. Set Post to minus 1 dB. Set Threshold near minus 6 dB on the drums bus and near minus 4 dB on the 808 bus as a start. Push Pre until you see between 1 and 3 dB of shaving on loud hits. Now remove gain from the faders until the master sits around minus 6 to minus 8 integrated on a loud section before any master processing.
Place Fruity Limiter last on the master. Set ceiling to minus 1 dB true peak. Raise input gain until the loud section hits between 1 and 3 dB of gain reduction. Confirm that short term LUFS and the true peak read inside targets. If the limiter shows more than 4 dB reduction on every bar the buses are not under control. Go back and let the soft clippers do more.
Crest factor is peak level minus RMS or an equivalent measure at a given window. You can observe the change by watching the difference between true peak and short term LUFS on a steady section. After clipping buses the difference should drop. After limiting the master the difference should stay stable while loudness rises.
Post at minus 1 dB
Threshold around minus 6 dB
Pre up until 1 to 3 dB shaving on kick and snare hits
Level match with Post and A B in context
Most modern drum packs have fast transients with strong low mids. A small amount of clipping catches peaks that later cause the master limiter to work too hard. This gives the master limiter room to act without large gain swings.
Post at minus 1 dB
Threshold around minus 4 dB
Pre up until the lowest notes remain clean and meters show light shaving
Check solo and in the track. If the top of the 808 dulls, reduce Pre or raise Threshold. If the 808 still triggers large peaks on the master, increase Pre a little and reduce the 808 fader to compensate.
The 808 produces long low energy with fast initial clicks. Light clipping removes the click peaks and stabilizes headroom. The body of the note stays intact. The master limiter then needs less reduction to hold a true peak ceiling.
A soft clipper can work on a synth bus that has many short stabs. Use the same approach as the drums bus with slightly less Pre. On a vocal bus we prefer a limiter rather than a clipper. Set a small amount of gain reduction with a fast attack and a release that returns between phrases. The result is a steady top that feeds the master in a controlled way.
Meter at the end for LUFS and true peak
Optional EQ for small broad moves
Optional compressor for glue at a low ratio
Soft clipper only if stray peaks still show up after bus work
Limiter for the final ceiling and loudness target
Instrumental beats for YouTube often sit between minus 10 and minus 8 LUFS integrated with true peak at or under minus 1 dB.
Song masters for platforms often sit near minus 14 LUFS integrated with true peak at or under minus 1 dB.
Soft clipper before the limiter with Threshold at minus 6 dB and Pre set to shave around 2 dB on the loudest hits.
Limiter with ceiling at minus 1 dB true peak and 2 to 3 dB gain reduction on loud sections.
We do not publish gear lists in this piece. The process matters more than the specific meter brand. You can reproduce the method with any LUFS meter that shows integrated and short term and any true peak meter.
Play a loud chorus or a drop.
Measure short term LUFS and true peak with no clipper and no limiter.
Insert a soft clipper on the drums and on the 808 with the recipes above.
Re measure. The difference between short term LUFS and true peak should reduce.
Insert a limiter on the master with the recipe above.
Re measure. Integrated LUFS should rise toward the target. True peak should stay under minus 1 dB.
Do an A B at matched output level. Verify that punch and sustain remain stable and that the limiter is not working more than 4 dB on every bar.
If the limiter works more than 4 dB on every bar the buses need more control. If true peak passes minus 1 dB the ceiling is set too high or the input is too hot. If the short term LUFS jumps while punch falls the soft clipper may be shaving too much. Balance the contributions of the two devices until the limiter does small work and the clipper cleans up only the fast spikes.
Works well on fast peaks like snare spikes and kick clicks.
Reduces crest factor without a moving gain envelope.
Simple controls that speed up decision making.
Pairs well with a limiter that handles the final ceiling.
Adds harmonic content when pushed.
Can blur low pitch if Pre is high.
Does not enforce a fixed ceiling on the master by itself.
In style that uses hard drums and 808, a soft clipper on buses is practical. It gives the master more room and keeps the limiter in a small working range.
Sets a fixed peak ceiling for delivery.
Raises loudness in a predictable way.
Preserves tone when reduction is small.
Large and constant reduction changes envelopes and can pump.
If the chain feeds the limiter with many peaks, the limiter becomes the only tool working and the sound loses movement.
The limiter is the final guard. It should not replace good control at the bus level. When the buses are right the limiter only trims. That is the stable way to mix and master inside FL Studio.
Goal is minus 9 LUFS integrated with true peak under minus 1 dB.
Drums bus soft clipper shaves 2 dB on hits.
808 bus soft clipper shaves 1 dB on low notes.
Master limiter shows 2 dB reduction on the chorus.
A B shows stable attack and clear low end.
Result meets target without dulling drums.
Goal is minus 14 LUFS integrated with true peak under minus 1 dB.
Vocal bus limiter does 1 to 2 dB on peaks with fast attack and release that returns between lines.
Drums bus soft clipper shaves 1 dB.
Master limiter touches 1 to 2 dB.
Level matches the platform target and keeps vocal articulation.
Symptom is dull kick click and blurred 808 pitch.
Fix by lowering Pre and raising track fader to keep level. Match Post and recheck the master limiter.
Symptom is overs on true peak and potential clips after conversion.
Fix by setting ceiling to minus 1 dB true peak and checking the meter after export.
Symptom is pumping or a slow meter that never returns.
Fix by moving release toward a time that returns before the next transient. For fast patterns try near 100 milliseconds and adjust by ear.
Symptom is that the louder option always seems better.
Fix by matching level with Post on the clipper and with output gain on the limiter. Then decide by tone and punch, not by loudness.
Symptom is limiter first and clipper after, which creates more peaks.
Fix by placing bus clippers before the master and by keeping the limiter last.
A common target is between minus 10 and minus 8 LUFS integrated. True peak at or under minus 1 dB. These values give a loud file that respects converter headroom. If a platform applies loudness normalizing, the track still translates.
A common target is near minus 14 LUFS integrated with true peak at or under minus 1 dB. This is a practical balance between loudness and headroom. If your genre expects a louder file, raise the master slowly and watch the limiter reduction.
If you prepare a file for a DJ set, keep true peak at or under minus 1 dB and test on a system. Avoid large limiting on the master. The system limiters will do more work. A stable file translates better across rigs.
This is the longer version of the checklist that many readers request. It is the SoundShaper method from session start to export.
Set project sample rate and buffer.
Name buses for drums, 808, instruments, vocals, effects.
Route tracks to buses.
Check that no track or bus clips before processing.
On the drums bus insert Fruity Soft Clipper.
Post at minus 1 dB. Threshold near minus 6 dB. Pre until the meter shows between 1 and 3 dB shaving on loud hits.
On the 808 bus insert Fruity Soft Clipper.
Post at minus 1 dB. Threshold near minus 4 dB. Pre until the lowest notes are stable and the meter shows light shaving.
On the vocal bus use a limiter with fast attack and a release that returns between phrases. Aim for 1 to 2 dB on peaks.
On the music bus use soft clipping only if you see stray spikes from layers that stack. Keep the amount small.
Place a meter that shows LUFS and true peak at the end of the master.
Place optional EQ before dynamics if you need broad balance moves.
Place the limiter last. Set ceiling to minus 1 dB true peak. Raise input gain until loud sections show between 1 and 3 dB reduction.
If the limiter rises above 4 dB reduction often, stop and revisit the buses. The master should not fix large bus problems.
Set up a switch that toggles the master chain.
Match output with the ceiling gain or with a trim plug in after the limiter.
Listen for kick start, snare body, 808 pitch, vocal consonants.
Watch short term LUFS for stability between sections. Watch true peak for headroom.
Export at the project sample rate.
Dither only when you change bit depth.
Re open the export in a new playlist and verify integrated LUFS and true peak.
If the file exceeds minus 1 dB true peak, lower the limiter ceiling and export again.
If your style uses hard drums and long 808 notes, treat soft clipping on buses as standard practice. It reduces the work that the master limiter has to do and keeps movement in the groove. The master limiter should do small work and provide the delivery ceiling. When you chase loudness only with the limiter, the envelope of the track changes and movement fades.
If you mix a vocal heavy record with wide dynamic range, use little or no clipping on the music buses and rely on a steady limiter on the vocal bus and a light limiter on the master. The result is cleaner transients and a voice that stays in front at all times.
Our choice in the Soft Clipper vs Limiter FL Studio debate is simple. Use both with clear roles. Use clipping to prepare buses so that peaks do not surprise the master. Use limiting to define the final ceiling and the loudness target. When each tool does a small and clear job, translation improves and revisions drop.
No. If your buses are under control and the limiter only trims, you can skip the soft clipper on the master. Keep bus clipping and master limiting as the default, and remove steps only when the meters show a clean pass.
Watch true peak first because delivery platforms and converters care about it. Then watch integrated LUFS for the overall target. Use short term LUFS to see how sections behave.
Yes. Set Maximus to act as a single band limiter. Set ceiling to minus 1 dB true peak. Use threshold and gain to reach light reduction on loud parts.
Reduce master limiter gain until reduction sits near 2 dB on peaks. Increase bus clipping a little if peaks still jump. Confirm with level matched A B. Restore small EQ moves if the balance changed during dynamics.
![[team] image of team member (for a mobile gaming)](https://cdn.prod.website-files.com/68efa70811edd8e5af30a90d/690abaa8987a07a672c4cd2c_channels4_profile.jpg)
![[background image] image of recording equipment (for a musician & band)](https://cdn.prod.website-files.com/68efa70811edd8e5af30a90d/69f3cf4fcb75032659180b80_Compressor%20VS%20Limiter.png)
![[background image] image of recording equipment (for a musician & band)](https://cdn.prod.website-files.com/68efa70811edd8e5af30a90d/69f2747f65722108a0ebe9ad_Fabfilter%20Pro-Q%204%20Review.png)
![[background image] image of recording equipment (for a musician & band)](https://cdn.prod.website-files.com/68efa70811edd8e5af30a90d/69f26d64b5543d116976bdcb_Serum%202%20Review.png)